This little crochet footprint pattern has been available on my blog since 2012 – and while the stitches were always correct, the way I explain my patterns has changed quite a bit over the years. Back then, I hadn’t quite found my pattern-writing voice yet. What felt “easy” to me didn’t always translate that way on paper. Since then, I’ve learnt that clarity matters just as much as creativity.
So this is a gentle revisit – not a redesign, just a re-telling. The same footprint, shared in a way that’s easier to follow and more enjoyable to make.
“Let the footprints that we leave… and the lives we live inspire.”

Easy Crochet Footprint Applique (Free Pattern & Photo Tutorial)
A small design with a long history.
© Dedri Uys 2012. Updated 2026 with a chart by Masako Kawahara. All Rights Reserved.
Information
Materials
- 4.5mm crochet hook
- Double-knit yarn
I used 4.5g of Yarnsmiths Pebble haze Prints and a 5mm crochet hook (because I crochet tightly).
Abbreviations
US Terms
- Ch – Chain
- Dc – Double crochet
- Hdc – Half-double crochet
- Rem – Remaining/remains
- RS – Right side
- Sc – Single crochet
- SM – Stitch marker
- Sp/sps – Space/spaces
- St/sts – Stitch/stitches
- Tr – Treble crochet
- WS – Wrong side
- () – Repeat instructions between brackets the number of times specified.
- [] – Used to indicate stitches made into the same st/sp.
Chart Legend
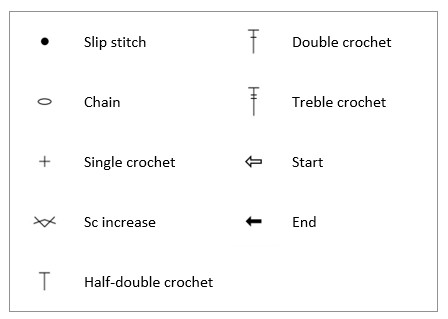
The chart is at the end of the pattern.
Gauge
N/A
Size
Each footprint measures 18cm/7” from toe to heel.
Notes
- Work into one loop only of each foundation ch st, unless otherwise specified.
- Short rows are rows that don’t stop and end where traditional rows stop and end. They are used for shaping.
- When making your sl sts, don’t make them too tight!
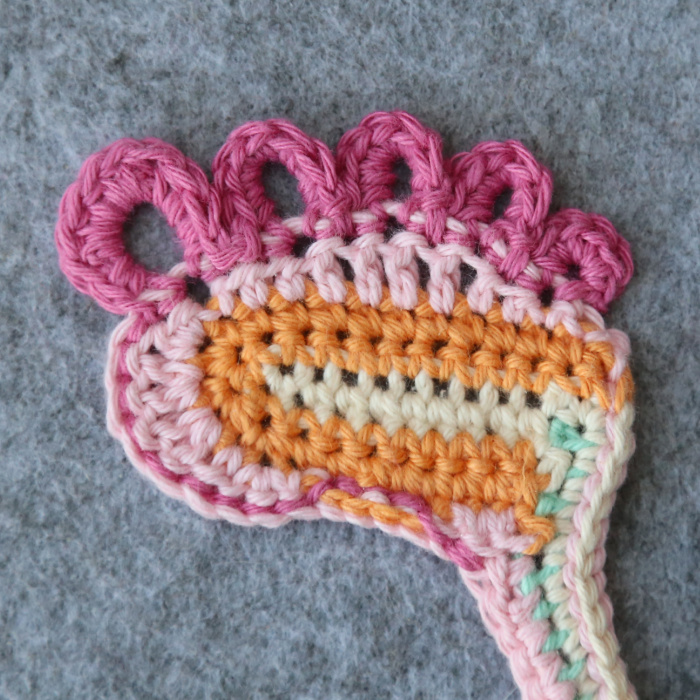
- I am using contrasting colours for this photo tutorial. This makes it easier for you to see where to place the stitches.
Instructions
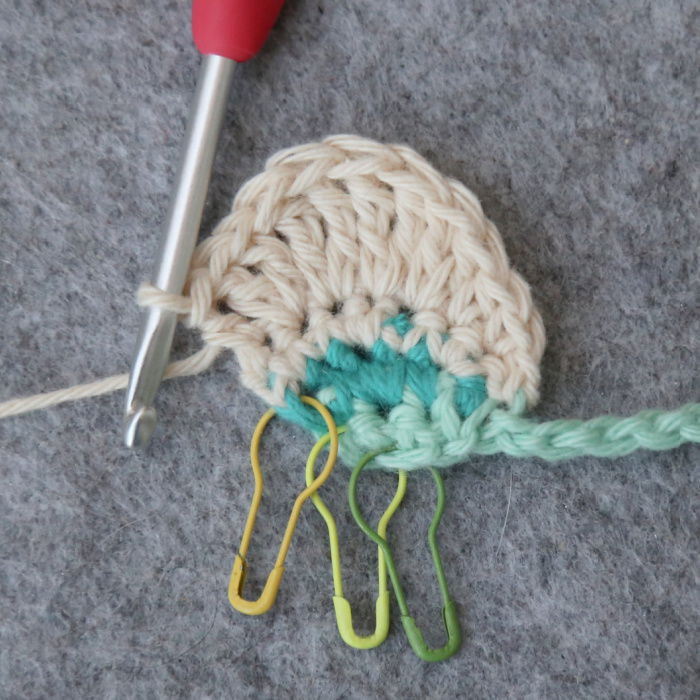
Ch 20 to start.
Short Row 1
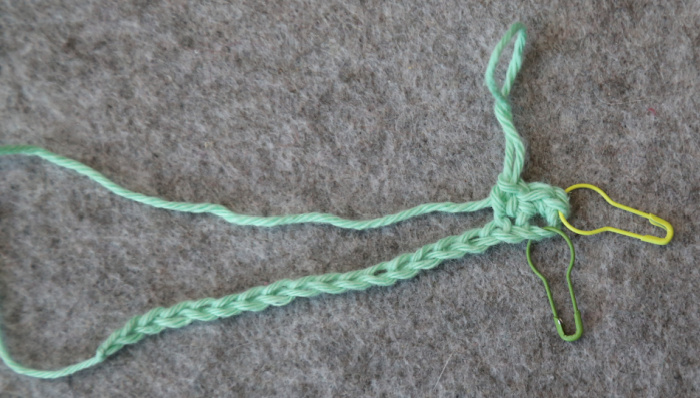
Make 2 sc in the second ch from the hook, marking this ch and the first sc with a SM. Sc in the next ch, TURN. (3 sc)
Short Row 2
With WS facing, ch 1 (doesn’t count as a st throughout). Sc in the first st, make 2 sc in each of the next 2 sts. Mark the last sc with a SM, placing the SM around the side of the st. TURN. (5 sc)
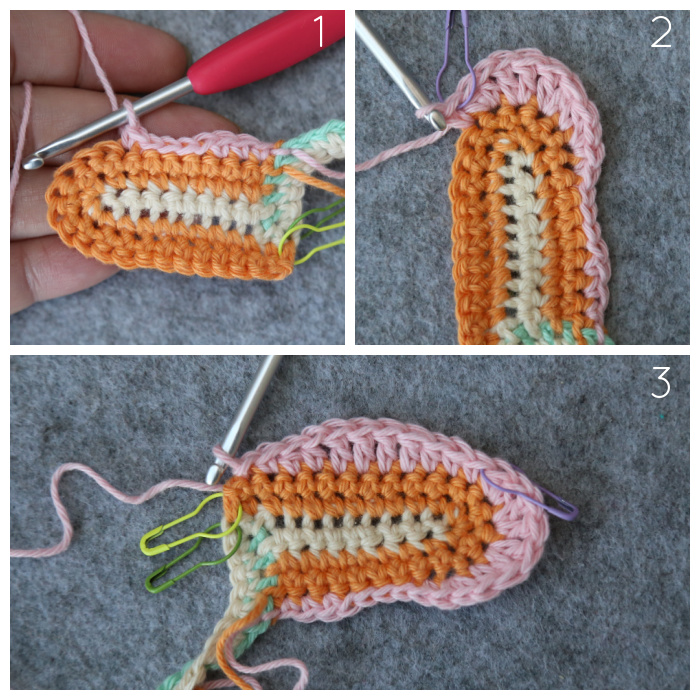
Short Row 3
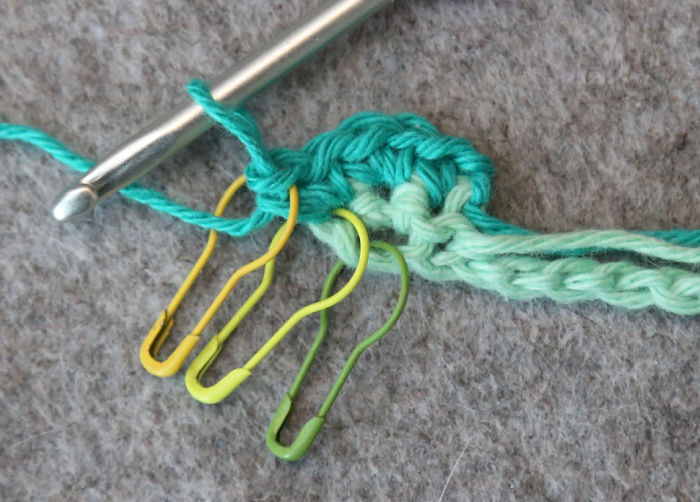
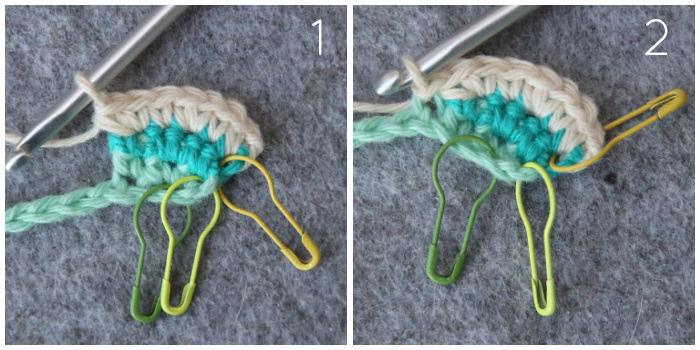
With RS facing, ch 1, sc in first 2 sts, make 2 sc in the next st. Sc in the next st, make 2 sc in the next st {Photo 1}, sl st in the next unworked ch {Photo 2}, TURN. (7 sc)
Short Row 4
This is a long, twisty short row consisting of 3 parts.
Working Around the Heel:
With WS facing, ch 1, skip the sl st, sc in the next st, hdc in the next st.
Make 2 dc in the next st, make 2 tr in each of the next 2 sts, make 2 dc in the next st, hdc in the last st. (1 sc, 2 hdc, 4 dc, and 4 tr)
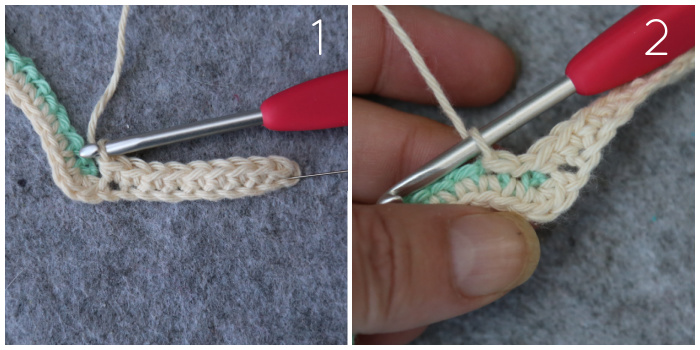
Working Along the Side:
Continuing around, make 3 sc in the side of Short Row 2, which will contain the first SM. Remove the SM {Photo 1}.
Sc in the side of Row 1, which will contain the next SM. Remove the SM {Photo 2}.
Sc in both rem loops of the next 3 ch sts, the first of which will contain the last SM and the last of which will contain a sl st. Remove the SM {Photo 3}.
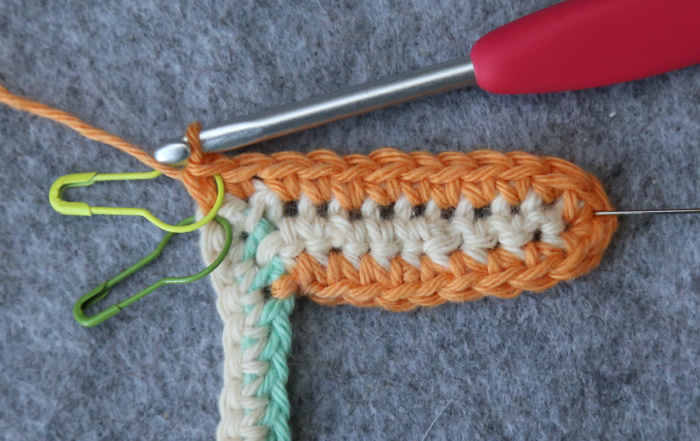
Sc in the next 15 ch sts. Make 3 sc in the last ch, marking the second st with a SM {Photo 4}.(25 sc)

Creating the Ball of the Foot:
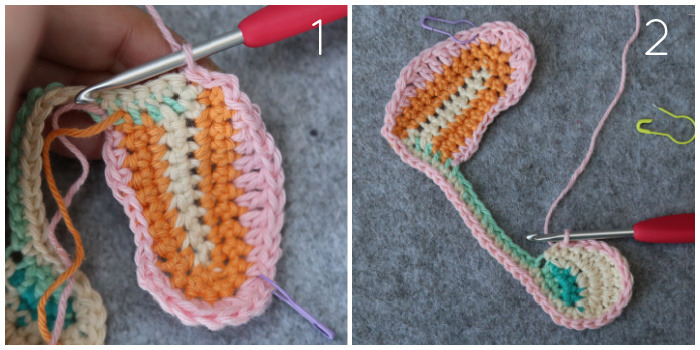
Ch 10. Sc in the second ch from the hook and the next 8 ch sts {Photo 1}. Skip the ch that already contains the 3 sc and sl st in both rem loops of the next 2 ch sts {Photo 2}. TURN. (9 sc, not including sl sts and ch sts)
Short Row 5
With RS facing, skip the 2 sl sts, sc in the next 8 sts, make 3 sc in the last st.
Continuing around, sc through both rem loops of the next 9 ch sts. Sc in the next 2 sts, the last of which should contain a SM. Mark the last sc with a SM, placing the SM around the side of the st. TURN. (22 sc)
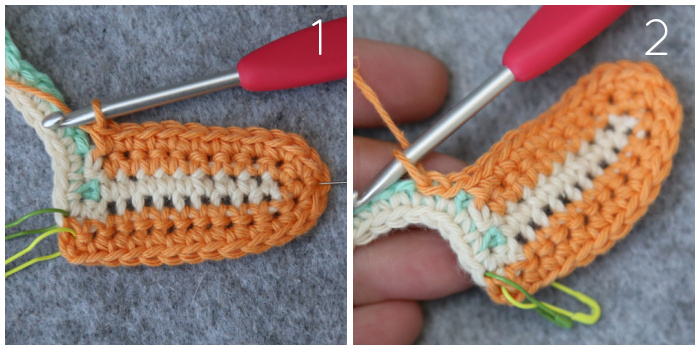
Short Row 6
With WS facing, ch 1, skip the first st, sc in the next 10 sts. Make 2 sc in each of the next 3 sts, sc in the next 8 sts {Photo 1}. Sl st through both rem loops of the next 2 ch sts {Photo 2}. TURN. (24 sc, not including sl sts)
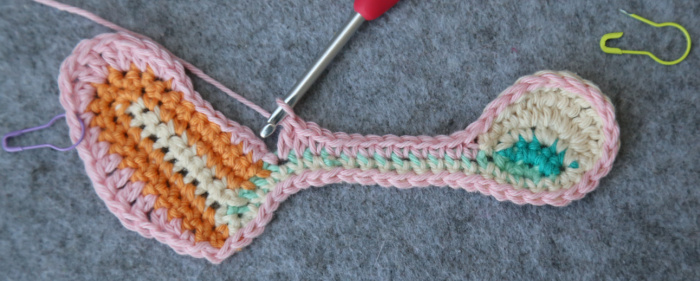
Round 7
Finally, a round that goes ALL the way around!
Ball of the Foot:
With RS facing, skip the 2 sl sts, sc in the next 3 sts, sl st in the next 4 sts, sc in the next st {Photo 1}.
Make 2 sc in the next st, hdc in the next st. Make 2 dc in each of the next 2 sts, make 2 hdc in the next st, sc in the next st. Mark this sc with a SM {Photo 2}.
Hdc in the next 2 sts, dc in the next 4 sts, hdc in the next 2 sts, sc in the next st. Sl st in the last st {Photo 3}. (8 sc, 7 hdc, and 8 dc, not including sl sts)
Side of the Foot and Heel:
Continuing around, ch 1, sl st in the side of Short Row 5, which will contain a SM. Remove the SM. Sl st in the side of Short Row 4, which also contains a SM. Remove the SM {Photo 1}. Sl st in the next 34 sts. This will bring you back to the foundation chain. (36 sl sts)
Working into the rem loops of the foundation ch, hdc in the next unworked foundation ch, sc in the next 9 ch sts, hdc in the next ch, dc in the last ch, which will contain a sl st. This will bring you back to the ball of the foot. (9 sc, 2 hdc, and 1 dc)
Short Row 8
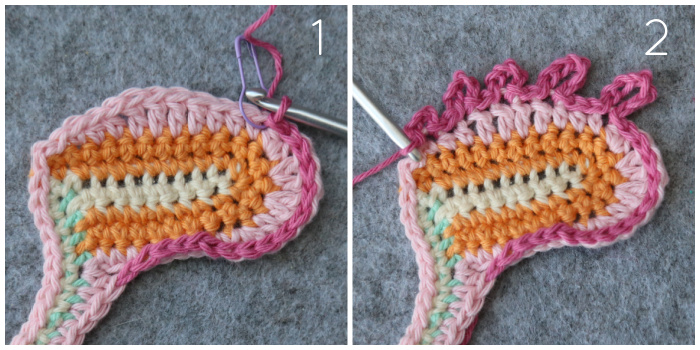
With RS still facing, skip the first 2 sts of Short Row 7, sl st in the next st. Sl st in the next 4 sts of Short Row 6, working OVER the sl sts from Short Row 7. Sl st in the next 11 sts of Short Row 7. The last sl st should fall in the marked sc after the hdc increase {Photo 1}. Remove the SM. (16 sl sts)
- Ch 6, sl st in same st.
- Sl st in the next 3 sts, ch 5, sl st in the same st.
- (Sl st in the next 2 sts. Ch 4, sl st in the same st) twice.
- Sl st in the next 2 sts, ch 3, sl st in the same st {Photo 2}. TURN. (1 ch-3 sp, 2 ch-4 sps, 1 ch-5 sp, and 1 ch-6 sp, not including sl sts)
Short Row 9: These Little Piggies
When making the sl sts in this round, work OVER the sl sts from Short Row 8. Sl sts are not included in the stitch counts for this row.
With WS facing:
- Make 5 sc in the next ch-3 sp, sl st in the next st of Short Row 7. (5 sc)
- Make 6 c in the next ch-4 sp, sl st in the next st of Short Row 7. (6 sc)
- Make 7 sc in the next ch-4 sp, sl st in the next st of Short Row 7. (7 sc)
- Make 7 sc in the next ch-5 sp, sl st in the next 2 sts of Short Row 7. (7 sc)
- [Sc, 8 hdc, sc] in the next ch-6 sp, sl st in the next st of Short Row 7. (2 sc and 8 hdc)
Fasten off and work away your ends.

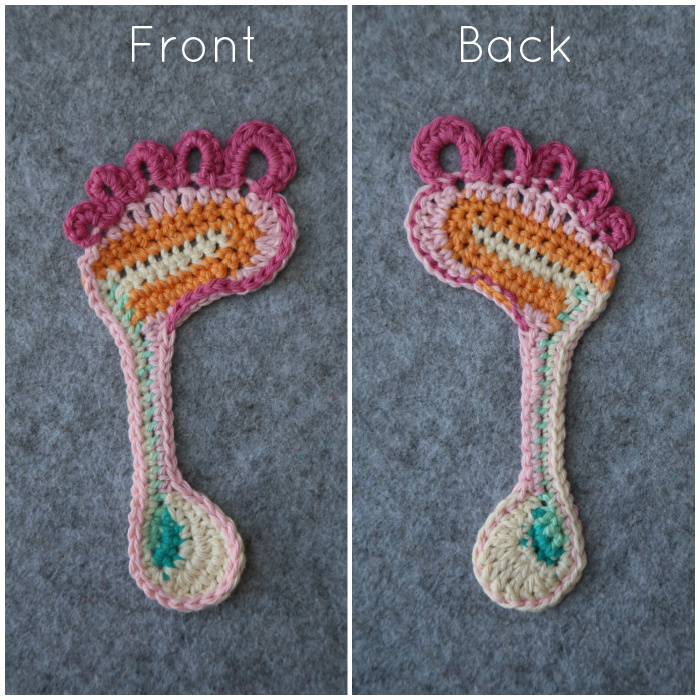
These footprints can be used with the front or the back facing, giving you both a left foot and a right foot. I appreciate that the difference between front and back is visible with the colours I used for the tutorial, but if you make them in a single colour, I don’t think it makes a big difference.
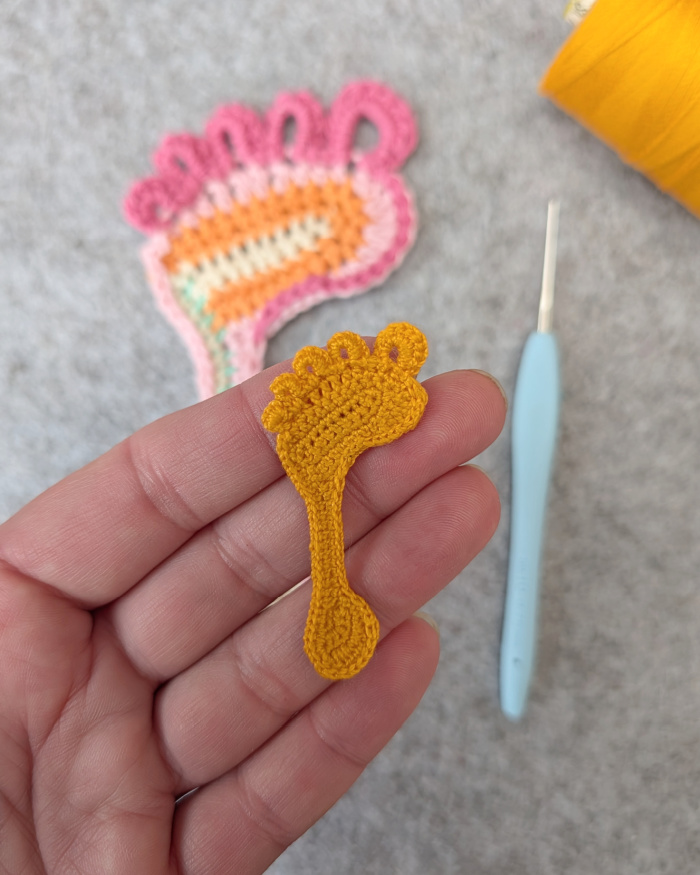
And just for good measure, I made one in sewing thread, using a 0.75mm Clover Amour crochet hook. Isn’t it cute???
Let me not forget to pay homage to the original 2012 version…


This blog post contains affiliate links. I only link to products I personally use or would use. All opinions are my own.


Kareema Griest says
Thank you for sharing your pattern. I’m hoping to make 2 medium sets (to represent the parents) & 1 small set (to represent their baby) to put on a blanket…ocean themed, w/a “beach” at the top. I hope these turn out well. :)
Dedri Uys says
I’d love to see it when you’re done :)
Mary says
Hi Dedri, thanks so much for sharing. I have made these footprints for someone who lost a baby too soon as a keepsake and to help the healing process.
Dedri Uys says
What a lovely gesture, Mary.