This is a very last-minute Halloween craft: A Crochet Pumpkin Segment Ball. We have had visitors all day – and what a nice visit it was – so I have not had time to post until now. Not that these few extra hours will really have made a difference. Anyone who wants to make something for Halloween will no doubt already have made it. This ball was designed for the occasion, however, so post the pattern I will.

The pumpkin segment ball is a simplified version of my Original Crochet Amish Puzzle Ball. It is only 6 cm high when completed, so makes for a very cute little thingy. Yes, I did say cute. But in keeping with the Halloween spirit, and if you are moved to do so, you can always embroider a scary face on this little crochet pumpkin.

Crochet Pumpkin Segment Ball Pattern
Materials
- 4 mm crochet hook (US G/6 UK 8)
- Double knit or worsted weight yarn (#3 or #4) in Orange and Dark Green
- Stuffing
- Yarn needle
Abbreviations
US Terminology (US/UK Conversion HERE)
- Ch – Chain
- Sc – Single crochet
- Sc2tog – Single crochet 2 together
- Sl st – Slip stitch
- St/sts – Stitch/stitches
- () – Repeat instructions between parentheses the number of times specified.
Instructions
Add this pattern to your Ravelry Queue.
The wedges are basic single crochet circles worked in the round. They are worked in a spiral, so you do not have to join at the end of each round. Just continue around, making the first stitch of each round in the first stitch of the previous round.
|
Wedges – Make 6 in Orange |
||
| 1 | Into a magic ring: Ch 1, make 6 sc. Remember to pull the magic ring closed before continuing. Alternative way to start: Ch 4 and join to the first st with a sl st to form a ring. Ch 1 and make 6 sc into the ring. | 6 |
| 2 | Make 2 sc in each st around. | 12 |
| 3 | (Make 2 sc in the next st, sc in the next st) 6 times. | 18 |
| 4 | (Make 2 sc in the next st, sc in the next 2 sts) 6 times. | 24 |
| 5 | (Make 2 sc in the next st, sc in the next 3 sts) 6 times. Fasten off and work away your ends. | 30 |
|
Chain of Lids – Make 3 in Orange |
||
| 1 | Ch 2. Make 2 sc in the second ch from the hook. Ch 1 and turn. | 2 |
| 2 | Sc in each st. Ch 1 and turn. | 2 |
| 3 | Make 2 sc in each st. Ch 1 and turn. | 4 |
| 4 | As Row 2. | 4 |
| 5 | Make 2 sc in the first st, sc in the next 2 sts, make 2 sc in the last st. Ch 1 and turn. | 6 |
| 6 | As Row 2. | 6 |
| 7 | As Row 2. | 6 |
| 8 | As Row 2. | 6 |
| 9 | As Row 2. | 6 |
| 10 | Sc2tog, sc in the next 2 sts, sc2tog. Ch 1 and turn. | 4 |
| 11 | As Row 2. | 4 |
| 12 | Sc2tog twice. Ch 1 and turn. | 2 |
| 13 | As Row 2. | 2 |
| 14 | Sc2tog. Ch 1. | 1 |
| Repeat Rows 1-14 once. This will give you a chain of 2 “lids”. Fasten off and work away your ends. | ||
|
Stem – Make 1 in Dark Green |
||
| 1 | Starting with a 15 cm (6″) yarn end, ch 4. | |
| 2 | Starting in the stitch furthest away from your hook, sc through one loop only of each of the 4 ch sts. In other words, you are working in the round. | 4 |
| 3 | Continuing around, sc in each of the 4 sts. | 4 |
| 4 | Sc in each of the 4 sts, sl st in the next st. Fasten off, again leaving a 15 cm (6″) yarn end. | 4 |
| You should now have a fat little tube. Use the initial yarn end to sew the 4 foundation chain stitches closed. The easiest way to do that is to insert your needle into the first chain and out through the second, in again through the third and out through the fourth. Pull tight and the end should close up… like a teeny tiny drawstring. Don’t cut this end just yet!
Work away your final yarn end. Place this little stem to one side until you are ready to attach it. |
||
A Little Help With The Lids
If you have never made one of my puzzle balls, working into the rows of the lids can be a bit daunting. So, before I tell you how to attach the wedges (circles) to the lids, I thought I would give you a quick run-down of the lids.
Although the lids only have 14 rows, there are actually 15 “holes” along the sides of the lids. Here’s why: working into the second ch from the hook in row 1 of the lids causes that second ch st to gape, giving you an “extra” hole.
Attaching the Segments
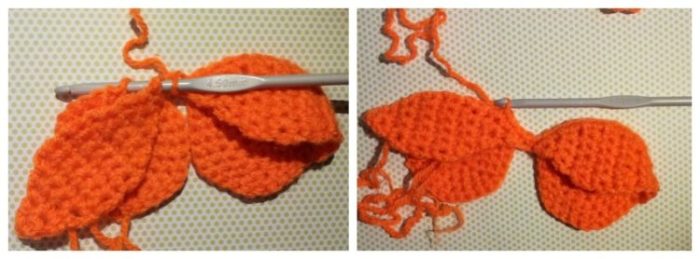
To attach the lids to the wedges (circles), place one of the circles face-down (with the wrong side towards you). Place one of the “chain of lids” on top of the circle as in the picture below.
With a slip knot already on your hook, insert your hook into the first row of the wedge lid AND any stitch around the side of the circle (so both layers) and make a sc. Continue making a sc into each row of the lid (see photo above) and each stitch around the outside of the circle until you have worked into all the rows up the side of the lid (so 15 sc’s). See photo below.
At this point, the lid will be standing up from the circle, sort of like a bra-cup. This is exactly what you want it to do, so don’t fret because it’s not lying flat!
")
Slip stitch into the ch stitch between the two wedge lids. Place another circle (wedge) behind the second wedge lid, again with the wrong side facing you. Now insert your hook into the first row of the second wedge lid AND any stitch around the outside of the circle and make a sc. Continue making a sc into each row of the lid AND each st of the circle until you have made 15 sc’s. The last sc should fall in the last row of the wedge lid.
You will now close the wedges by working down the other side of both lids and circles. So, starting in the same (last) row of the lid and the NEXT stitch around the outside of the circle, make 15 sc’s through both layers. Remember to stuff as you go!
When you have stuffed and completed one wedge, sl st into the ch st between lids again and then continue working 15 sc’s through both layers of the last wedge, stuffing as you go. 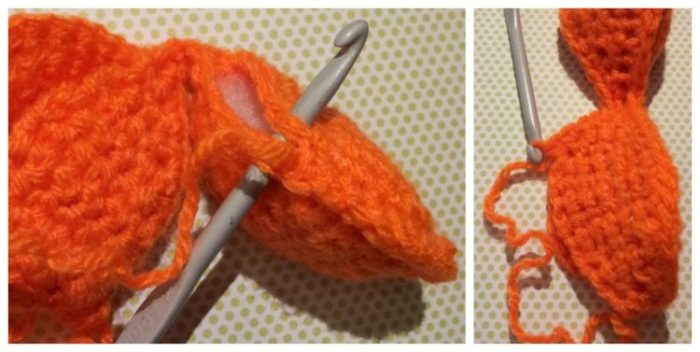
When you get to the end, ch 1 and fasten off, leaving a 15 cm (6″) yarn end. Use your yarn needle to attach the two ends to each other so that you have a 2-wedge segment.

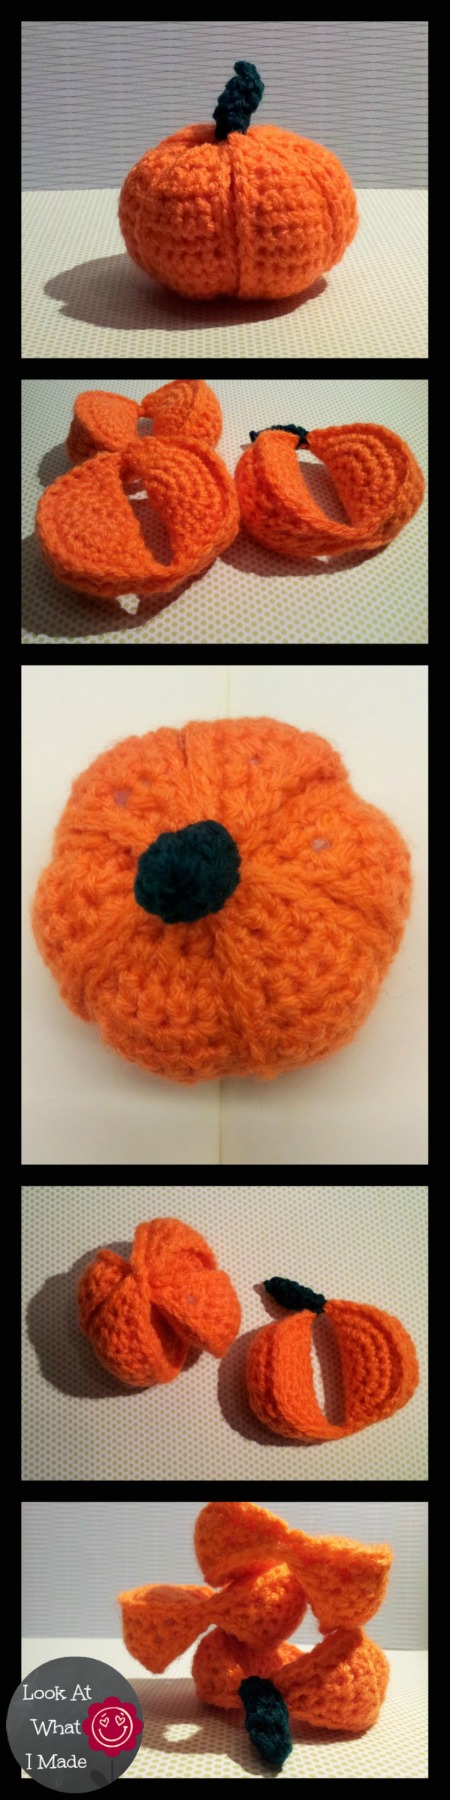
Repeat with the other two segments so that you end up with 3 segments, each containing 2 wedges… sort of like an orange. Finally, attach the stem to the top of one of the segments using the 15 cm (6″) yarn end from the stem.

To assemble your teensy crochet pumpkin, just slip the segments over each other, keeping the one with the stem for last.
")
I’ve added a spooky border to my photo (using PicMonkey) to make this crochet pumpkin less cute, but I am afraid it hasn’t worked.
This pattern will also make a great crochet ball for a baby and a super simple puzzle for a toddler. Why not try to make one with coloured wedges and black lids? Like an inverted round Rubix cube…
If you are feeling more adventurous, you can always try the Mini Crochet Amish Puzzle Ball or the Crochet Kiwi Puzzle. And if you would rather bake than crochet, have a look at my Skeleton Cookies. They were made using a DIY cookie cutter. Who knew empty canned-food tins could be so useful!

This blog post contains affiliate links. I only link to products I personally use or would use. All opinions are my own.


Dani Massey says
Hi, Dedri!
I love ALL your patterns, but this one is my special favorite! I’m making several with an off-white wedge and red lids and some with green lids to resemble red and Granny Smith apples! These I will give to each of my granddaughter’s teachers. Not only will they last longer than real apples, but think what a great stress buster they can be in moments of quiet between classes!
At one of our local schools, the teacher that handles the special-needs students uses a little doo-dad on the desk to indicate to the other children to not disturb that student while they are trying to work out the assignment they were given. This allows that student the extra quiet they need; and allows the other children to know, with a visual reminder, not talk to or disturb that student just right now. Saves lots of reminders and conflict! I will make some red ones (red means stop). for her to use for this purpose. Then, if it falls, it doesn’t hurt little toes or makes any large noises. When the student finishes the assignment, they could be rewarded with getting to play with the puzzle for a few minutes. Or take it apart to indicate they are finished. Great!
Dedri Uys says
What a brilliant idea to use them like that :) I’ve made plenty of apples and oranges from these over the years. So quick and easy. Have a lovely day!
Dedri
Laura says
Love your patterns! I have the amamani book and have made the Dino and sea turtle. I also used your pattern to make a peacock and my own fish version! This is an awesome tiny puzzle. I’m going to use it to make fruit puzzles like oranges, watermelons, lemons limes etc. for all the babies in my life! so excited! Yay!
Dedri Uys says
Thank you, Laura. They work very well for fruit puzzles. I made my boys some apples, oranges, and limes. They loved them.
Lynn says
Dear Dedri, I absolutely love your puzzle ball patterns. They are so unique…you are extremely talented. I’ve purchased the book, and also stumbled across a kiwi, and a red octopus, and now the pumpkin. Am I missing any? Thank you so much for sharing your unique and wonderful talents with us! ☺️
Lynn (tnpakrat)
Dedri Uys says
Hi Lynn.
Thank you for your comment :) I also have patterns for a fish, a cow, and a rhinosaur for sale on Ravelry. And then there is a free flower ball and a free star ball too.
Cheri says
Dedri,
I am trying to download the pumpkin puzzle ball pattern. I have installed the PDF download creator,but every time I try to download the pattern it takes me to a different download program site and I can’t seem to get the pattern,is there another way I could get the pumpkin pattern and the kiwi pattern as I have not been successfull with either one. Thank you so much for your help! I love the puzzle ball patterns and am looking forward to seeing more!
Dedri Uys says
Hi Cheri. You should not have to download anything as the pattern is written out in the post. I suspect that you are clicking on an advertisement.
Annie Oper says
You probably aren’t still looking, but if you click on the print friendly button, it gives you the option of creating a pdf for it which you can download.
Heidi Yates says
Seriously one of out of the coolest things ever! Thank you for the pattern and for being so talented.
Dedri Uys says
Thanx Heidi :)
Rhondda Mol says
Hi Dedri! I love this :)
My son is obsessed with Halloween :) I am going to try to make this for him before Thursday!
He also loves balls and puzzles so I think this is a winner :)
Thank you for linking up at Link & Share Wednesday!
Rhondda
Missy's Crafty Mess says
This is so cute. I will be making one for my Daughter.
Dedri Uys says
Thank you, Missy x