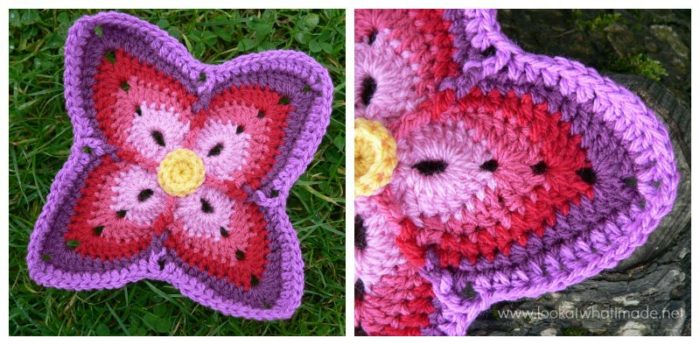
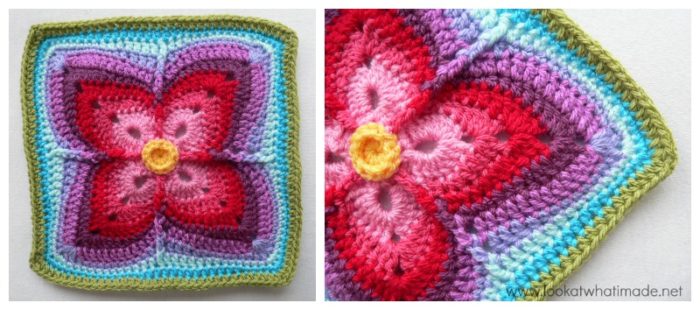
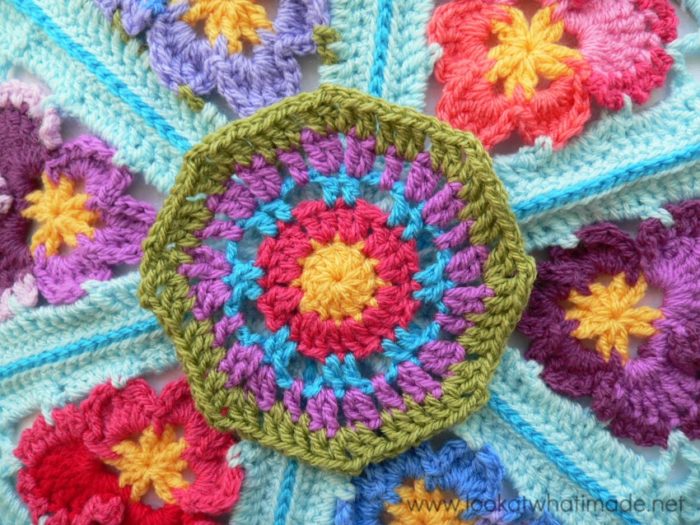
Block 26 of the Block a Week CAL (hosted by Kimberly Slifer) is Julie Yeager’s striking Firenze Square. I love Julie’s designs and this is another one I am particularly fond of. You can find more of Julie’s patterns here on Ravelry.
Update: This pattern is no longer available for free. Julie is happy for the tutorial below to remain on my site, but it is not the complete pattern. You can buy the complete written pattern HERE.
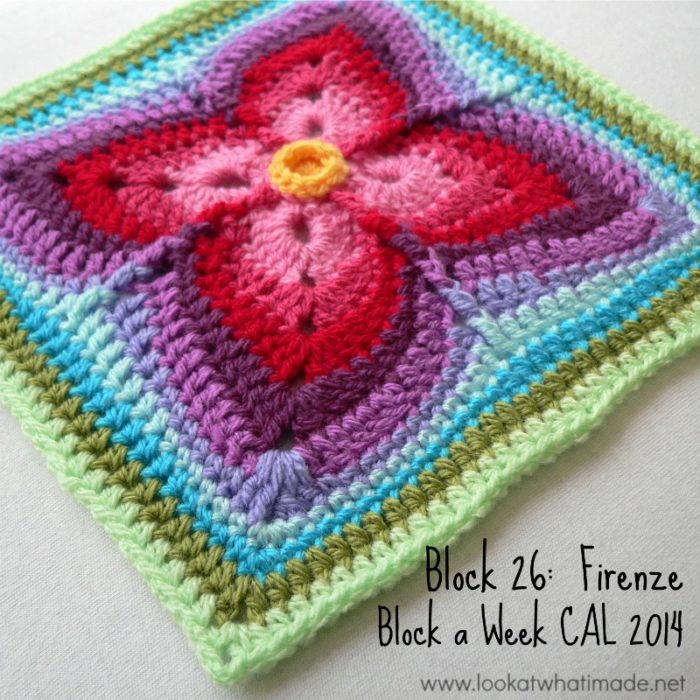

Firenze Square
{Pattern © 2012 Julie Yeager Designs. Photo tutorial done with kind permission}
Pattern
You can BUY the pattern here on Ravelry. It is no longer a free pattern.
Suggested Materials
- 5.5 mm Clover Amour Crochet Hook (US I/9 UK 5)
- Worsted weight yarn
Size
- Using the hook and yarn specified, your square should be a nice even 12″ when you are done.
- Using a 4 mm crochet hook (US G/6 UK 8) and double knit yarn, as I have done, your finished square will be about 7.5″ big.
My Yarn and Colour Choices
I am using the Stylecraft Special DK.
- Saffron (Rounds 1, Optional 14, and Optional 15)
- Fondant (Rounds 2-4)
- Pomegranate (Round 5)
- Lipstick (Round 6)
- Plum (Round 7)
- Magenta (Round 8)
- Lavender (Round 9)
- Sherbet (Round 10)
- Turquoise (Round 11)
- Meadow (Round 12)
- Spring Green (Round 13)
Notes
- The initial ch st’s in each round are counted as a stitch, except for the initial ch st in Rounds 2, 10, and 11, which doesn’t count as a stitch.
- US Crochet Terminology used. (See this comparative chart if you need help transcribing from US to UK)
- Affiliate Link: The yarn used in most of the tutorial photos is Patons 100% cotton dk
.
Special Stitches
- Bpsc – Back post sc (explained in the relevant round)
- Sc2tog – Single crochet 2 together (also known as a single crochet decrease). This stitch is also explained in the relevant round.
- Fptr – Front post treble crochet. This is the same as a standard tr, but made around the post of the stitch instead of into the top of the stitch.
- Spk dc (or long dc) – Spiked double crochet. The dc is made into the row below, with the stitch pulled up to the hight of the current row.
Firenze Square Photo Tutorial
This photo-walkthrough is NOT the actual pattern and should not be used instead of the pattern, but rather in conjunction with it.
Thank you very much to Julie Yeager for giving us permission to do this photo-tutorial for her Firenze Square. And a special thank you to Kimberly Slifer for letting me do these tutorials and for obtaining the necessary permission.
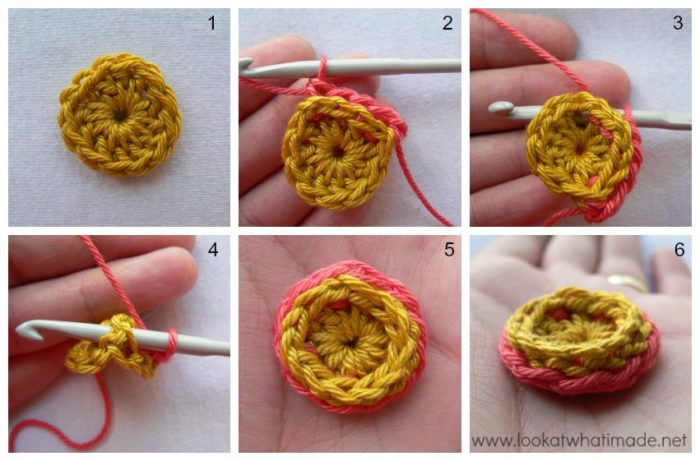
Round 1
You can start this round with a magic ring instead of the initial ch-4.
Magic Ring Instructions for Round 1
Into a magic ring: ch 3 (this counts as your first dc). Dc x 11 into the ring and pull the ring tight. Join to the top of the initial ch-3 with a sl st.
If you feel like practising the invisible join I talked about two weeks ago, feel free to use it instead of the sl st join. Make sure that you understand which stitch to join to if you do use it!
If you are not familiar with working into a magic ring, this video tutorial from Moogly is clear and easy to follow.
Please remember, when working into a magic ring you HAVE to work away your initial tail very well. If you just cut it, your whole square might unravel!
Stitch count: 12 dc’s
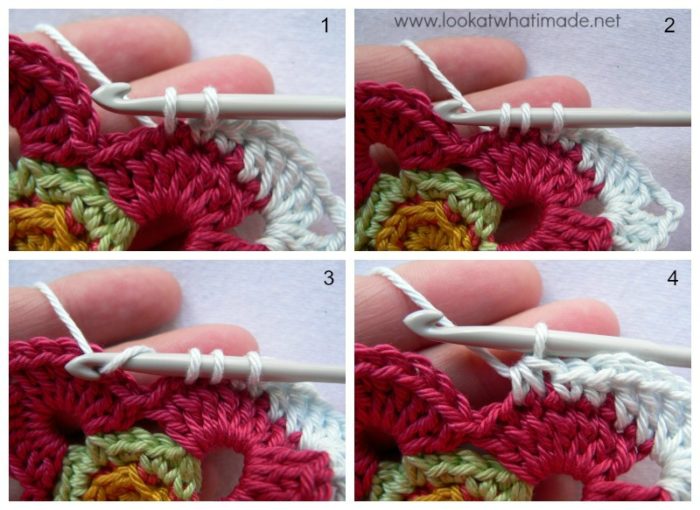
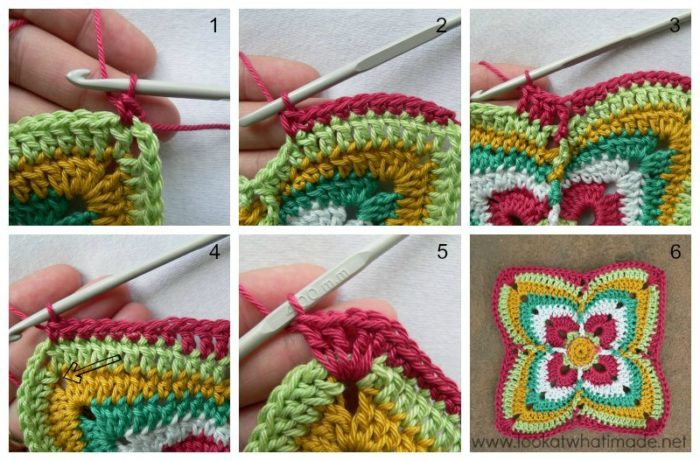
Round 2
In this round you will be making back post single crochet stitches (bpsc’s).
Photo 1 below shows Round 1 completed. Photo 2 shows you what the bpsc’s should look like.
To Make the Bpsc’s:
Insert your hook from back to front around the post of the relevant stitch (Photos 3 and 4) and complete a sc as normal.
- If you are using the same colour, ch 1 and make a bpsc in the same st as the sl st join.
- If you are using a new colour, join your yarn by making a standing sc around the back post of any st around.
Make a bpsc around the post of each of the remaining 11 st’s. Join to the first sc with a sl st.
When you have completed this round, the tops of your stitches from Round 1 should stand up and form a little well (Photo 6). The bpsc’s from Round 2 will look like a band of chain stitches around the base of the well (Photo 6).
Stitch count: 12 bpsc’s
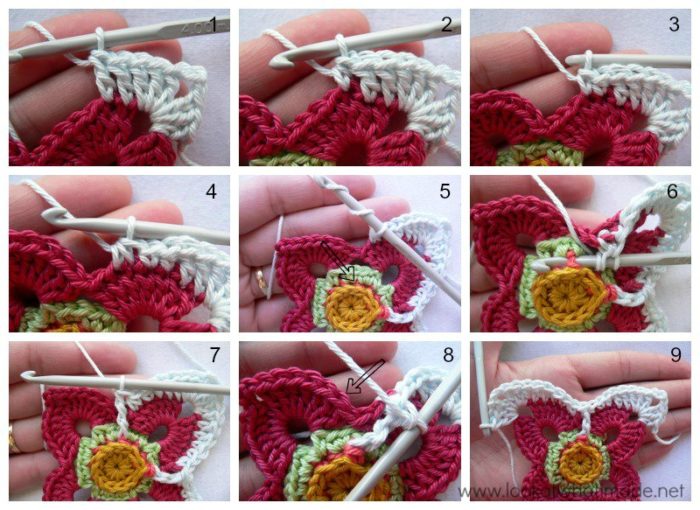
Round 3
- If you are using the same colour, ch 1 and make a sc in the same st as the sl st join. Ch 5 and sc in the same st.
- If you are using a new colour, join your yarn by making a standing sc in any st around. Ch 5 and sc in the same st (Photos 1 and 2).
*Make 2 sc’s in each of the next 2 st’s – see Photo 3. (Sc, ch 5, sc) in the next st.* Repeat from * to * twice. Make 2 sc’s into each of the last 2 st’s. Join to the first sc with a sl st (Photo 4).
Stitch count: 24 sc’s and 4 ch-5 loops
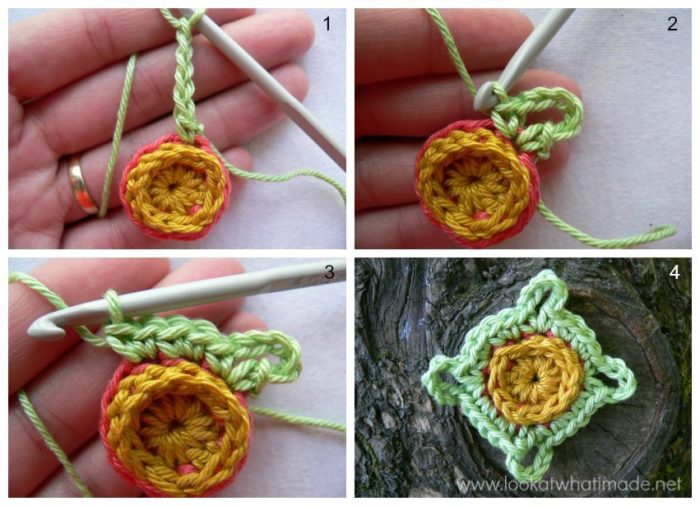
Round 4
- If you are using the same colour, sl st into the ch-5 loop. Ch 3 (this counts as your first dc). (6 dc, ch 3, 7 dc) all into the same ch-5 loop.
- If you are using a new colour, join with a standing double crochet in any ch-5 loop around. (6 dc, ch 3, 7 dc) all into the same ch-5 loop (Photos 1 and 2).
(7 dc, ch 3, 7 dc) into each of the remaining 3 ch-5 loops. Join to the top of the beginning ch-3 (or the standing double crochet) with a sl st.
Stitch count: 56 dc‘s and 4 ch-3 spaces
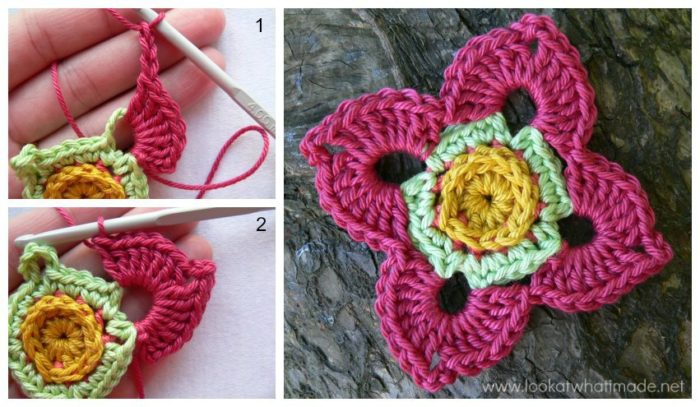
Round 5
In this round you will be using sc2tog’s (or single crochet decreases).
How to Make a Single Crochet Decrease (Sc2tog)
Insert your hook into the next st and pull up a loop (Photo 1). Insert your hook into the next st and pull up a loop (Photo 2). Yarn over (Photo 3) and pull through all 3 loops on your hook (Photo 4).
In Photo 4 you can clearly see that the post of the sc2tog looks like a “W”.
Join your new yarn by making a standing double crochet in any ch-3 space around. (2 dc, ch 3, 3 dc) into the same ch-3 space.
*Dc in the next 2 st’s (Photo 1). Remember that the first stitch will be slightly hidden by the stitches you just made into the corner. See this tutorial if you need help identifying the first st to work into. Hdc in the next st (Photo 2) and sc in the next st (Photo 3). Sc2tog over the next 2 st’s (Photo 4). Skip the last dc of the petal and make a fptr around the post of the sc in Round 2 directly below where the petals join (indicated with an arrow in Photo 5 and illustrated in Photos 6 and 7). Skip the first dc of the next petal. Sc2tog over the next 2 st’s (the arrow in Photo 8 shows you the first stitch to work into). Sc in the next st and hdc in the next st. Dc in the last 2 st’s before the ch-3 space. (3 dc, ch 3, 3 dc) in the ch-3 space. (Photo 9)*
Repeat around as instructed in the pattern and join to the top of the standing double crochet with a sl st.
Stitch counts:
- Total: 68 st’s and 4 ch-3 spaces {16 sc’s, 8 hdc’s, 40 dc’s, and 4 fptr’s}
- Per Side: 17 st’s {4 sc’s, 2 hdc’s, 10 dc’s, and 1 fptr}
Round 6
As written.
You will be skipping the sc2tog’s before and after each fptr in this round. Remember also that the first st after every corner will be slightly hidden.
In Photo 1 the next available stitch is the sc2tog, which you will skip. In Photo 2, the arrow indicates the first stitch to work into after making the fptr.
Stitch counts:
- Total: 84 st’s and 4 ch-3 spaces {16 sc’s, 24 hdc’s, 40 dc’s, and 4 fptr’s}
- Per Side: 21 st’s {4 sc’s, 6 hdc’s, 10 dc’s, and 1 fptr}
Round 7
As written.
You will be skipping the sc before and after each fptr in this round (in other words, the first and last sc of each petal).
Stitch counts:
- Total: 100 st’s and 4 ch-3 spaces {24 sc’s, 24 hdc’s, 48 dc’s, and 4 fptr’s}
- Per Side: 25 st’s {6 sc’s, 6 hdc’s, 12 dc’s, and 1 fptr}
Round 8
As written.
You will be skipping the sc before and after each fptr in this round (in other words, the first and last sc of each petal).
Stitch counts:
- Total: 100 st’s and 4 ch-2 spaces {24 hdc’s, 72 dc’s, and 4 fptr’s}
- Per Side: 25 st’s {6 hdc’s, 18 dc’s, and 1 fptr}
Round 9
You will have noticed that the second half of each side (the part after each fptr) so far has been a mirror image of the first half (the part before each fptr). In this round (and Round 10), the two halves of each side are NOT mirror images of each other.
The first st of each side will be hidden by the stitches of the corner. Make sure you don’t accidentally skip that first st.
Join your yarn by making a standing single crochet in the second dc of any corner around (Photo 1). Sc in the next 9 st’s (Photo 2). *Hdc in the next st. Skip the next hdc and fptr around the fptr. Skip the next hdc and dc in the next 3 st’s (Photo 3). Hdc in the next 2 st’s and sc in the last 6 st’s (Photo 4). (2 spkdc, ch 1, 2 spkdc) into the ch-3 space from Round 7 (indicated with an arrow in Photo 4), working over and enclosing the ch-2 space of Round 8 (Photo 5). Sc in the next 10 st’s.* Repeat around and join as instructed in the pattern.
Stitch counts:
- Total: 108 st’s and 4 ch-2 spaces {64 sc’s, 12 hdc’s, 12 dc’s, 4 fptr’s, and 16 spkdc’s}
- Per Side: 27 st’s {16 sc’s, 3 hdc’s, 3 dc’s, 1 fptr, and 4 spkdc’s}
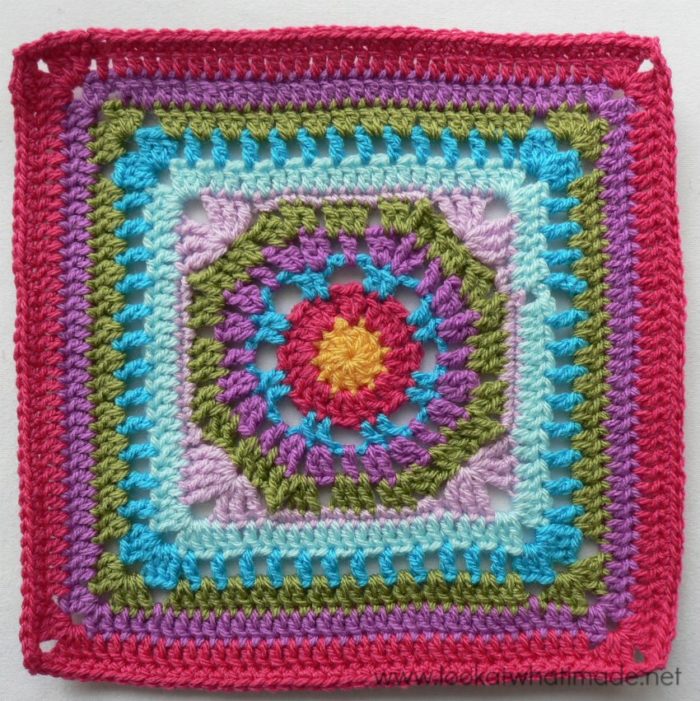
Here’s my completed Round 9 using Stylecraft Special DK. Sorry for the poor photos. The light was horrendous yesterday, but I hope you can at least get an idea of what your square should look like at this point.

Round 10
In this round you won’t be skipping any stitches before and after the fptr’s. Be mindful of the fact the first st of every side will be hidden by the corner stitches. You’ll have to pull the 3 sc’s in each corner out of the way so that you can insert your hook into the first st.
Stitch counts:
- Total: 120 st’s and 4 ch-2 spaces {80 sc’s, 20 hdc’s, 16 dc’s, and 4 fptr’s}
- Per Side: 30 st’s {20 sc’s, 5 hdc’s, 4 dc’s, and 1 fptr}
Round 11
- If you are using the same colour, ch 1 and make a sc in the same st as the sl st join.
- If you are using a new colour, join your yarn by making a standing sc in the same st as the sl st join.
Sc in the next 9 st’s (Photo 1). *Hdc in the next 12 st’s (Photo 2). The first hdc should fall in the hdc before the fptr in the previous round (see Photo 1). Sc in the next 4 st’s (Photo 3). Make 3 sc’s in the next sc (Photo 4), which should be the central sc of the 3-sc corner. Sc in the next 13 st’s.*
Repeat and join as instructed in the pattern.
Stitch counts:
- Total: 128 st’s {80 sc’s and 48 hdc’s}
- Per Side: 32 st’s {19 sc’s and 12 hdc’s, not including the central sc of the 3-sc corner}
Round 12
As written.
Stitch count: 132 hdc’s and 4 ch-2 corners {33 hdc’s per side}
Round 13
As written.
Stitch count: 140 hdc’s and 4 ch-2 spaces {35 hdc’s per side}
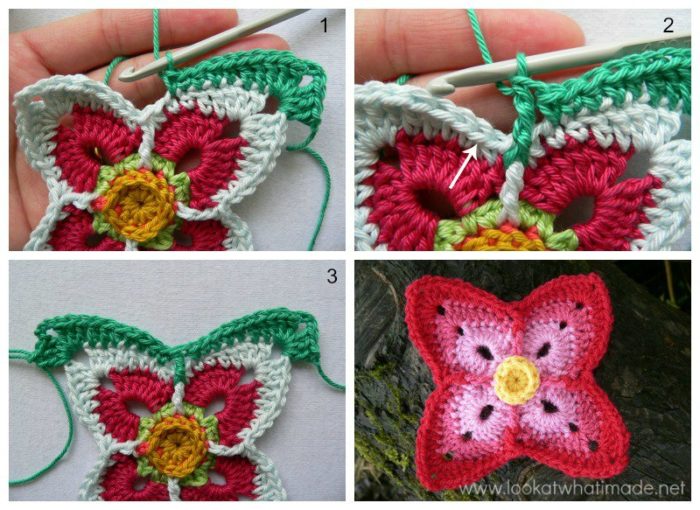
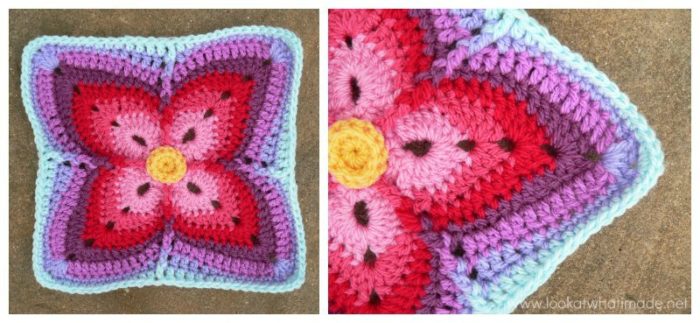
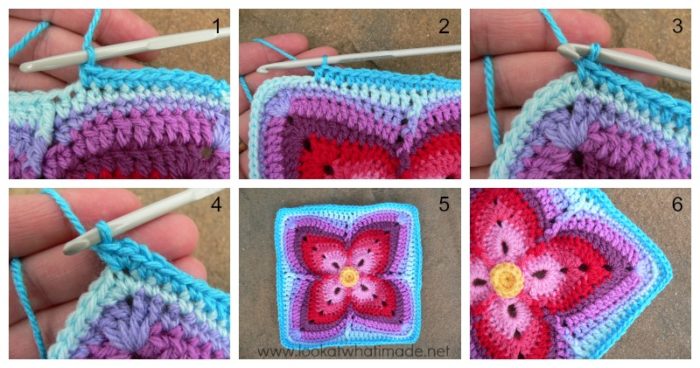
My square will need 2 additional rounds to get it to the size of the other squares I have made so far. It is worth noting that the corners of this square tend to creep clockwise. The photo below was taken after blocking and my corners are still a bit skew. Never mind, though. Once the square is attached to the others it will be right as rain.
I have added an Optional Additional Round 14 and 15 to get my square to the same size as the other squares. You
Remember to subscribe to my Weekly Newsletter if you would like to be kept in the loop. You can also like my Facebook page or follow me on Bloglovin, Google+, Pinterest, Twitter, or Instagram.

Happy Hooking!


Carin says
Hi there! I love these squares! I’m trying to figure out this pattern on my own, but I’m confused with round 10. The stitch count says there should be 4 chain 2 spaces (I believe this is in the corners), but you talk about 3 sc’s in the corners. Can you help me?
Jenny Lowman says
Hi Carin. I have made this square before and can’t find the pattern for the life of me, but Dedri’s comment about moving the 3sc out of the way refers to starting the next round (11). I would double check the original pattern for specifics, as Dedri just created a help-along to be used along side the original pattern. It may be clearer in the original. I will comment further if I can actually find the pattern and where I hid it away! Jenny
Emma says
Please help me? I’m very late to the party but i bought the pattern and i am using your colour combination. The problem is you have added an extra row between rounds 7 and 8 of the written pattern. Meaning my magenta round is the one with the spk dk at the corners rather than the lavender round.
This is not explained anywhere and I want to stick with your colours and the look your square turns out with.
Please will you help because without this i will have a pretty square that I do not really love.
Thank you
Emma
Dedri Uys says
I’ve sent you an email, Emma. I have checked my colour placement and it looks correct to me, without any extra rounds added. If you can reply to my email with a photo, I can help you figure out what’s going on :)
Dedri
Tina Pigors says
I am so excited as coming down for your course in Durban. I suddenly thought that I needed to make sure I could understand your patterns and found your block a week patterns … They are just stunning. I have been crocheting a blanket for X number of years each with a different square. With a little adjustment to size I have done more crochet squares for this blanket in a weekend than I think I did last year. Thank you so much for making this possible
Dedri Uys says
Hi Tina. I am so pleased that you will be coming to the workshop! The designers who designed the squares are amazing. I am very privileged to have been allowed to do the photo tutorials for them. I would love to see your blanket when it’s done. I hope you bring it to the workshop :)
Mel Johnston says
Totally confused with out complete pattern, why does everything have to have a price. I like on a fixed income and enjoy crocheting. This was supposed to be fun instead it turned into a pain. Beautiful pattern wish I could finish it. :(
Dedri Uys says
Hi Mel. I am sorry that this pattern is causing you pain. Of the 48 patterns featured in the block a week CAL, only 4 are paid patterns, so maybe you can swap those 4 for the other 44 free patterns offered. None of these designs are mine. I merely received permission from the designers to make helpful photo tutorials as aids to the written patterns (links to which can be found at the start of each tutorial under ‘Pattern’).
Dedri
Geetha says
Thanks for sharing such wonderful designs, I just love each one of them, wish I can make them too !
Jenny says
What’s stopping you, Geetha? This square is gorgeous :)
Lynda Anderson-Fisk says
Hi, Dedri~
I love your photo tutorials. They help me immensely. I am working on the 2014 Block a Week CAL on my own.
I have recently found that the pictures in your tutorials for this project are no longer printing when I go to Print Friendly on my own, if there is no Print Friendly button on your website’s tutorial. Is it possible to add the Print Friendly Button to the tutorials that currently don’t have that? It would be superb if you could do that without too much work; otherwise, I can do a copy and paste with the photos on your website to put with the dialog that I copy and paste separately, since they both don’t copy together.
Could you please let me know via e-mail whether you can do this for me? That would be so excellent if you could do this, but I understand if it’s too much to ask in view of all the irons in the fire that you have going.
I appreciate all your hard work in making these tutorials, and the countless others you have made. Thank you soooo much! Hugs to you!!
Dedri Uys says
Hi Lynda. There was just a glitch on that page. I have fixed it now, so you should be able to see the print-friendly button at the bottom of the page. If you find any other ones where the print-friendly button doesn’t show up, please let me know and I will fix them individually. It should show on every single page.
I will look into why the photos don’t print if you go to print-friendly directly. Thank you for highlighting that for me.
Dedri
debbie vale says
Thank you!
manya says
I had hoped to do this square in the very near future. But now I discovered that the pattern was only available as a Ravelry download until September. If this is really a CAL, shouldn’t the instructins be available for a few months more at least until the end of the year without cost. I’m not as free as I’d like to be to do these squares each week.
Thank you for the beautiful patterns and I’m looking forward to near year’s CAL.
Manya
MYRIAM KLEIN says
Wanted to post my photo of Firenze Block 26 but apart from the Official CCC site on FB I couldn’t find where in Ravelry nor Dedri’s page.
Dedri Uys says
Myriam, you can post a photo to the Ravelry projects page (where you found the pdf version of the pattern).
Krys says
Just beautiful!!:)
Thank you!
Dedri Uys says
Thank you :)
Joyce van den Hout says
Thanks for this tutorial, it’s helping a lot. I finaly got it about the invissible join. And such a lovely pattern, looks like a little windmill from a fair. And becouse it’s off centre, it has a touch of motion…… would like to blow at it to make it go round and round….especialy in your choice of colors. (and don’t say it’s Lucy’s….you picked the order, didn’t you?)
Dedri Uys says
Thank you, Joyce. I think Julie has done such an amazing job with this design.
Amy West says
I’m so pleased you are able to receive the permission to do photo tutorials of these various crochet squares/mandalas! I’m such a visual learner! You do an excellent job. Thank you!
Carolyn King says
Just had to stop with my current projects to make this beautiful block (especially after seeing your lovely photos and your work. Thank you, Dedri, for how you help with the CAL. I am learning so, so much!
Lee Ann says
Oh my gosh, this square is magnificent! I don’t know how else to describe it and the colors serve to make it that much prettier! Thank you very much!!! :). :)
______
Lee Ann
Crochet…Gotta Love It! Blog:
http://crochetgottaloveit.blogspot.com
Pinterest: http:// http://www.pinterest.com/crochetsister
YouTube Channel:
http://youtube.com/user/crochetgottaloveit
#crochetgottaloveit #crochet
Dedri Uys says
Thank you, Lee Ann :)
Carol D says
This is beautiful! Though I do plan on doing this one, I may have to put off completing…I’ve just ordered yarns to do this in at least close to the color-way it is shown. With tons of yarn around here, I don’t have the shades I’d like to use…so have ordered and will anxiously await its arrival! I haven’t read the whole pattern (Or your tutorial) yet, but I have followed many of your excellent tutorials.
Since I’ve spent a good bit of time this week working on a crochet sash/belt for a new dress I bought – and working out how I’m going to assemble a sweater I’ve been working on for baby girl, I didn’t complete Block 25 yet, so may give that one a try while waiting for my yarn to arrive…
Thanks Dedri for your awesome tuts and to all who give so generously of their talents to help the rest of us increase our skills….it is SO appreciated!
Dedri Uys says
Thank you, Carol. I am always pleased to hear that these tutorials are useful. Which colourway are you using?
Vickie says
I really like all the colors you choose for the squares. Kind of tropical looking.
Dedri Uys says
Thank you, Vickie. I wish i could take credit for the pathway, but they are the colours Lucy from Attic24 uses for most of her projects.
Carrie says
Oooo pretty :)