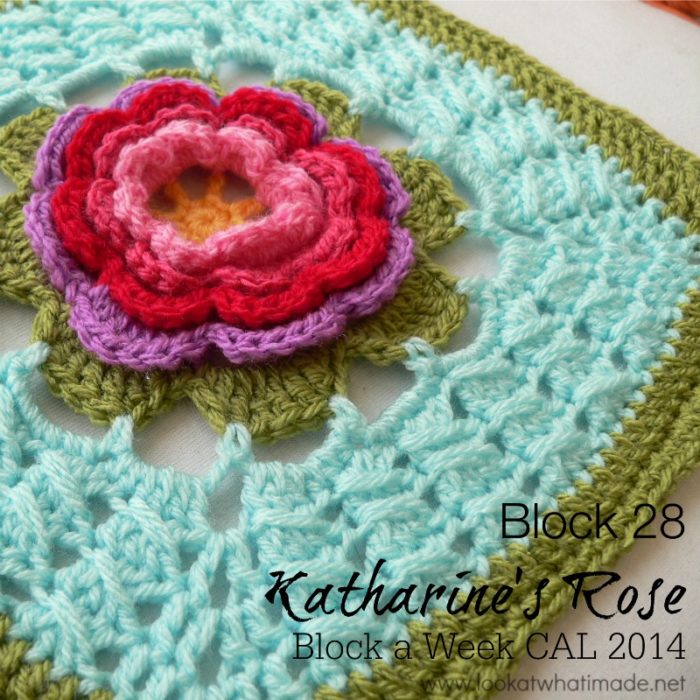
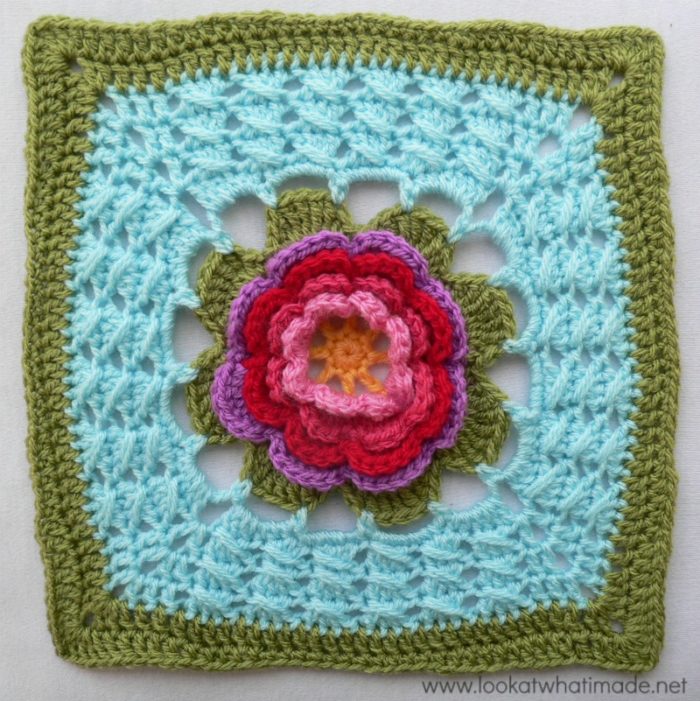
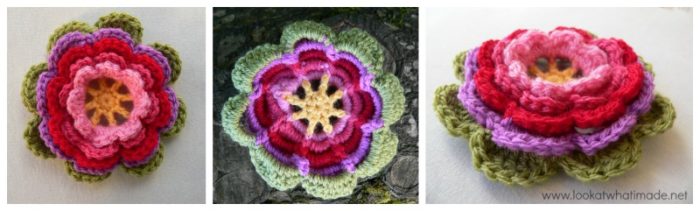
Block 28 of the Block a Week CAL (hosted by Kimberly Slifer) is Melinda Miller’s Katharine’s Rose Square. The central flower is beautiful and textured and the cable stitches give it such a delicate air. I love how this square is constructed and how simply it is designed.

I have now added a post outlining the extra rounds I added to each square to get them to the size of Block 1, which was the biggest. You can find that HERE.
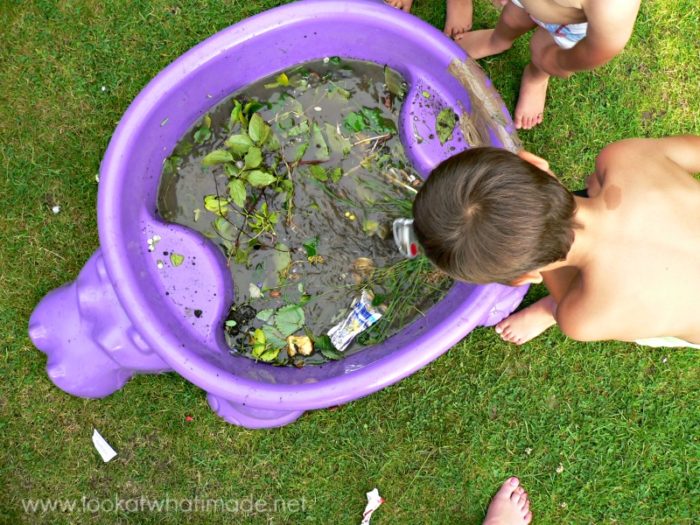
While I was doing this tutorial, the boys made some Lizard Soup. It started out as Stinky Water, then briefly changed to Perfume, before becoming Lizard Soup with which to lure lizards out of hiding. Doesn’t that look scrummy?
Katharine’s Rose Crochet Square
{Pattern © 2009 Melinda Miller. Photo tutorial done with kind permission}
Pattern
- Available as a Free Ravelry Download
- Find it on Melinda’s website, MoCrochet
Suggested Materials
- 5 mm Clover Amour Crochet Hook (US H/8 UK 6)
- Worsted weight yarn
Size
- Using the hook and yarn specified, your square should be a nice even 12″ when you are done.
- Using a 4 mm crochet hook (US G/6 UK 8) and double knit yarn, as I have done, your finished square will be about 8.5″ big.
My Yarn and Colour Choices
I am using Stylecraft Special DK.
- Saffron (Rounds 1 and 2)
- Fondant (Rounds 3 and 4)
- Pomegranate (Rounds 5 and 6)
- Lipstick (Rounds 7 and 8)
- Magenta (Rounds 9 and 10)
- Meadow (Rounds 11, 17, 18, and Optional Additonal 19)
- Sherbet (Rounds 12 – 16)
Notes
- US Crochet Terminology used. (See this comparative chart if you need help transcribing from US to UK)
- Stitch counts have not been included, so I have added them here
Special Stitches
Cable Stitch: Skip the next st. Dc in the next 3 st’s. Working in front of the 3 dc’s, yarn over and insert your hook into the skipped stitch. Pull up a loop to the height of the dc’s. (Yarn over and pull through 2 loops) twice, completing an extended (or long) dc. You can find a tutorial for the cable stitch here.
Invisible Join: Feel free to use the invisible join when changing colours at the end of a Round. Just make very sure that you understand which stitch to join to.
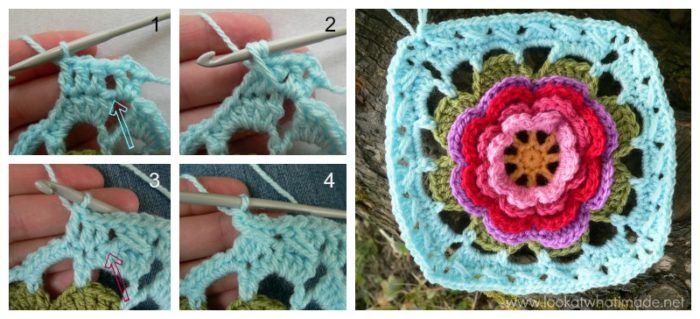
Katharine’s Rose Square Photo Tutorial
This photo-walkthrough is NOT the actual pattern and should not be used instead of the pattern, but rather in conjunction with it.
Thank you very much to Melinda Miller for giving us permission to do this photo-tutorial for her Katharine’s Rose Square. And a special thank you to Kimberly Slifer for letting me do these tutorials and for obtaining the necessary permission.
Round 1
You can start this round with a magic ring instead of the initial ch-2.
Magic Ring Instructions for Round 1
Into a magic ring: ch 1 (this does not count as a st). Sc x 8 into the ring and pull the ring tight. Join to the top of the first sc with a sl st.
If you feel like practising the invisible join I talked about last week, feel free to use it instead of the sl st join. Make sure that you understand which stitch to join to if you do use it!
If you are not familiar with working into a magic ring, this video tutorial from Moogly is clear and easy to follow.
Please remember, when working into a magic ring you HAVE to work away your initial tail very well. If you just cut it, your whole square might unravel!
Stitch count: 8 sc’s
Round 2
- If you are using the same colour, ch 5 (this counts as your first dc and ch-2 space).
- If you are using a new colour, join your yarn by making a standing double crochet in any st around. Ch 2.
(Dc in the next sc, ch 2) in each st around. Join to the third ch of the beginning ch-5 (or the top of the standing double crochet) with a sl st.
Stitch count: 8 dc’s and 8 ch-2 spaces
Round 3
- If you are using the same colour, ch 1 and sc in the next ch-2 space.
- If you are using a new colour, join with a standing single crochet in any ch-2 space around.
(3 dc, sc) in the same ch-2 space. (sc, 3 dc, sc) in each of the remaining 7 ch-2 spaces. Join to the first sc with a sl st.
Stitch count: 8 petals

Round 4
Before we get started with Rounds 4 – 11, I need to babble for a bit.
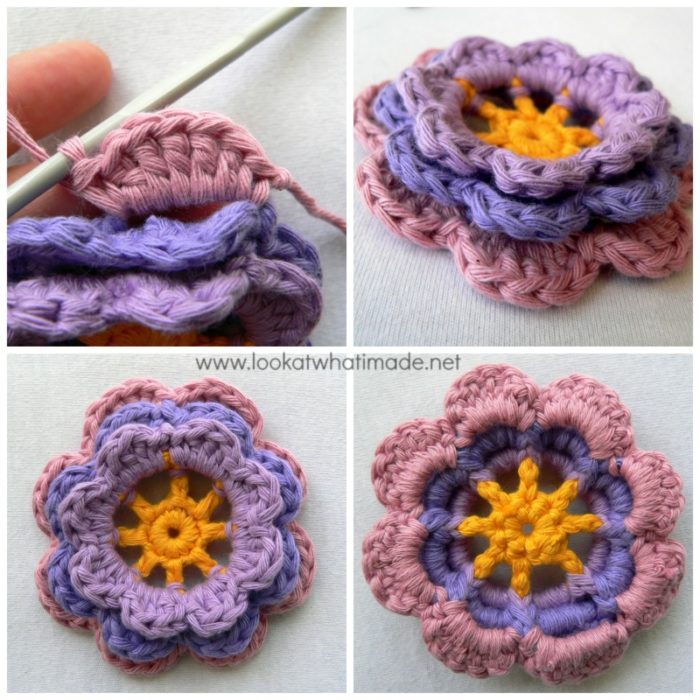
Melinda tells us to sl st between petals, but she doesn’t actually tell us where to sl st to. Initially I made my sl st’s in one of the 2 sc’s between petals, but as the pattern warns, my rose soon started “mounding”. After my third try, I gave up and decided to make my sl st’s into the posts between petals, which I will explain in just a second. The result was a rose that didn’t “mound” and kept its shape really well. The subsequent rose was also smaller than my initial effort and fit into the square better.
The photo below shows the 2 different roses on top of each other (worked up to the end of Round 7). You can see that the rose on top (Option A below) is smaller than the rose beneath it.
I will supply both sets of instructions and you can make up your own mind.
Please note that I have not altered Melinda’s pattern, I have just chosen to interpret it in a certain way.
Right, let’s get started!
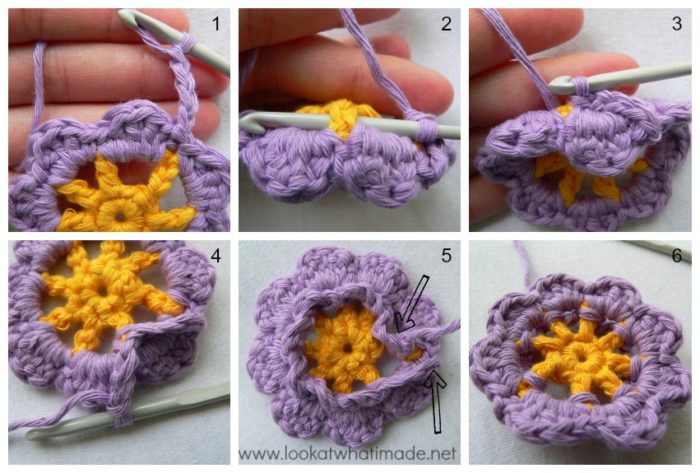
Option A (which is what I used)
- If you are using the same colour, continue as below.
- If you are using a new colour, join your yarn by making a sl st in the same st as the sl st join.
(Ch 4 and holding the petal to the front, sl st around the post of the next dc from Round 2 by inserting your hook from back to front around the dc) 8 times (Photos 1 – 5).
There will be a slight “step” between the beginning of the round (which started in the first sc of a petal) and the end of the round (which ended with a sl st around the back post of the dc) – see Photo 5. This doesn’t matter.
Option B
- If you are using the same colour, continue as below.
- If you are using a new colour, join your yarn by making a sl st into the first sc of any petal around.
(Ch 4 and sl st into the first sc of the next petal) 8 times. The last sl st should fall in the same st as the first sl st (Photos 1 – 3).
Photo 4 shows the flower at the end of Round 5 when making your sl st’s into the first sc of each petal.
In Photo 5 below you can see the “mounding”. This can be squished down by fluffing up the petals and manipulating the flower a bit (Photo 6), but it doesn’t keep its shape indefinitely.
Stitch count: 8 ch-4 spaces
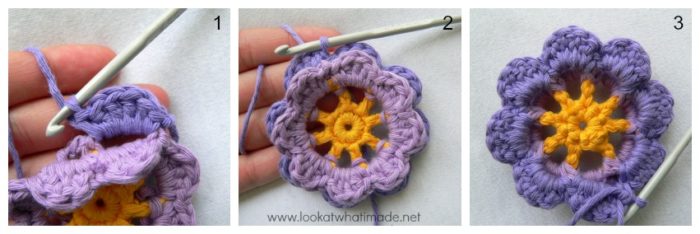
Round 5
- If you are using the same colour, sl st into the first ch-4 space. Ch 1 and sc in the same space.
- If you are using a new colour, start with a standing single crochet in any ch-4 space around.
(4 dc, sc) in the same ch-4 space – see Photo 1. (Sc, 4 dc, sc) in each of the remaining 7 ch-4 spaces (Photo 2). Join to the first sc with a sl st.
Photo 3 shows the flower from the back.
Stitch count: 8 petals
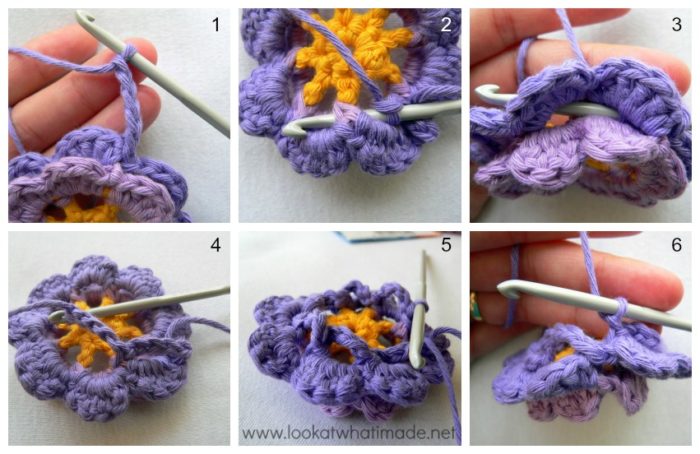
Round 6
I will continue making my sl st’s around the back posts between petals, and the instructions will reflect that. You are welcome to sl st to the first sc of each petal instead.
- If you are using the same colour, continue as below.
- If you are using a new colour, join your yarn by making a sl st in the same st as the sl st join.
(Ch 5 and holding the petal to the front, sl st around the sl st from Round 4 by inserting your hook from back to front around the sl st) 8 times.
Photos 2 and 3 show the hook inserted around the sl st from Round 4.
There will be a slight “step” between the beginning of the round (which started in the first sc of a petal) and the end of the round (which ended with a sl st around the back post of the sl st) – see Photo 6. This doesn’t matter.
Stitch count: 8 ch-5 spaces
Round 7
As written.
If you are making your sl st’s around the back posts of the sl st’s 2 rows below, this is what your flower will look like from the side, front, and back.
Stitch count: 8 petals
Round 8
As written.
Stitch counts: 8 ch-6 spaces
Round 9
As written
Stitch count: 8 petals
Round 10
As written.
Stitch count: 8 ch-7 spaces
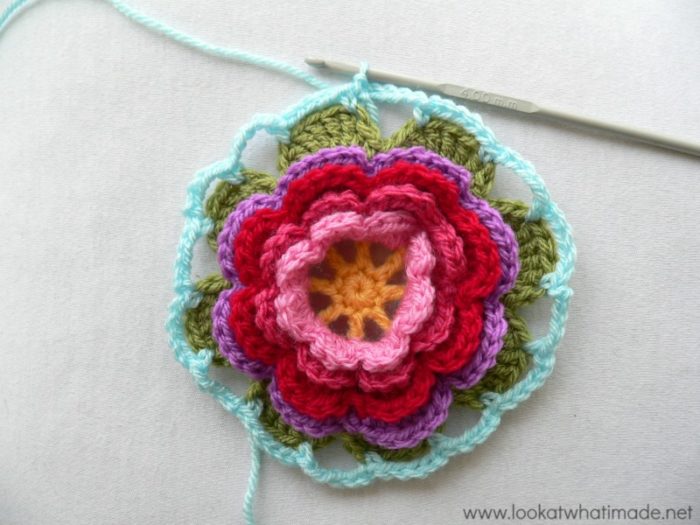
Round 11
As written.
Stitch count: 8 leaves
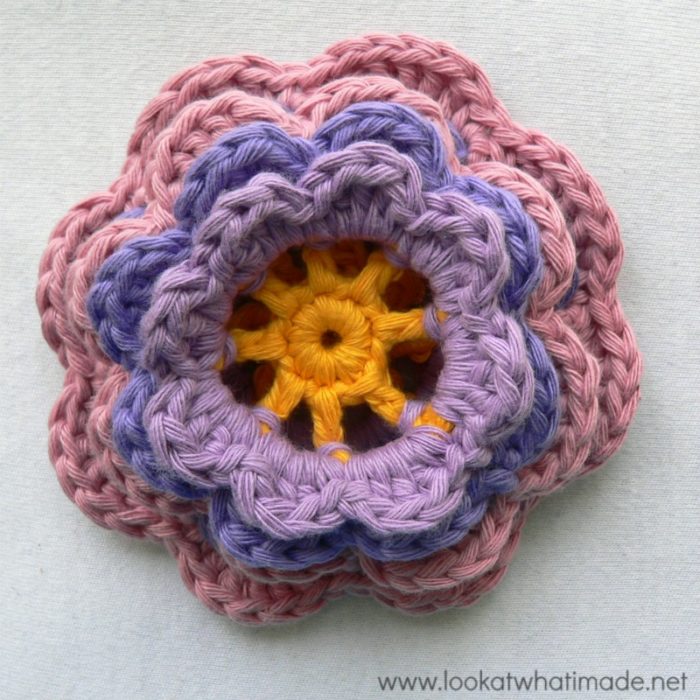
This is what the completed rose looks like at the end of Round 11. If you have sl st’d into the first sc of each petal instead, your flower will look different from the back.
Round 12
As written.
I joined my new yarn by making a standing sc in the first tr of any petal around, but that was purely for consistency. Feel free to start with a sl st as instructed.
In this round, you will only be working into the first and last tr of each petal.
Stitch count: 16 ch-5 spaces and 16 sc’s
Round 13
As written.
You should end up with 6 st’s in each ch-5 space.
Stitch counts:
- Total: 96 st’s and 4 ch-2 spaces {48 sc’s, 24 hdc’s, and 24 dc’s}
- Per Side: 24 st’s {12 sc’s, 6 hdc’s, and 6 dc’s}
Now doesn’t that look pretty?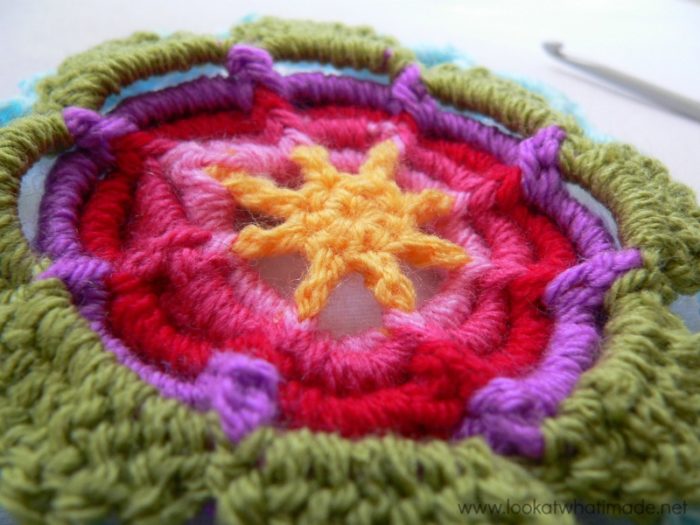
Round 14
In this Round, you will be making cable stitches.
Join your yarn by making a standing double crochet in any corner ch-2 space around. Ch 2 and dc in the same space. Skip the first (hidden) stitch. Dc in the next 3 st’s (Photo 1). Working in front of the 3 dc’s, yarn over and insert your hook into the skipped stitch. Pull up a loop to the height of the dc’s (Photo 2). (Yarn over and pull through 2 loops) twice, completing an extended (or long) dc. This is your first cable stitch made. Make 5 more cable stitches.
*(Dc, ch 2, dc) in the corner ch-2 space. Make 6 cable stitches.* Repeat from * to * 2 more times. Join to the top of the first dc with a sl st.
Photos 3 and 4 show the second cable stitch being made.
Stitch counts:
- Total: 24 cable st’s, 8 dc’s, and 4 ch-2 spaces
- Per Side: 6 cable st’s and 2 dc’s
Round 15
As written. Your cable stitches should fall over the cable stitches from the previous round.
Stitch counts:
- Total: 24 cable st’s, 16 dc’s, and 4 ch-2 spaces
- Per Side: 6 cable st’s and 4 dc’s
Round 16
As written. Your cable stitches should fall over the cable stitches from the previous round.
Stitch counts:
- Total: 24 cable st’s, 24 dc’s, and 4 ch-2 spaces
- Per Side: 6 cable st’s and 6 dc’s
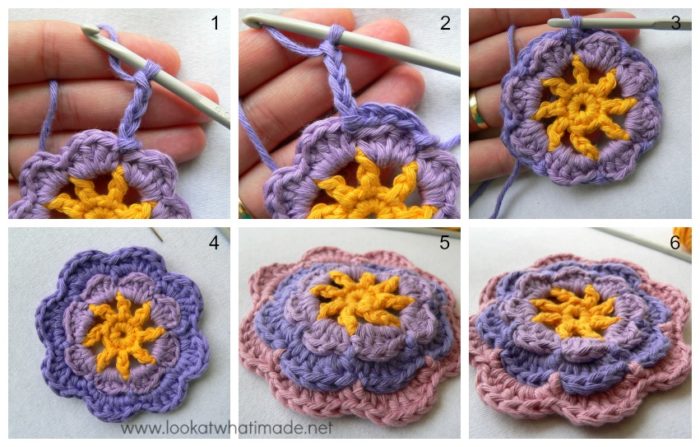
The photos below were taking on my daily commute. Isn’t the floor of the Picadilly Line Tube pretty?
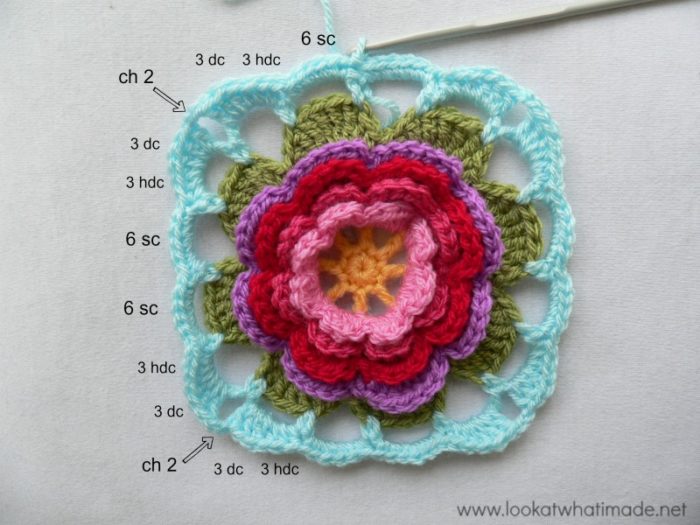
Round 17
As written.
Stitch counts:
- Total: 136 dc’s and 4 ch-2 spaces
- Per Side: 34 dc’s
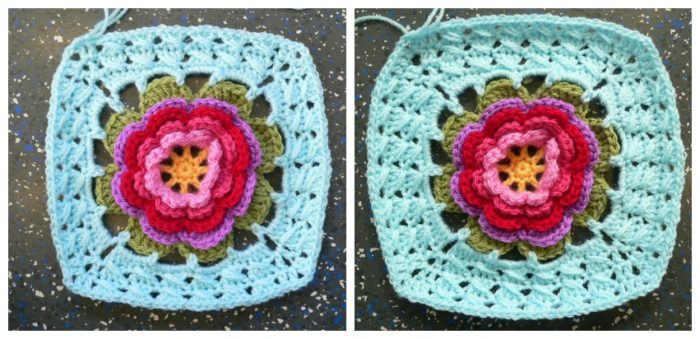
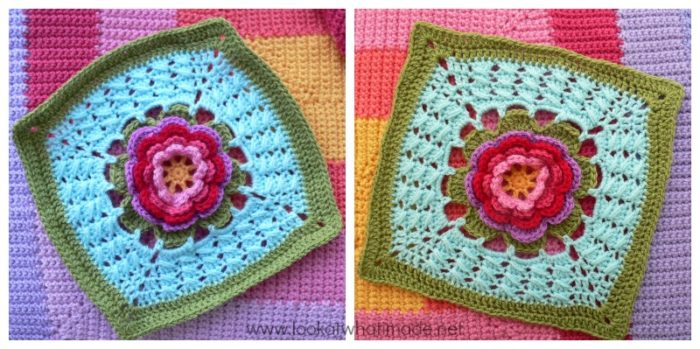
Round 18
As written. This square isn’t very square at the end of this round, even after blocking (see the photo on the left below), so I have altered the last round slightly to make it more square (see the photo on the right below).
You can find the alternative instructions for the last round, as well as the added optional Round 19 (to get the square to the same final stitch count as the others) HERE.
Stitch counts:
- Total: 152 dc’s and 4 ch-2 spaces
- Per Side: 38 dc’s
Join the Block a Week CAL
If you would like to be part of the Block a week CAL on Facebook, please join the Official CCC Social Group (you must be logged into Facebook to do so) so that you can access and utilize the support and encouragement of all the lovely ladies on there.
You can also join the Block a Week CAL Flickr Group so that you can inspire others and be inspired yourself.
For those of you who do not like Facebook, you can always follow along with me here. I will be posting the blocks every week.
Remember to subscribe to my Weekly Newsletter if you would like to be kept in the loop. You can also like my Facebook page or follow me on Bloglovin, Google+, Pinterest, Twitter, or Instagram.

More Blogs Following the CAL
- San from Loopsan – using Stylecraft in sophisticated Parchment, Denim, Mocha and Meadow
- Lou Mander from Tea, Crochet and Me – using Stylecraft in White, Mocha and Raspberry
- Wendy from Little Wendy Crochet (Dutch photo tutorials)
Happy Hooking!


Crocheter says
I found if, during the cable rounds, you replace the corner double crochet corners with trebles that the block works out perfectly square.
Paula says
Hi, Dedri! I think this block is missing whatever tag it needs to come up under the CAL category on the blog. I’ve been using the category to reference all the patterns at once, but I’m behind, so I just noticed it. :) I wasn’t sure if you knew, but thought I’d mention it. Thanks for all your coaching!
Dedri Uys says
Thank you. I will try and fix it now :)
Carrie says
I’m sure that perfume smelled lovely! So lovely the lizards just wanted to dive in! ;)
I am so far behind in the CAL it isn’t funny! Might have to make some cushions out of the squares… :( one this for sure though. I am making this block, it is BEAUTIFUL!!!
chatti says
The Ravelry link to the pattern, isn’t a link.
Dedri Uys says
Thank you, Chatti. I have fixed it now :)