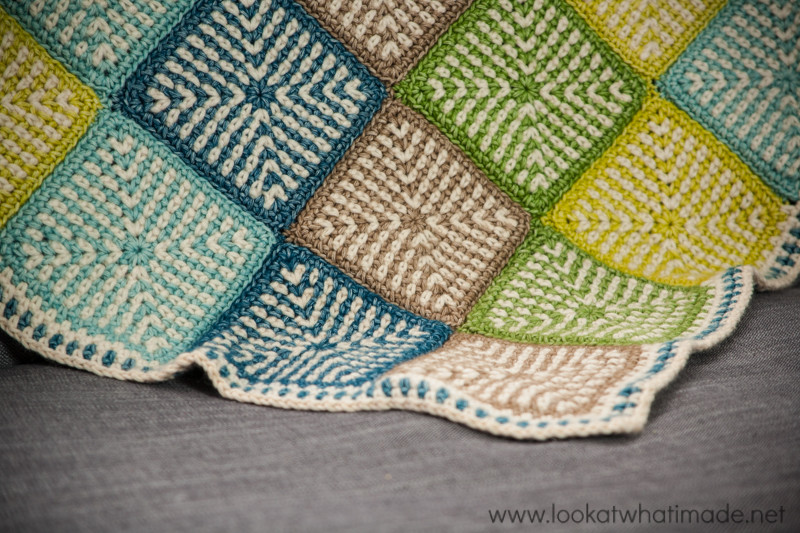
Phew! I have finally written the instructions for the Two-Colour Linen Stitch Square used in my Linen Stitch Manghan. The linen stitch has always been one of my favourite stitches, and I am very pleased to present you with this pattern. The stitch is very dense, so I will be using a much larger hook than recommended for the yarn weight.
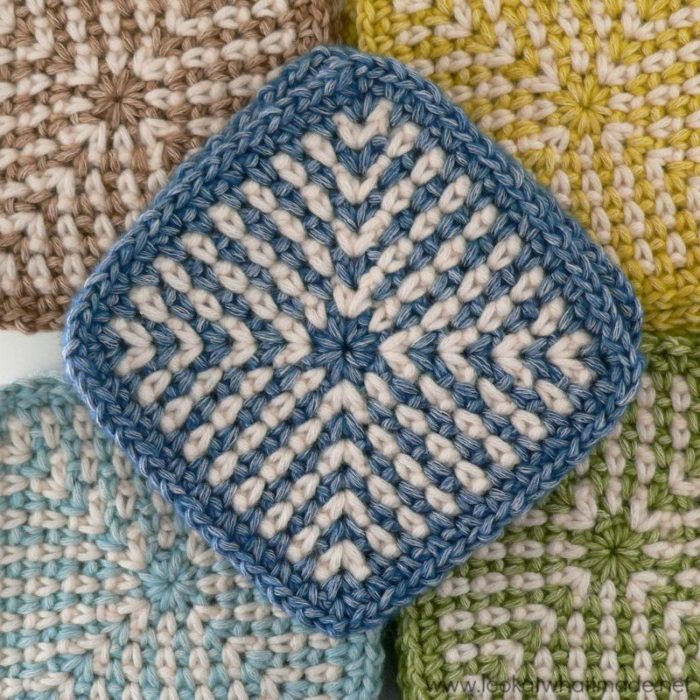
These instructions are written specifically for Linen Stitch Squares made using only 2 colours and alternating colours in every round. If you are looking for instructions on using multiple colours, or only one colour, I suggest having a look at the instructions for a Regular Linen Stitch Square.
After having made lots (and LOTS) of these squares, I hit upon a way to carry your yarn so that you would only end up with 4 tails of yarn to sew away at the end of each square.
Enjoy!
Size
15 cm (6″) blocked.
Gauge
9 Linen Stitches and 14 rows per 10 cm (4″) square.
Materials
- Worsted weight yarn in 2 colours per square – I am using Scheepjeswol Stonewashed XL in Blue Apatite and Moonstone for this tutorial.
- 8 mm Clover Amour crochet hook (US 11/L)
Abbreviations
US Terminology
- Ch – Chain
- CC – Contrasting Colour
- MC – Main Colour
- Sc – Single crochet
- Sl st – Slip stitch
- St/st’s – Stitch/stitches
- * and () – Repeat instructions between asterisks and parentheses the amount of times specified.
Special Stitches
Corner: (Sc, ch 1) twice into the ch-1 corner space.
Suggestions and Notes
- Use a piece of scrap yarn to mark the corner ch-1 spaces of your last round if you are going to have trouble identifying them later on.
- You will always work into the ch-1 spaces from the previous round, not into the single crochets. There is one exception, which will be covered in the note after Round 3.
- Rounds are joined in the first ch-1 space, not in the first single crochet, except for Round 10.
Instructions
For this pattern we will be using the Linen Stitch. Linen stitches are made by making a (sc, ch 1) into the ch-1 spaces from the previous round. If you have trouble identifying the ch-1 space, see THIS TUTORIAL.
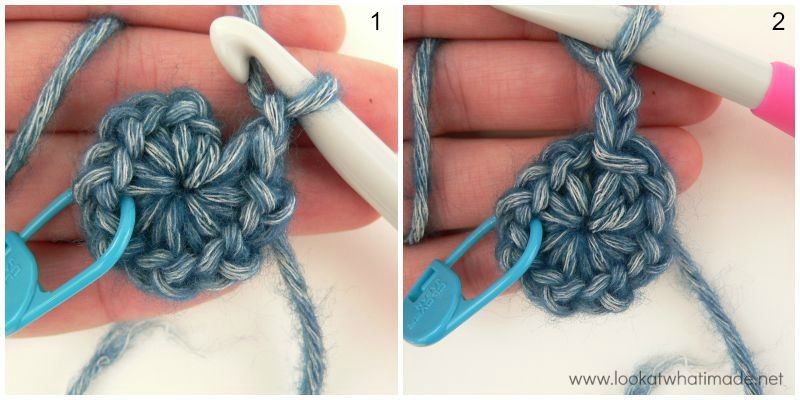
Round 1
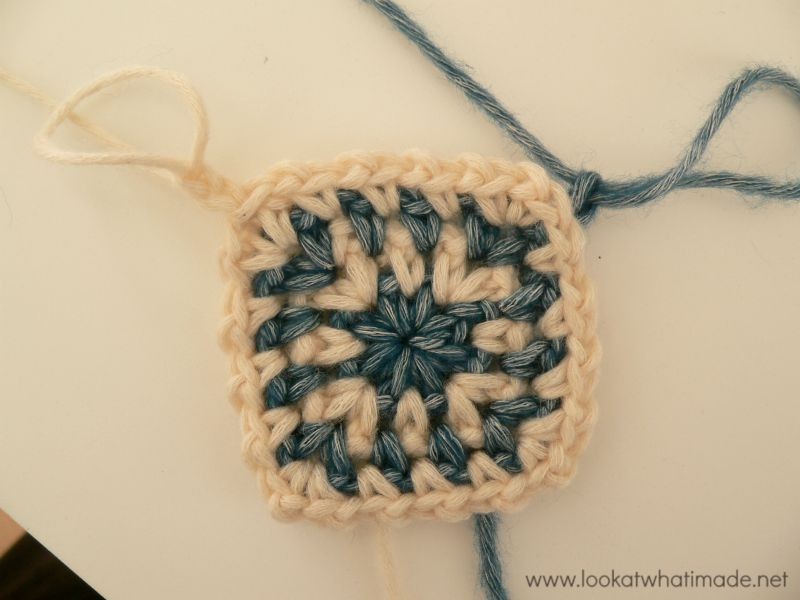
With your Contrasting Colour, make a magic ring. Ch 1 to secure the magic ring. This ch-1 does not count as a stitch/space. Into the magic ring, (sc, ch 1) eight times (Photo 1), marking the third ch-1 space with a stitch marker! Join to the first ch-1 space with a sl st. Ch 2 (Photo 2), pull up a long loop so that your work won’t unravel, and remove your hook from your yarn. {8 sc’s and 8 ch-1 spaces}
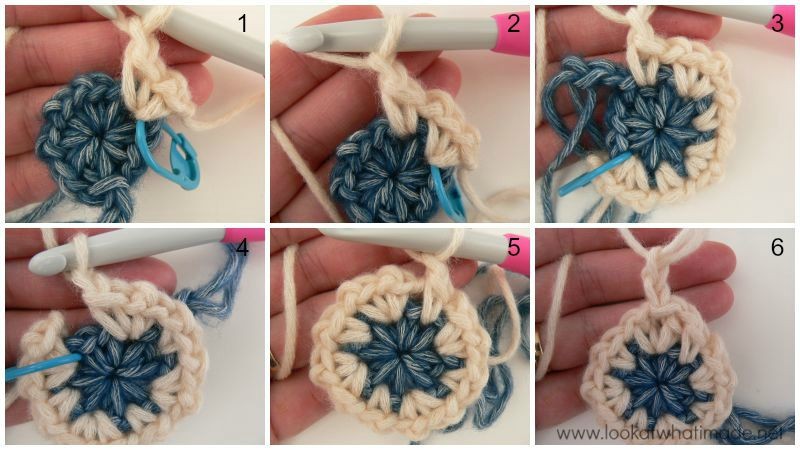
Round 2
First Side: Join your Main Colour by making a standing single crochet in the third (marked) ch-1 space of the previous round. (Ch 1, sc, ch 1) in the same ch-1 space (Photo 1). This is your first Corner made. (Sc, ch 1) in the next ch-1 space (Photo 2).
Second Side: Make a Corner in the next ch-1 space (see Corner under Special Stitches above). (Sc, ch 1) in the next ch-1 space.
Third Side: Make a Corner in the next ch-1 space. (Sc, ch 1) in the next ch-1 space (Photo 3).
Fourth Side: Keeping the CC ch-2 from Round 1 to the back of your work, make a Corner in the next ch-1 space, which already contains the sl st join from the previous round (Photo 4). (Sc, ch 1) in the last ch-1 space (Photo 5). Join to the first ch-1 space with a sl st. Ch 2, pull up a long loop, and remove your hook from your yarn (Photo 6).
{ 12 sc’s and 12 ch-1 spaces}
Round 3
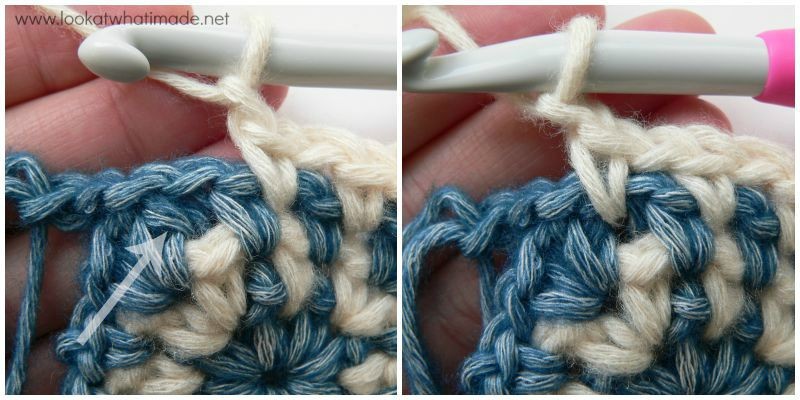
First Side: Pick up your CC yarn (Photo 1). (Sc, ch 1) twice into the next ch-1 corner space (Photo 2). This is your first Corner made. (Sc, ch 1) into each of the next two ch-1 spaces. When working into the last of the two ch-1 spaces, insert your hook through the top of the standing single crochet that started the previous round and work over the ch-1 space (Photo 3). It will make your work neater (see Notes below).
Second Side: Keeping the MC ch-2 from Round 2 to the back of your work, make a Corner in the next ch-1 corner space (Photo 4). (Sc, ch 1) into each of the next two ch-1 spaces.
Third Side: Make a Corner in the next ch-1 corner space. (Sc, ch 1) into each of the next two ch-1 spaces.
Fourth Side: Make a Corner in the next ch-1 corner space. (Sc, ch 1) into each of the next two ch-1 spaces (Photo 5). Join to the first ch-1 space with a sl st. Ch 2, pull up a long loop, and remove your hook from your yarn (Photo 6).
{16 sc’s and 16 ch-1 spaces}

Notes
These tips apply to rounds 3–9.
- When you get to the last ch-1 space before the sl st join from the previous round, you will notice that the ch-1 space is ‘filled’ by the top of the first sc from the previous round. To eliminate that ‘fullness’ and to make the corner look as much like the other corners as possible, don’t insert your hook into the ch-1 space but insert it into the top of that first sc and make your next (sc, ch 1) into it, encompassing the ch-1 space.
- When working into the ch-1 space that contains the sl st join from the previous round, make sure that you keep the ch-2 from the previous round behind your work.
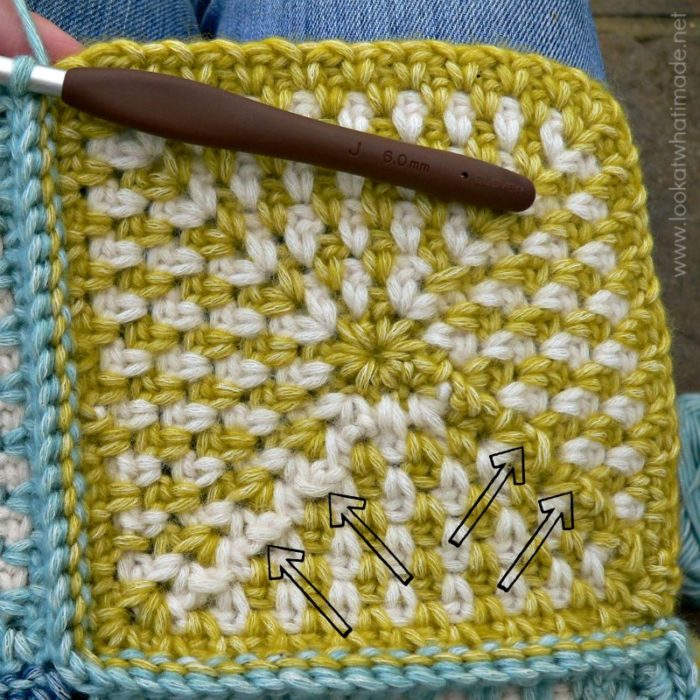
- For the remainder of the rounds, you will change colours on every round, unless otherwise stated. To change colours, you will pick up the dropped loop from two rounds down and start the round in the ch-1 corner space directly after it.
Round 4
Pick up your MC yarn. *Make a Corner in the next ch-1 corner space. (Sc, ch 1) into each of the next three ch-1 spaces.* Repeat from * to * 3 more times. Join to the first ch-1 space with a sl st. Ch 2, pull up a long loop, and remove your hook from your yarn.
{20 sc’s and 20 ch-1 spaces}
Rounds 5 – 7
Change colour. *Make a Corner in the next ch-1 corner space. (Sc, ch 1) into each of the ch-1 spaces across.* Repeat from * to * 3 more times. Join to the first ch-1 space with a sl st. Ch 2, pull up a long loop, and remove your hook from your yarn.
Stitch Counts:
- Round 5: 24 sc’s and 24 ch-1 spaces
- Round 6: 28 sc’s and 28 ch-1 spaces
- Round 7: 32 sc’s and 32 ch-1 spaces
Round 8
Change colour. *Make a Corner in the next ch-1 corner space. (Sc, ch 1) into the next seven ch-1 spaces.* Repeat from * to * 3 more times. Join to the first ch-1 space with a sl st. Ch 1 and fasten off your MC yarn.
{36 sc’s and 36 ch-1 spaces}
Round 9
Pick up your CC yarn. *Make a Corner in the next ch-1 corner space. (Sc, ch 1) into the next eight ch-1 spaces.* Repeat from * to * 3 more times. Join to the first ch-1 space with a sl st.
{40 sc’s and 40 ch-1 spaces}
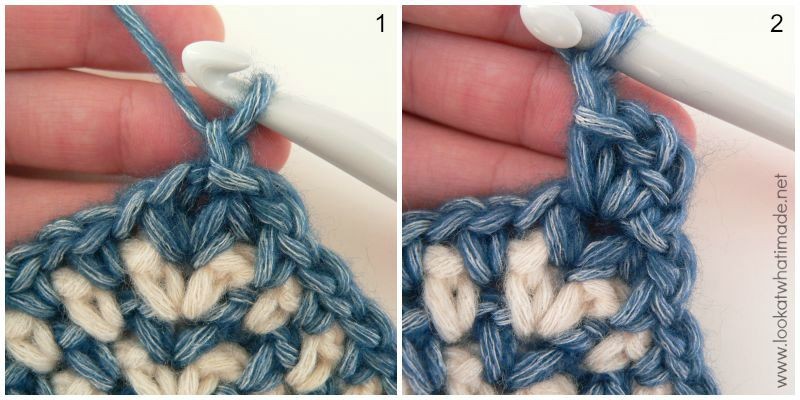
Round 10
Ch 1 (Photo 1). (Sc, ch 1) twice into the same ch-1 corner space (Photo 2). (Sc, ch 1) into the next nine ch-1 spaces. *Make a Corner. (Sc, ch 1) into the next nine ch-1 spaces.* Repeat from * to * 2 more times. Join by using the Invisible Join. Using this join will make it easier to attach your squares neatly at that point. If you are determined not to use the Invisible Join, you can join to the first sc with a sl st.
{44 sc’s and 44 ch-1 spaces}
Fasten off and work away your tails of yarn.
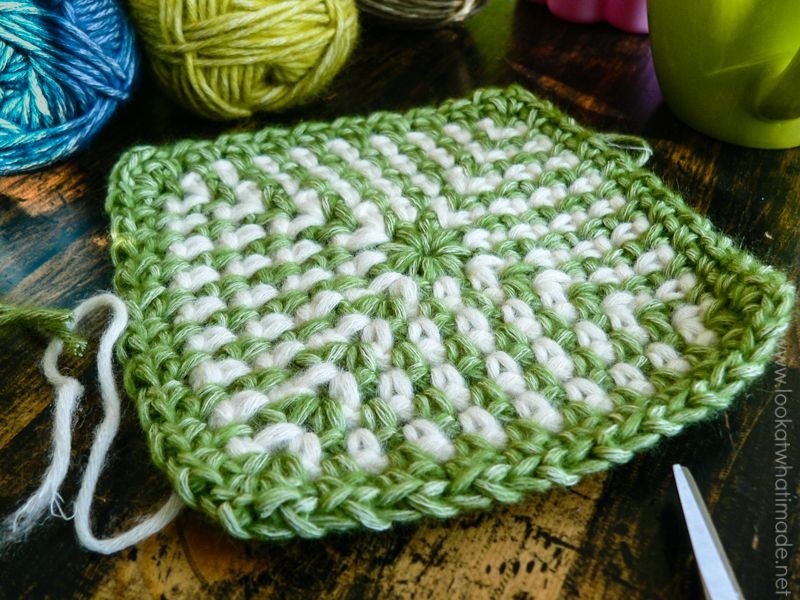
When you turn your work around, you will see that the ch-2’s used to carry your colours up your work are not very visible at all. I can guarantee you that those few ch-2’s are definitely preferable to having to work away a million tails of yarn!
If you like this pattern, please have a look at my Linen Stitch Manghan.

This blog post contains affiliate links. I only link to products I personally use or would use. All opinions are my own.


Devin says
This is a lovely pattern!
I am looking for a suitable square pattern for making a very large buffalo check blanket in wool, so I am wondering,
Using the same yarn, will this pattern and the regular linen stitch squares you have linked, work up to be close enough to the same dimensions such that they can be neatly joined together for a large blanket?
Specifically, for a buffalo check pattern, the solid squares would be done in regular linen stitch, squares and then the intersection squares with both colors, done in this two-color linen stitch. Would approximate the neat orderly weave you normally see on buffalo check compared to just pairing yarns and using one of each color.
Jenny Lowman says
Hi Devin. Dedri is busy in Oz at the moment. I would suggest maybe making a square of each to see how they turn out :)
BW ~ Jenny
Johanne says
Beautiful tutorial. It is very well laid out with very good photos. Love your tutorials Detri.
Jenny Lowman says
We are glad you are enjoying Dedri’s tutorials, Johanne :)
Louisa says
Does there happen to be a video of this anywhere?? I’m understanding, but still feel like I might be doing something wrong.
Jenny says
Hi Louisa. Jenny here.
There isn’t a video for this particular square, but there are lots of videos available to demonstrate linen stitch. What exactly are you struggling with?
Denise says
LUV this. Made my first today. I’m wondering can this successfully be a full size baby blanket in one piece?
Dedri Uys says
It can, but the motif starts twisting quite a bit after a few more rounds. I have gotten around this by turning at the start of every round.
Kaustubh Patel says
Thank you for sharing this.
Leanna says
Hi. I know how to crochet and crochet lots. I am writing to tell you that I think your tutorial is extremely thorough and well done.
Congrats!
Dedri Uys says
Thank you, Leanna :)
Rhonda Semple says
Wool Warehouse doesn’t have the colour pack for these anymore. I can buy the wool separately but I think you don’t get credit if so – is it worth your while to have a few more stocked there?
Dedri Uys says
Hi Rhonda. Occasionally they run out of packs, but they get more stock when that happens. I hope you managed to get the separate colours in the end.
Stacie says
Thank you for sharing this pattern. Your idea for “carrying” colors and avoiding lots of ends to weave in, is genius!!
Dedri Uys says
Thank you, Stacie :)
Dedri Uys says
I am a big fan of the Stonewashed XL. If there were more colours, I don’t think I would use anything else!!!
Angie says
Dedri,
Lovely pattern! nd I also learnt a new technique – increasing in the linen stitch. I’d like to ask if you could please show me how to decrease in the linen stitch too. I’m new to this stitch but love it so much!
Thank you,
Angie
Dedri Uys says
Hi Angie. Thank you. I don’t usually have a need to decrease, but the one time I did decrease, I simply skipped the ch between 2 sc’s, so in the next round there wouldn’t be a ch-1 to work into, effectively decreasing by 1 linen stitch. You would simply skip both sc’s the same way you usually skip the other sc’s. I hope that helps, it’s a bit hard to explain what I mean.
Example: Normal: (ch 1, sc) into each ch-1 space. Decrease: (Ch 1, sc) in the next ch-1 space. Sc in the next ch-1 space.
Cindy says
What a gorgeous square! I just love the look of the two colors worked throughout the square. I have bookmarked this and really want to try crocheting it soon.
Jill says
Round 9 ends with a sl st and Round 10 begins with a sl st. In the photo following Round 10 I only see one sl st. I can’t believe this is an error (your instructions are always impeccable!!), but I can’t figure out how to place these two sl sts. Can you please help?!
Dedri Uys says
It was an oversight. Thank you for pointing that out, Jill.
Dee says
This pattern is so unique! Thank you for sharing it. I will make this for my oldest grandson for Christmas, but will use only the blue squares alternating with pure white squares. I know it will be beautiful. Yours is my favorite website of all the crochet websites on the internet. It is always pure joy to see what you are making.
Dedri Uys says
Thank you very much, Dee. I would love to see your blanket when it is done :)
peg niland says
Dedri, Please explain the “Magic Ring” Thank You, Peg
Jenny says
Magic ring tutorial
Here you go Peg :)
Keilah says
What a clever use of the two-color linen stitch! Those squares are awesome.
Paula says
What a beautiful blanket. Doesn’t look too difficult, I may try this for baby shower gift.
Thanks for sharing
Therese says
Dedri,
First, thank you for such a concise and we’ll written BEAUTIFUL pattern. I can hardly wait to pick out my colors and make one. Second, thank you for offering the pattern in a PDF.
Makes it so much easier for me using a tablet.
You do beautiful work, and I appreciate your thoroughness and willingness to share!
Dennis says
I love the square here. I found a little tweak if you’d like to try it out to see if it works better and looks neater. Instead of chaining two at the end of a round… Just pull up a loop like you do normally in your pattern. Then, after crocheting a round on top of the previous, when you reach the end, fasten off by slip stitching into the first crochet of the round. Make sure when you reach the long loop of the previous round that you do not crochet over the connected end of the yarn. You will need to capture both the loop and the loose end in one stitch worked around them with them both on the underside. Then, when you start your next round you insert your hook in between the front and back loop and grab the loop and pull it through then tighten it down and grab the loose end connected to the yarn ball and slip it up on top of the work. It will leave a bit of a flaw looking thing on the underside but not bad at all and no big bulky runners running all the way to the end. Give it a try and let me know if you have any questions or want a set of pics. It looks good on mine!!
Nanda says
This is a wonderful blanket! It looks hard to do but after ready the instructions it looks much easier! This blanket is put on my list. How many balls did you use for each colour?
Jenny says
Nanda, have a look at the manghan pattern to give you an idea :) Linen Stitch Manghan Pattern
Maggie Lewin says
Thank you yet again Dedri – I love it – perfect for my husband in West Ham Football team colours – claret and blue. Looks like it will be really warm too.