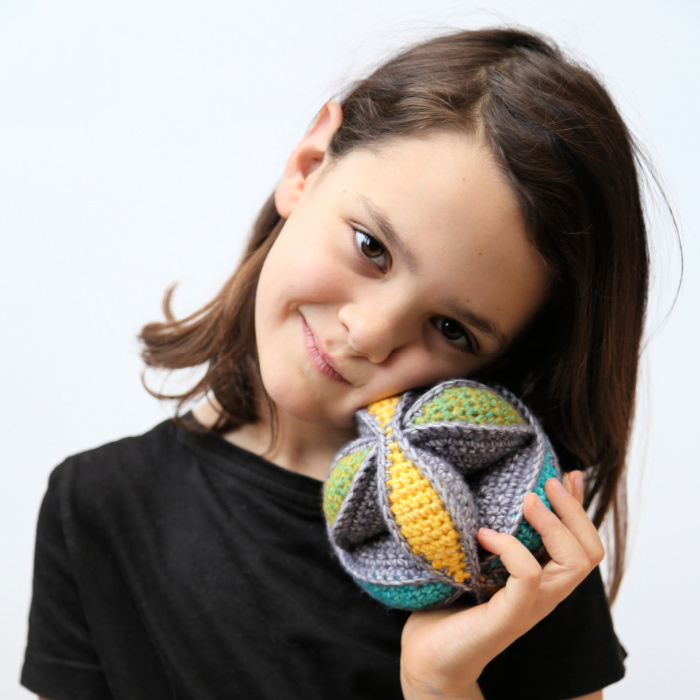
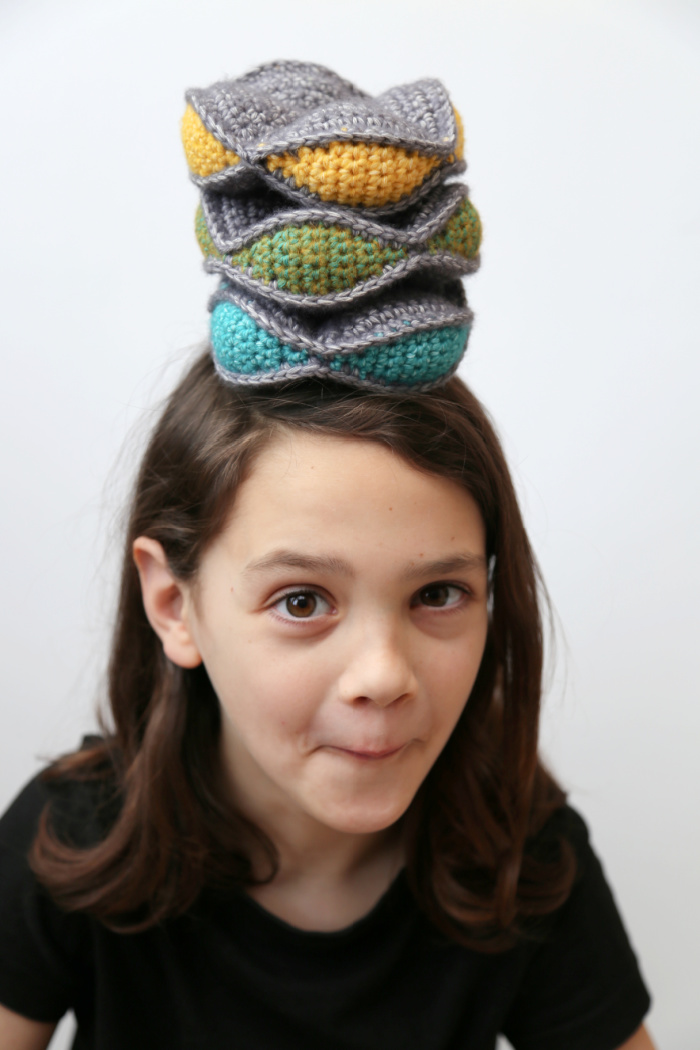
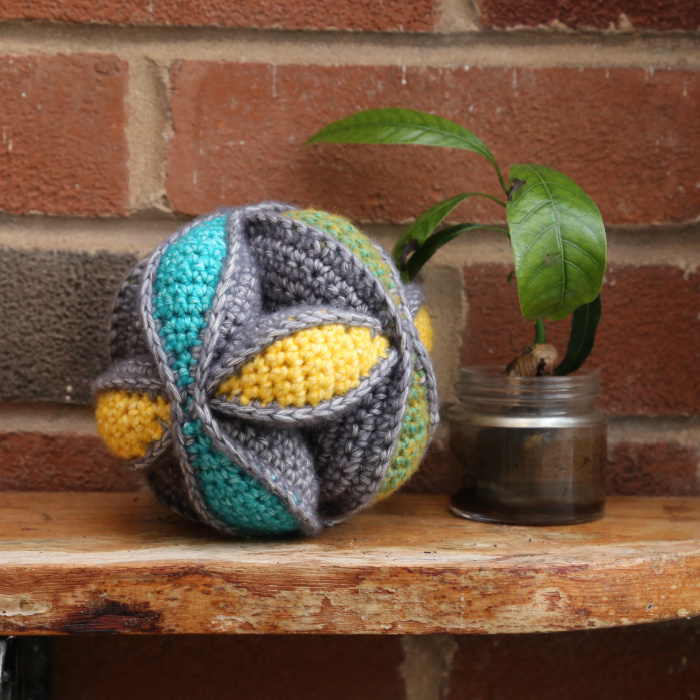
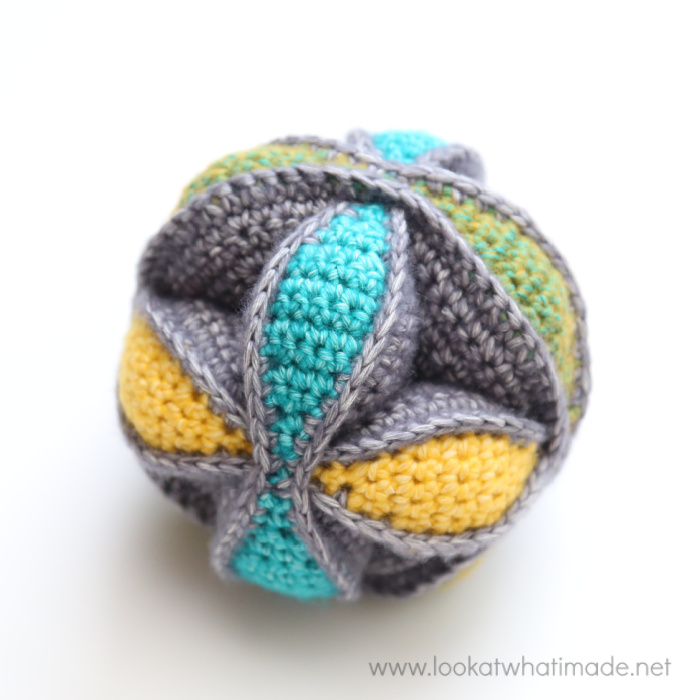
Let me introduce you to my Crochet Amish Puzzle Ball. I can hype it up and tell you that your kids will have endless hours of fun playing with this puzzle ball, but the truth is that I have a lot more fun with this puzzle ball than my kids do (although they DO love it). The minute someone walks into my house I practically force it on them! And what fun it is watching people try to assemble it. Of course, it only takes them a little while to figure it out because it IS pretty simple.
Update January 2022: I have updated the pattern for the puzzle ball. The pattern remains the same*, just easier to follow and with better photos.
*I have changed the recommended hook from a 4mm to a 4.5mm, and I have changed the recommended yarn from a double-knit to a worsted weight.
I designed this ball in 2011 and shared it in 2012 when the little mister above was not even a year old.
Ten years later, my boys still LOVE playing with their original (pink) ball.
Ten years later, I am still as passionate as ever about sharing patterns in a way that makes them as easy as possible (within my means) to follow.
What a wonderful decade this has been!

This Amish Puzzle Ball comes apart into three segments which have to be assembled to form the ball.
The chunky design means that it is super easy for little hands to grab hold of. And the million colour possibilities make it a treat for little eyes and inquisitive minds.
Bonus: If you are at all concerned about the apparent amount of sewing involved, let me put your mind at ease. All the segments are crocheted together at the end, and the ends are enclosed INSIDE the ball (if you follow my advice), leaving you with 3 tiny ends to sew away. That’s right! Three itty bitty bouts of sewing. I think that’s pretty awesome!
Thank you, Tannie Esther, for sending me the link to the fabric Amish puzzle ball and starting me on this journey!
Crochet Amish Puzzle Ball Pattern
Dedri Uys ©2011. Updated 2022. Charts by Masako Kawahara. All Rights Reserved.
Resources
- Add This Pattern to your Ravelry Queue
- Hashtag: Please use #amishpuzzleball so that we can see your photos.
- Video Tutorial by Elizzza from www.knitaholics.com:
- Part 1
- Part 2
- Part 3
- Please note that Elizzza turns her wedges inside out before attaching them to the lids. I prefer not to turn them inside out. Keeping the seam on the outside makes it easier to attach the wedges to the lids AND it helps the wedges interlock slightly better when the ball is assembled.
- Translations (Original):
- Danish Translation by Marianne Topping from Tulle Momsemor
- Dutch Translation by the ‘Haak Met Ons Mee’ Facebook Group.
- French Translation by Olivia from Chez Olivia
- German Translation Maja Heidingsfelder
- Italian Translation by Elisa Aliforni
- Japanese Translation by Masako Kawahara from Crochet Hmmm
- Polish Translation by Aga Ta
- Russian Translation by Olga Morkova
- Slovak Translation by Andrea Laca
- Spanish Translation by Ana from Hasta el Monyo
- Swedish Translation by Sofia from Fittforcefive
If you prefer a formatted ad-free US PDF version of this pattern (both Photo Tutorial with Charts and Written-only), you can buy it in my Ravelry Store HERE or in my Etsy Shop HERE.
Difficulty
Intermediate
Materials
- 4.5mm hook
- Scissors
- Yarn Needle
- Fiberfill stuffing
- Scheepjes Stonewashed XL (50g/75m, 70% Cotton/30% Acrylic)
- Colour 1: Smokey Quartz (842) x 2 balls
- Colour 2: Turquoise (864) x 1 ball
- Colour 3: Beryl (873) x 1 ball
- Scheepjes Riverwashed XL (50g/75m, 70% Cotton/30% Acrylic)
- Colour 4: Amazon (991) x 1 ball
Useful Information
I used:
- 70.5g of yarn for 12 wedges
- 8g of yarn for each ‘chain of lids’
- 14g for joining
- 50g of stuffing
Size
15 cm (6″) in diameter
Gauge
It is important that you work as tight as you can so that your stuffing doesn’t show through your stitches.
Abbreviations
US Terminology used.
- Ch – Chain
- Sc – Single Crochet
- Sc2tog – Single crochet two together
- Sl st – Slip Stitch
- St/sts – Stitch/stitches
- () – Repeat all instructions between parentheses the number of times specified.
Notes
- The initial ch st in each row does not count as a st.
- Ensure that you stuff the segments very well (more than you think you need to) – see Tips at the end of the pattern.
Instructions
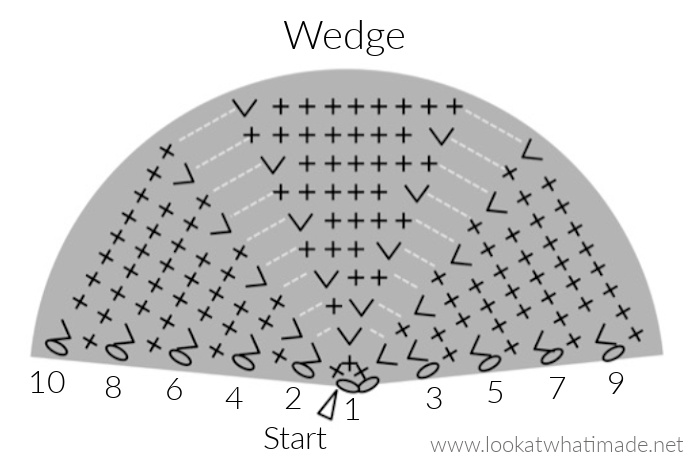
Wedges
(Make 12 in Colour 1)
These wedges are worked in rows and joined with a seam. If you would rather make seamless (spiral) wedges, see the Instructions for the Star Ball.
Row 1: Ch 2, make 3 sc in the second ch from the hook, turn. (3)
Row 2: Ch 1, 2 sc in each st, turn. (6)
Row 3: Ch 1, (2 sc in next st, sc in next st) 3 times, turn. (9)
Row 4: Ch 1, (2 sc in next st, sc in next 2 sts) 3 times, turn. (12)
Row 5: Ch 1, (2 sc in next st, sc in next 3 sts) 3 times, turn. (15)
Row 6: Ch 1, (2 sc in next st, sc in next 4 sts) 3 times, turn. (18)
Row 7: Ch 1, (2 sc in next st, sc in next 5 sts) 3 times, turn. (21)
Row 8: Ch 1, (2 sc in next st, sc in next 6 sts) 3 times, turn. (24)
Row 9: Ch 1, (2 sc in next st, sc in next 7 sts) 3 times, turn. (27)
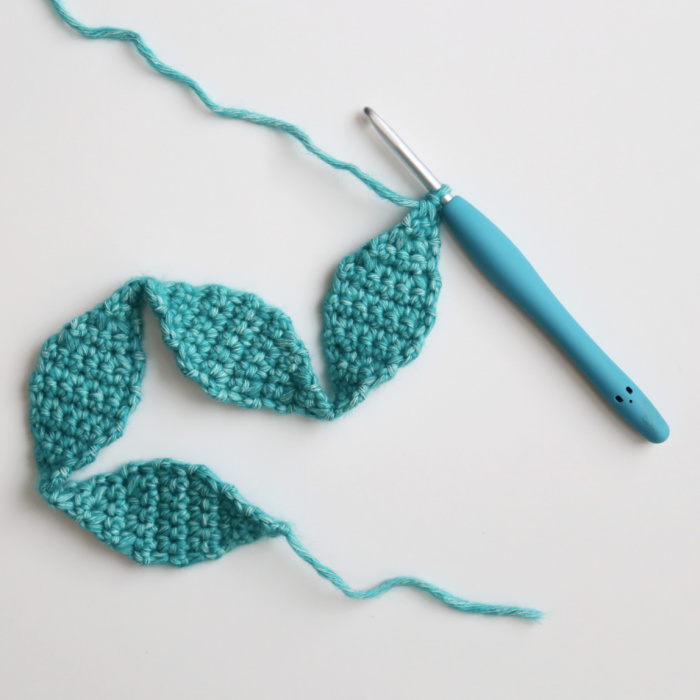
Row 10: Ch 1, (2 sc in next st, sc in next 8 sts) 3 times, ch 1, do not turn {Photo 1}. (30)
Fold the half-circle in half so that the end containing the hook is closest to you {Photo 2}. Insert your hook into the first row down the side of the resulting wedge (through both layers – see Photo 3) and make a sc. Make 8 more sc, working into each row down the side and through both layers. Remember to put your initial yarn end INSIDE the wedge before closing it completely. When you get to the end, ch 1 and fasten off {Photo 4}.
To eliminate the final yarn end, insert your hook into one of the stitches at the pointy end of the wedge (from the inside of the wedge to the outside – see Photo 5) and pull the end through to the inside of the wedge {Photo 6}.
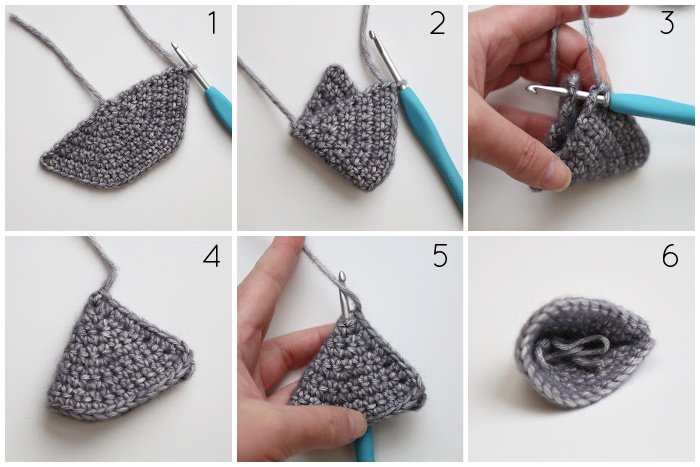
If you want to, you can turn the resulting wedge inside-out so that you don’t end up with a seam. I personally prefer (and recommend) the seam as it helps the Puzzle Ball to interlock better when assembled.
Chain of “lids”
(Make 3 – one in each of Colours 2, 3, and 4)
Row 1: Ch 2, make 2 sc in the second ch from the hook, turn. (2)
Row 2: Ch 1, sc in each st, turn. (2)
Row 3: Ch 1, 2 sc in each st, turn. (4)
Row 4: Ch 1, sc in each st, turn. (4)
Row 5: Ch 1, 2 sc in the first st, sc in next 2 sts, 2 sc in the last st, turn. (6)
Row 6: Ch 1, sc in each st, turn. (6)
Rows 7-9: As Row 6.
Row 10: Ch 1, sc2tog, sc in next 2 sts, sc2tog, turn. (4)
Row 11: Ch 1, sc in each st, turn. (4)
Row 12: Ch 1, sc2tog twice, turn. (2)
Row 13: Ch 1, sc in each st, turn. (2)
Row 14: Ch 1, sc2tog, don’t fasten off!
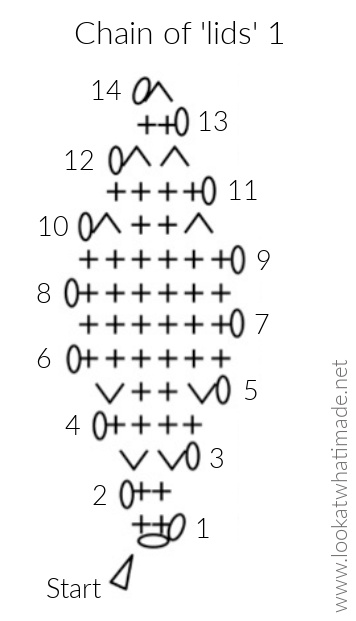
Repeat rows 1 – 14 THREE more times. This will give you a chain of 4 “lids”.
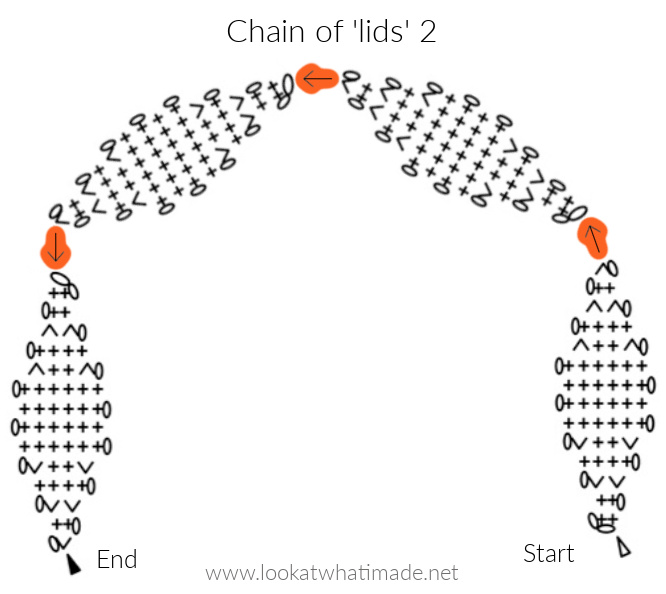
On the very last “lid” of the chain, ch 1 and fasten off.
Hint: If you are going to use the “lid” colour (so the same colour) to attach the wedges to the lids, don’t fasten off. Just continue with the assembly instructions below.
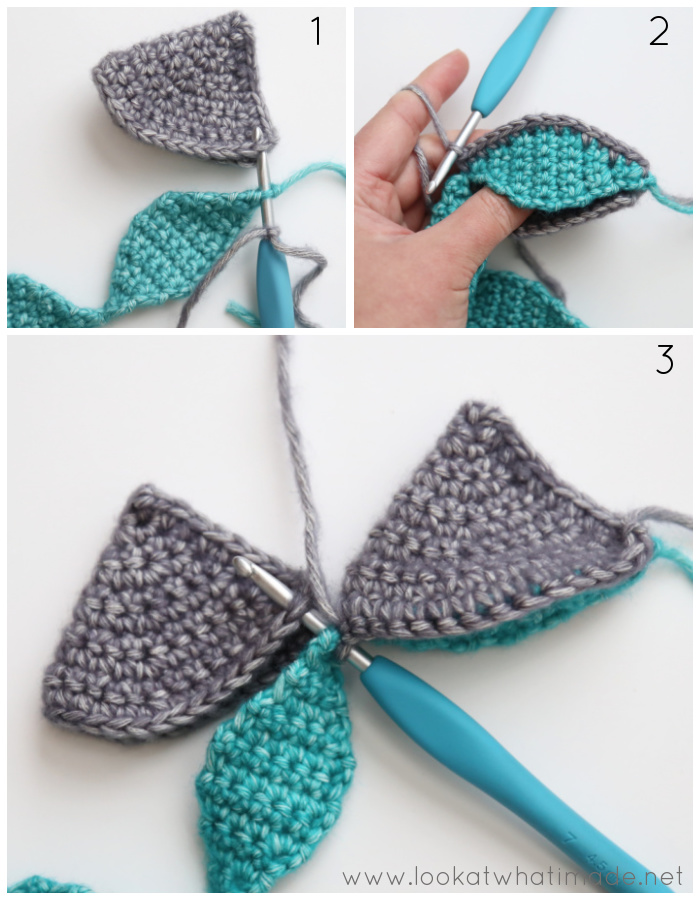
Assembling the segments

You will be attaching 4 wedges to each chain of lids, working up the chain of lids on one side and then down the other side, stuffing as you go. You will be working into each st of the wedge opening and each row of the chain of lids.
See Tips below if you are unsure about the placement of the stitches in the rows of the lids.
With a Colour 1 slip knot already on your hook, place your first
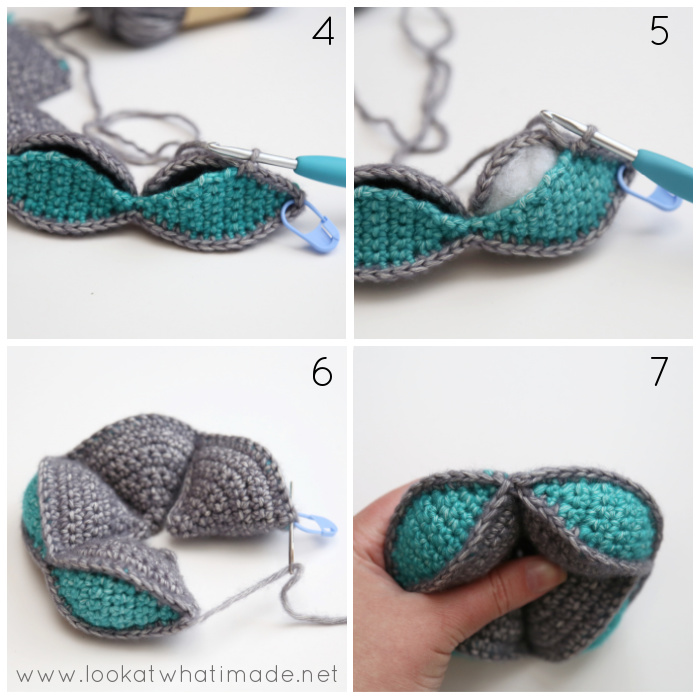
wedge behind the first lid on the right (with the sc seam of the wedge to your right – left, if you are left-handed) and insert your crochet hook through the first st of the chain of “lids” and the first st of the opening of one of the wedges {Photo 1}. Make a sc through both layers. Make 14 more sc, working into each row of the lid and each stitch of the wedge {Photo 2}.
Join the next wedge to its lid in the same way {Photo 3} and continue until you have attached one side of each of the 4 wedges and lids. You may wish to mark the last sc with a stitch marker so that you can find it easily when sewing the ends of the segment together.
Now you will be “closing” the wedges. Insert your hook into the same (last) st of the fourth lid and the next st of the fourth wedge and make a sc. Continue working through both layers as before, making 15 sc along the other side of each wedge and lid {Photo 4}, and stuffing as you go {Photo 5}.
When you reach the last st of the first wedge, join to the first st with a sl st and fasten off, leaving a 10cm/4” end. Use the end to sew the tips of the first and last wedges together thoroughly {Photo 6}.
Alternatively, you can sl st them together before fastening off, which is what I prefer. To do that, simply sl st in sts 16 and 15 of the sts around the top of the 4th wedge (in that order), so the stitches at the pointy end, and then sl st in the first and second sts of the first wedge. Fasten off and work away your ends.
You have now completed one segment.
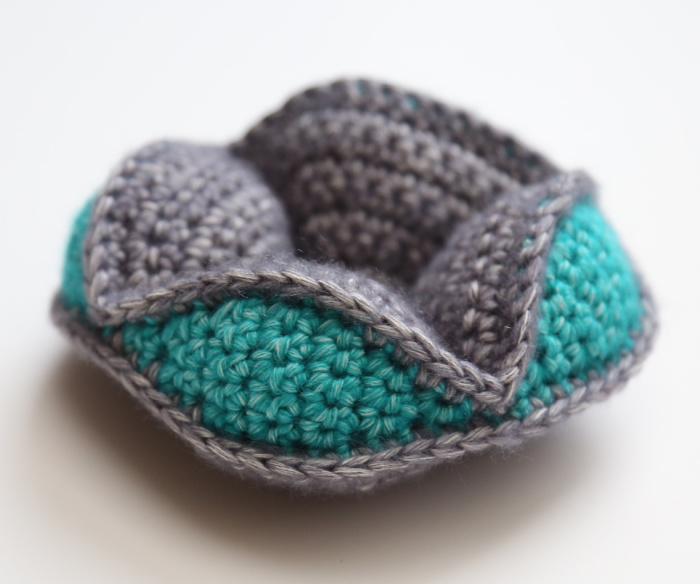
Repeat for the remaining 2 segments.
Tips
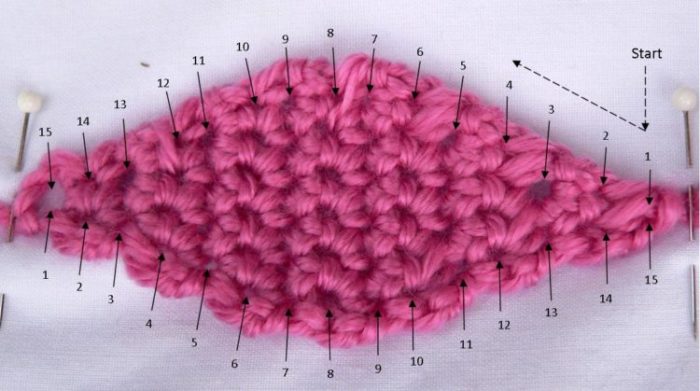
Having Trouble Lining up the Lids and Wedges?
Although the lids only have 14 rows, there are 15 “holes” along the side of each lid. This is because the ch st you work the first row into also forms a hole. So, in essence, you are working into that ch st and then into each of the 14 rows. I have included a numbered photo below to help explain this. It is numbered starting from the sc2tog of Row 14, where you will start attaching the lid to its wedge, to the initial ch st of Row 1, and then back again around the bottom of the lid. I hope this eliminates a few questions.
A word about Stuffing
This ball EATS stuffing! I have noticed that people tend to think they have overstuffed the ball because the wedges are quite fat and the segments are super snug. The ball will stretch over time, and to get the best results you want to stuff it nice and full! If you use too little stuffing, the segments won’t interlock well and the ball is more likely to become lifeless after a lot of playing. If your tension is a bit loose and you find your stuffing poking through your stitches, you may find this Stuffing Bomb Tutorial useful.
Building your Amish Puzzle Ball
When your segments are all nicely stuffed and neatly finished off, slip one segment over the other segment so that they form a cross.
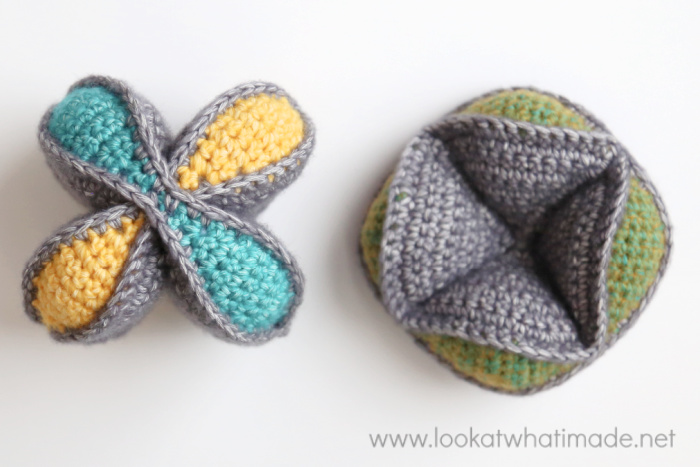
Slip the third segment over both of these segments, slotting the wedges into the holes around the side of the cross. If you need more help, you can watch THIS YouTube Clip.
Related Free Crochet Patterns
- Crochet Flower Puzzle Ball
- Olive the Crochet Octopus Puzzle
- Pumpkin Segment Ball
- Mini Amish Puzzle Ball
- Star Ball
- Harlequin Puzzle Ball by Projectarian
Related Book

FAQ’s
Q: Can you work the wedges in a spiral instead of in rows and thus avoid the seam?
A: Yes, you can. But again, the seam helps the wedges interlock slightly better when the ball is assembled. You can find a pattern for seamless wedges HERE.
Q: How much should I stuff the wedges/ball?
A: You need to stuff it enough so that the wedges bulge slightly, but not so much that the stitches stretch and become “holey”. It doesn’t matter if your 3 segments seem quite snug. In fact, you want them to be quite snug. After a while, the segments will relax and if you haven’t stuffed your ball enough, it will become limp and lifeless.
Q: Help! My lids are too small for my wedges!
All yarns are NOT created equal. So if you are going to use scrap yarn for your ball, or even if you use two different types of yarn, there is going to be a variation in your gauge. When using different types of yarn (even if they appear to be the same thickness), make sure that the yarn you use for your lids is as thick as the yarn you use for the wedges. The yarn you use for the lids can even be a little bit thicker than the yarn you use for the wedges – within reason. The wedges are more elastic than the lids.
If you have any other questions, please feel free to contact me and I will try my best to answer them to your satisfaction.

This blog post contains affiliate links. I only link to products I personally use or would use. All opinions are my own.


Himaja Wijenayake says
Hi, I’m trying to purchase your fish amamani pattern via ravelryto make for my niece’s birthday but PayPal won’t accept my card. Is there any other way I can purchase the pattern? I’m in a rush and a panic here
Much love for all your designs!
Jenny Lowman says
Hi Himaja. You can pay by PayPal or by credit or debit card on Ravelry. The option to pay by card appears under the pay by PayPal tab on the payment option in the basket.
Carlin says
Translate in Dutch please
Jenny Lowman says
Hi Carlin. There are no plans for a Dutch translation yet. Keep watching the Socials for any updates, as I know Michael is translating several of Dedri’s patterns for her at the moment :)
J
Sabine says
Hi!
I was wondering if you used scheepjes stone washed or scheepjes stone washed XL?
Stone washed have a recommended hook size of 3-3.5 mm and Stone washed xl have 5.00 mm.
I am wondering so I know if im goin down a hook size or up.
Looks like a very fun pattern, cant wait to try it!
Sincerly Sabine
Jenny Lowman says
Hi! Dedri used Stone washed in the revised 2022 pattern.
Alicia says
You should use the XL. The pattern says use the Stonewashed but call for Scheepjes Stonewashed (50g/75m, 70% Cotton/30% Acrylic). 50g/75m is the XL the stonewash is 50g/130m and is 78% cotton and 22% Acrylic and with a 4.5mm hook it leaves lots of holes. I recommend the XL
Daniela says
What is your recommendation for yarn substitutions? i have a big stash of a worsted weight vs the fine/sports you are recommending and wondering if i could use it
Jenny Lowman says
There’s no reason why you can’t use worsted yarn, Daniela.
Rinou says
Hello,
Have you a translation in Frensh ? Thank you.
Rinou
Jenny Lowman says
No translations are available or being worked on at this time, I am afraid. Sorry for the inconvenience.
Elodie says
https://olivialebeon.wordpress.com/2015/09/14/balle-montessori-au-crochet-traduction-francais/
:)
Judy says
I really enjoyed making this for my granddaughter. And now that I know what I’m doing, I think I will make another and make it a little smaller.
The directions and the photos were so clear and easy to follow.
Thank you!
Jenny Lowman says
We see lots of puzzle balls in your future, Judy :)
Jane says
Thank you for sharing! It’s hard for me to follow most patterns but, not yours. Written and photos are so easy to understand. I made 2, one with a G hook and another with an H hook. Definitely will be making more for gifts. Thank you again
Jenny Lowman says
Dedri has a real gift for writing beautiful patterns :)
Mariapia says
Grazie mille per questo tutorial. Davvero utile. Baci
Donna says
Hi Dedri,
I hope this finds you well.
Regarding the yarn. I just finished two baby blankets. The label on the skein doesn’t mention worsted weight. The only thing specified is US 6 = 5 1/2 STS/IN.
I really want to use this yarn to make your puzzle ball. I know that you recommend worsted weight. If I use the yarn that I have, will the ball be not as good?
Jenny Lowman says
Hi Donna,
If you use thinner than worstead weight yarn, you will simply find that the ball will be smaller in dimension than Dedri’s original design.
BW
Jenny
Amanda says
First thing I’ve crocheted that is stuffed, that came out looking somewhat like the pic. I am pleased with the pattern and how easy it was to follow.
Sarah says
Do you have a pattern available for that lovely sweater the baby in the pictures is wearing?
Dedri Uys says
Hi Sarah,
I don’t sorry!
Delina Warr says
I’m thinking of signing up for Christmas craft fair this and I wanted to add this in my shop as a gift for babies because I really like this project. I was wondering if I could my the item and sell what I made but the pattern would be linked to u. If there are any conditions to selling the items I would really like to know. Thanks and God bless.
Dedri Uys says
Hi Delina (my aunty’s name). You are welcome to make and sell as many as you can.
Dedri
Marcia says
Wonderfull! I Loved so much!
Michelle says
I stuffed mine with batting, I pulled a piece off and folded it into a little fat triangle. Sc edging around the whole lid part first really makes stuffing and closing easier too!
JeddahLina says
I used cotton batting for mine too! Also, I used 100% cotton worsted yard , I Love Cotton from Hobby Lobby to be exact and it came out fine.
Overall, I’m pleased with the project but it did take longer to make than I previously thought. Using polyfill probably takes less time to fill. Because the batting took time to cut and fold just right to fit.
Does anyone know of a fluffy cotton that can be used for stuffing?
Thank you for the pattern Dedri. Happy crocheting!
Jenny Lowman says
A company in the U.K. called Hooked Yarn make a recycled fluffy cotton filling
Link here
They do it in dark grey too.
Bailey says
Love it! I had so much fun choosing colors – I went with light blue lids, and alternating white and light gray centers. I also found that doing a sc border in my attachment color before joining lids to wedges made it much easier and made the outline clearer! Can’t wait to work up lots of different colors for my nephew.
Dedri Uys says
That’s a great tip :) I might try that :)
Tura Street says
This was amazing. I had so much fun making it. This is a gift for a friend of mine, and I hope that she enjoys. Thank you so much for this amazing pattern.
Laura says
Just finished my first one and it looks super. You’re right – the adults are having as much fun as the kids.
I slightly changed something on the lids. When doing the ch2 to start #2, 3, & 4, I went in to the second chain but also picked up a loop from the last sc2tog, like when closing a picot. I found it provided a sturdier connection.
Thank you for the pattern!
Dedri Uys says
Hi Laura. Did doing it this way still leave you with 15 ‘holes’ to work into when joining the lids to the wedges?
Michele Kalauokalani says
I had a blast making this, made 2, one for my daughter and granddaughter. They enjoy throwing it back and forth, but taking them apart and attempting to put them back together proved frustrating and a little exciting, thank you;)
Would it be alright if I made some to sell at my childrens school Christmas fair. Of course all attributes to you will be mentioned, along with your link to your patterns.
This is the 1st time I’ve come across this puzzle ball. The closest I’ve come across to something remotely resembling this, was the Rubiks Snake- where you manipulate it into a ball, do you remember…
Dedri Uys says
Hi Michele. You are welcome to make and sell as many as you want. Thank you for asking :)
Rachael says
I really loved this pattern and it was easy to follow! Great project for scrap yarn!
Dedri Uys says
Thank you :)