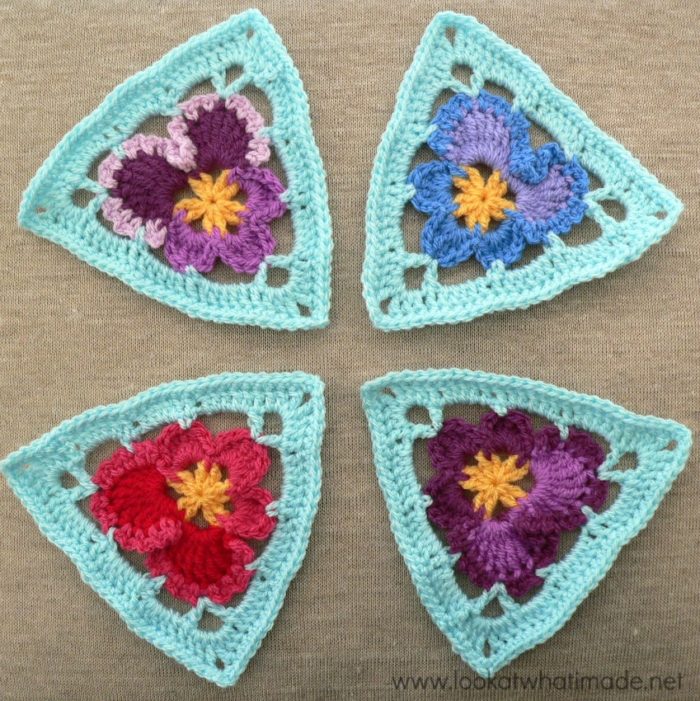
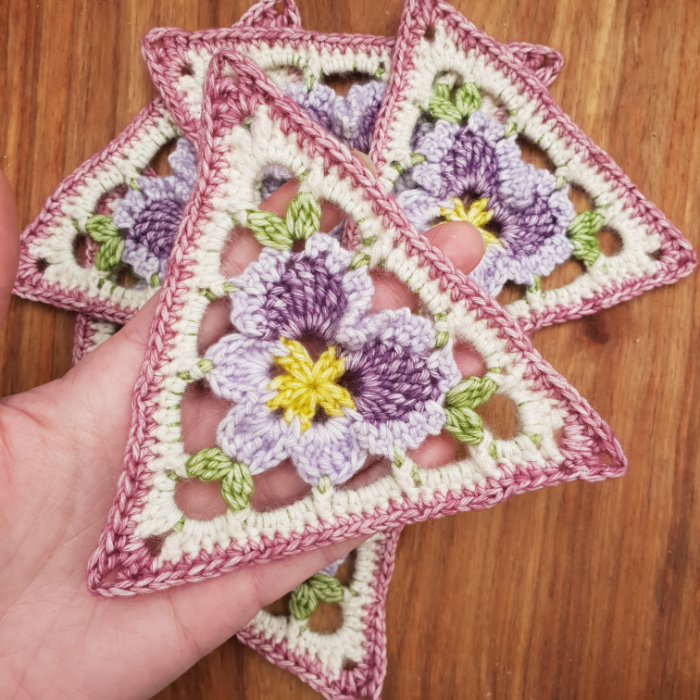
I had originally hoped to use the triangles in this bunting to make a ‘Pansy Pizza’. Unfortunately, I am still not completely happy with how the finished Pansy Pizza looks, so you will have to wait a little bit longer while I tweak the triangle pattern. In the meantime, feel free to make this Crochet Pansy Bunting.
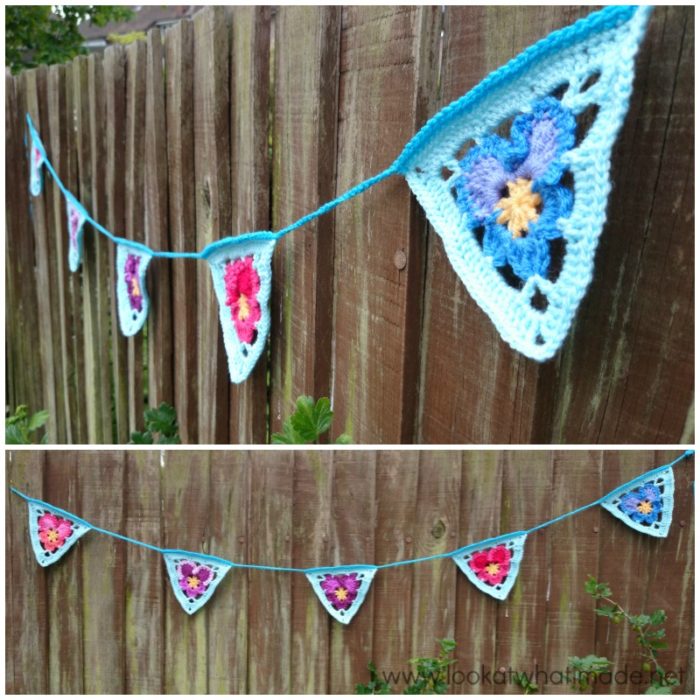
This is a dribs and drabs design, by which I mean that it is not a stand-alone pattern. If you intend to follow these instructions offline, please make sure that you also save the instructions for the Crochet Pansies, which you can find HERE.
Granny’s Crochet Pansy Triangle
©Dedri Uys 2014. All Rights Reserved. Edited by Venetia Smith
If you would like to print this pattern, you can find a print-friendly button at the bottom of this post. You can then remove any images you do not want to print by clicking on them. If you would like to save this pattern to your Ravelry Queue, you can do so HERE.
Difficulty
Intermediate
Materials
- Double knit yarn in 1 (or 2) colours for the triangles and 3 colours for the pansies.
- 4 mm Crochet Hook (US G/6 UK 8)
- Yarn needle
Abbreviations
US Crochet Terminology used throughout. US/UK Conversion HERE.
- Ch – Chain
- Dc – Double crochet
- Sc – Single crochet
- Sl st – Slip stitch
- Sp/sps – Space/spaces
- St/sts – Stitch/stitches
- [] – used to indicate stitches to be worked into the same st/sp
- () and * – repeat the instructions between parentheses and asterisks the number of times specified.
Optional Special Stitches
First Bobble Stitch
Start with a sl st in the indicated st/sp. Ch 3. (Yarn over and insert your hook into the same st as the sl st, yarn over and pull up a loop, yarn over and pull through 2 loops) twice. Yarn over and pull through all 3 loops on your hook.
Subsequent Bobble Stitches
Yarn over and insert your hook into the indicated st/sp. Yarn over and pull up a loop. Yarn over and pull through 2 loops. (Yarn over and insert your hook into the same st/sp, yarn over and pull up a loop, yarn over and pull through 2 loops) twice. Yarn over and pull through all 4 loops on your hook.
You can find the photo tutorial for the First Bobble Stitch and the Subsequent Bobble Stitch HERE.
Instructions
Following the photo tutorial below, make as many Pansy Triangles as you want/need for your bunting. Then follow the instructions for joining them to each other to create the bunting. If you would like to add leaf-like bobbles to your bunting, you will find additional instructions at the end of Round 1.
Step 1: Crochet the Pansy Triangles
Pansy
To start, make a Pansy following THIS PANSY PATTERN. When you have crocheted the Pansy, continue with Round 1 below.
Round 1
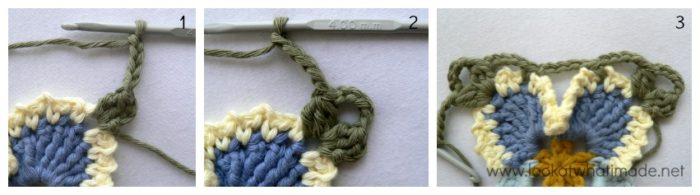
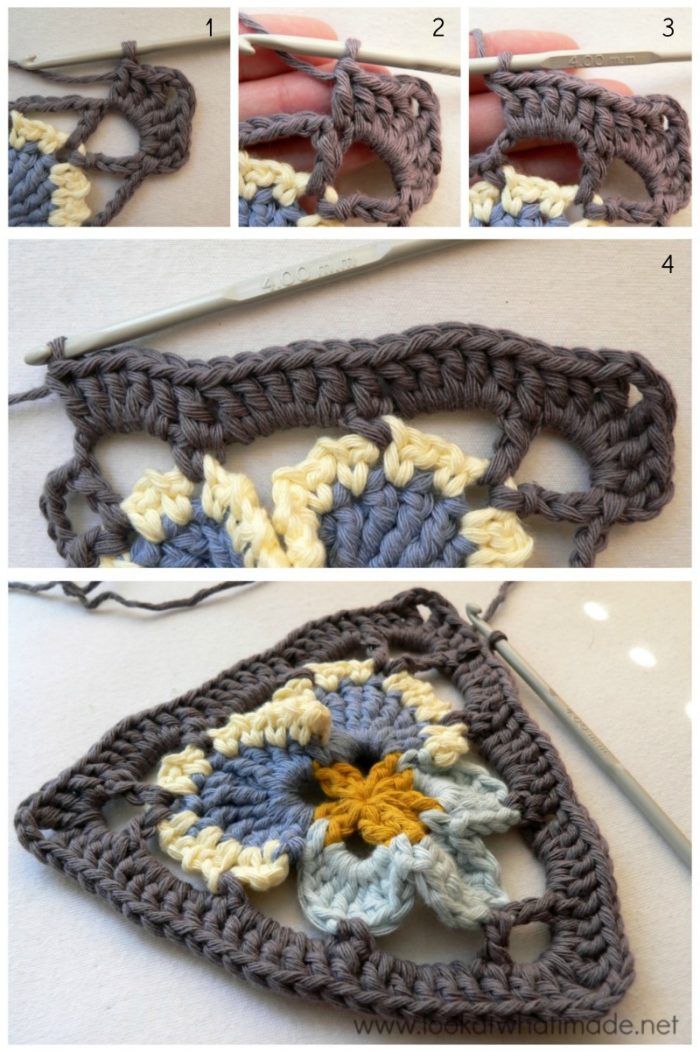
With the right side of the Pansy facing you, join your yarn by making a sl st in the 5th ch-2 sp of the first Large Petal {Photos 1 and 2}. Ch 8 (counts as first dc and ch-5 sp) and dc in the same ch-2 sp {Photo 3}.
Ch 5, skip the next ch-2 sp and sc in the next ch-2 sp {Photo 4}. Ch 5, skip the next 8 ch-2 sps and sc in the next ch-2 sp {Photo 5}. Ch 5 and skip the next ch-2 sp. [Dc, ch 5, dc] into the next ch-2 sp {indicated with an arrow in Photo 6 and illustrated in Photo 7}.
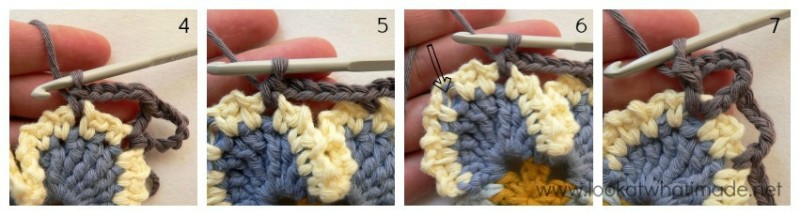
Ch 5, skip the next 2 ch-2 sps and sc in the next ch-2 sp. This sc should fall in the second-to-last ch-2 space of the second Large Petal {Photo 8}.
Ch 5, sc in the 5th st of the first Small Petal {in other words, the third tr -see Photo 9}. Ch 5. [Dc, ch-5, dc] in the 5th st of the next Small Petal {in other words, the third tr -see Photo 10}. Ch 5, sc in the 4th st of the last Small Petal {in other words, the second tr -see Photo 11}.
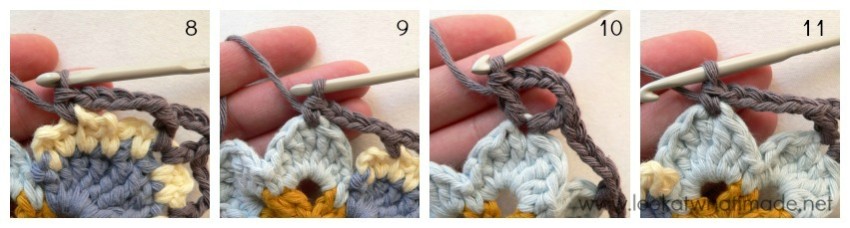
Ch 5, sc in the 2nd ch-2 sp of the first Large Petal {Photo 12}. Ch 5 and join to the third chain of the initial ch-8 with a sl st {Photo 13}.
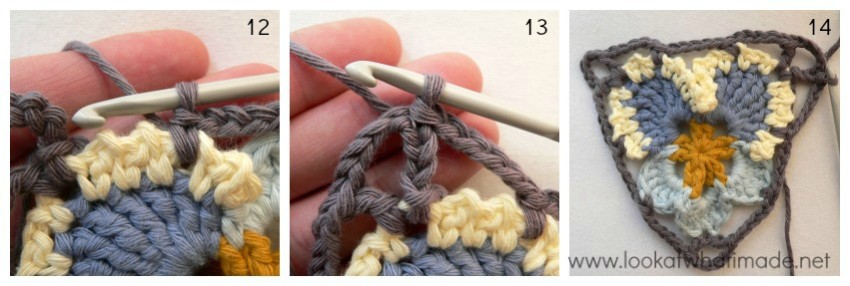
Stitch Count: 6 dc, 6 sc, and 12 ch-5 sps
Optional Leaves
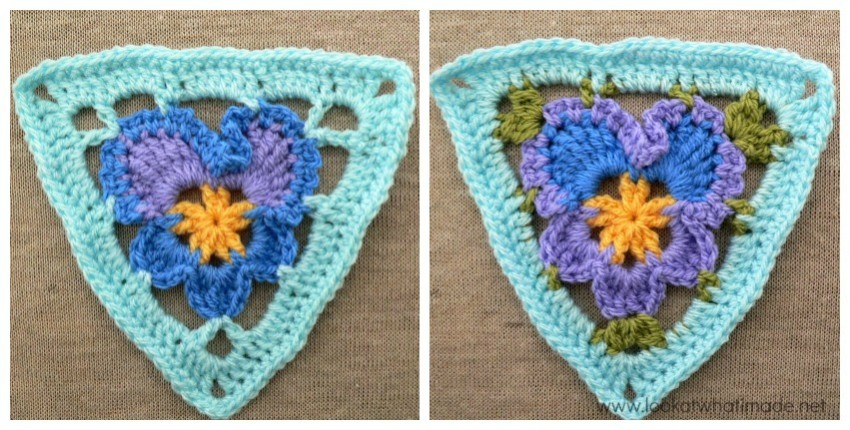
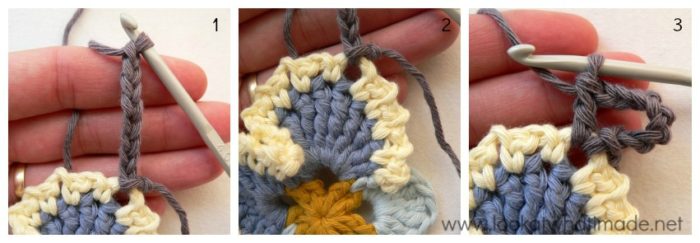
If you would like to make little Bobble Stitch leaves in the corners, replace the beginning ch-3 with a First Bobble Stitch {Photo 1} and replace all the other dc in this round with a Subsequent Bobble Stitch {Photos 2 and 3}.
You can find the photo tutorial for the Bobble Stitch HERE.
Round 2
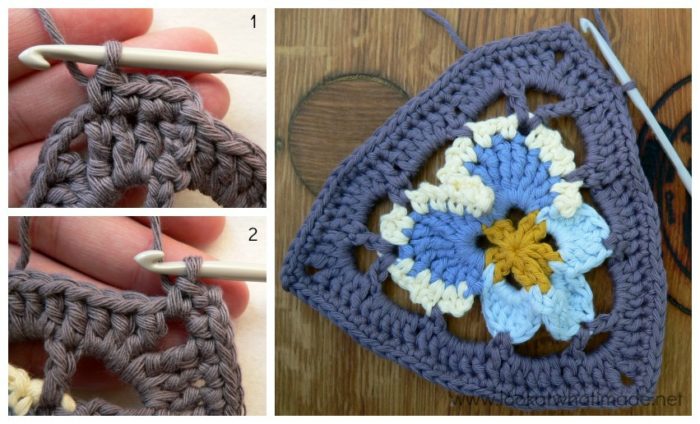
Ch 3 (this counts as your first dc). *[2 dc, tr, ch 2, tr, 2 dc] into the ch-5 corner sp {Photo 1}. (Dc in the next st {Photo 2} and make 5 dc in the next ch-5 sp {Photo 3}) three times {Photo 4}. Dc in the last st before the corner sp.* Repeat from * to * 2 more times, omitting the very last dc on the last repeat. Join to the top of the beginning ch-3 with a sl st.
Stitch Count: 75 sts and 3 ch-2 sps {25 sts per side}
Round 3
Ch 1 and sc in the same st. Sc in the next 3 sts {Photo 1}. ([Sc, ch 2, sc] into the ch-2 corner sp {Photo 2}. Sc in each of the 25 sts across) 3 times, omitting the last 4 sc on the last repeat. Join to the first sc with a sl st. Fasten off and work away your ends.
Stitch Count: 81 sc and 3 ch-2 sps {27 sc per side}
Step 2: Creating the Bunting
This is the super easy bit. You can make the chains on either end of the bunting as long or as short as you fancy. You can also put the triangles right next to each other, or space them with 20 chains, as I have done. I’m going to tell you how I did it, and then you can improvise :)
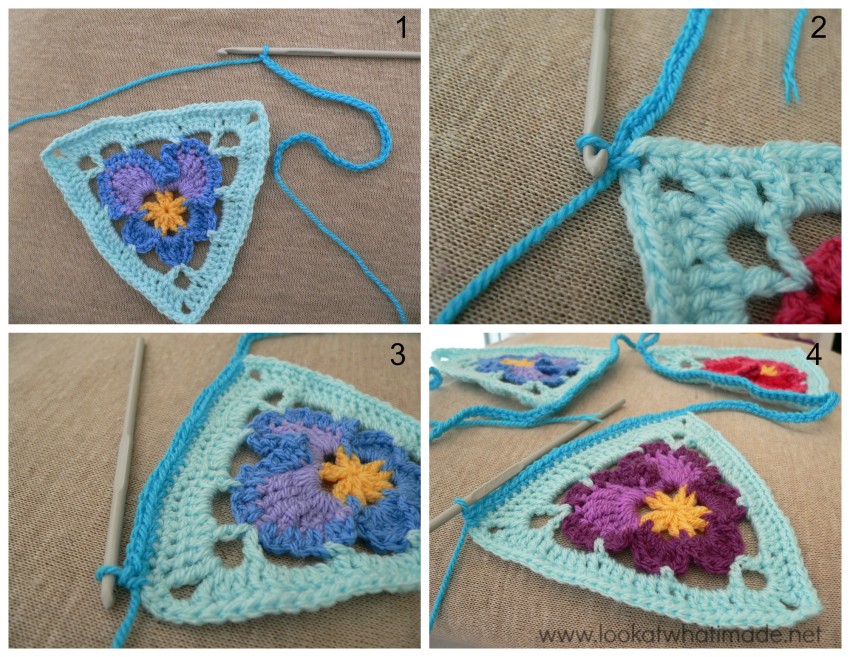
With any colour yarn and using the same size hook as for the triangles, chain 40 {Photo 1}. *Sc in the first ch-2 sp along the top of the first triangle {Photo 2}. Sc in each of the 27 sts along the top of the triangle {Photo 3}. Sc in the ch-2 corner sp.*
Chain 20 and add the next triangle by repeating the instructions between asterisks above. Do this until you have attached all your triangles {Photo 4}. When you have attached the last one, chain 40 again and fasten off.
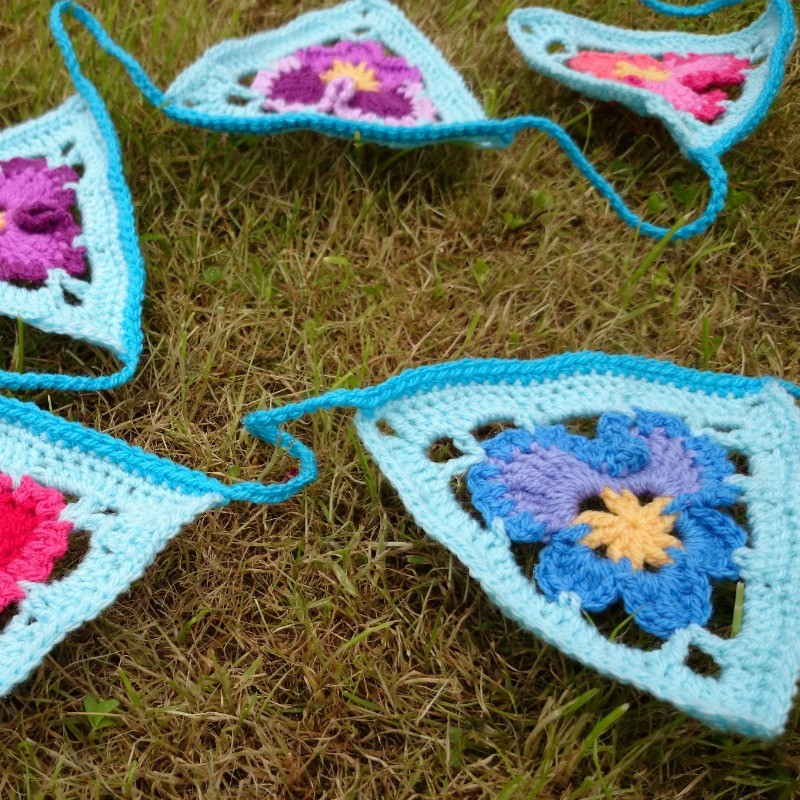
And there you have it… Colourful Crochet Pansy Bunting!
Update 2021: You can see from my photos that I did not block my triangles. This was one of the first patterns I ever shared, and I wasn’t so hot on blocking back then. Now, I would advise you to block the triangles so that the corners are nice and crisp! Blocking will also ‘open up’ the lace part of the pattern so that the Pansy has more room to breathe.
Please note that the photo below shows an updated version of the triangle, not the original used above for the bunting. I am sharing it merely to illustrate what a good blocking can achieve.
Free Flower-Related Patterns
- Simple Crochet Flowers
- Crochet Flower Ball
- Kinga’s Cluster Flowers
- Ruffled Flowers
- This Little Leaf
- Crochet Pansy Leaf

This blog post contains affiliate links. I only link to products I personally use or would use. All opinions are my own.



Shery says
Hello, while looking at the single pansy (which I love) pattern I saw a gorgeous white version that had multiple pansies in the triangle block. Do you also have a pattern for that! Thank you!
Dedri Uys says
Hi Shery,
I don’t, unfortunately. It is a very old piece of lace crocheted by my great-grandma.
Michele says
Hello Dedri,
You mention that the blocked triangle is not the same pattern. I’ve searched and can not find the pattern for it. Is it available yet? I think it’s just beautiful with the leaves in there as well.
Jenny Lowman says
Hi Michele. The ‘Pansy Pizza’ pattern isn’t available yet, I am afraid.
BW
Jenny
Emma says
I simply can’t work out the leaves :( It says to replace the first ch3 with a bobble stitch, but there’s no ch3 on round one. Could you let me know what I’m missing? Thank you
Dedri Uys says
The rounds starts with: Ch 8 (counts as first dc and ch-5 space). The first 3 chains of the ch-8 counts as your first dc and it is those 3 chains that you will replace with a first bobble stitch. So you would make a First Bobble Stitch and ch-5 instead of chaining 8. I hope that helps.
Paulene says
Last night I was thinking about a crochet pansy and today I just happened across this. Thank you
Dedri Uys says
You’re welcome :)
Sandra says
I love the pansy pattern. Thank you so much for sharing this lovely design!
Dedri Uys says
Thank you, Sandra :)
Phyllis Stuart says
I love the pansy pattern, Dedri!! So pretty! Thank you for sharing it’s history with us as well. You are so very talented. I’m working on 2 Sophies at the present & am learning so much & am having fun too. Xx from Mississippi
Dedri Uys says
Thank you, Phyllis :)
Erzsebet from crochet world says
I love this – reminds me of tibetan flags actually! – and I learnt the English name of this flower – these crochet flowers are so cute!
Dedri Uys says
Thank you, Erzebet :)
RedSetter says
Fabulous, what a beautiful pattern. Thanks so much for sharing.
Carol Trump says
I love pansies – they are the first flowers I plant in my garden. Yours are just as beautiful as the real ones. You have caught the very essence of them. I had never thought of a banner. Cannot wait to do one for under my summer umbrella. Thank you for your extreme creativity and especially your thoughtfulness in sharing it with all the crocheters!!! Your crocheting friend, Carol
Dedri Uys says
Thank you, Carol. Pansy bunting would look wonderful under your umbrella. I think I need to make a loooong piece to put in my garden. I hope you share the finished bunting with me :)
Amjaylou says
Hello! This is such a fab design – I love it, and is going to be pinned for the future. Thanks for sharing this with us, Dedri
Amanda x
Dedri Uys says
Thank you, Amjaylou :)
Jacky Russell says
Very pretty pansies! There is a lot if bunting around, but these are really unusual! :)
http://www.thequietstitcher.com
Dedri Uys says
Thank you, Jacky :) I hope you get time to make some.
Frances Garrett says
Been looking for pansy items. Thanks
Carrie says
Pretty! As always I can’t wait for the pizza! :)
Heather says
I’m going to start this tonight ….. Thank you so much for sharing the pattern, I think it’s wonderful. Xxxx
Dedri Uys says
Thank you, Heather ;)