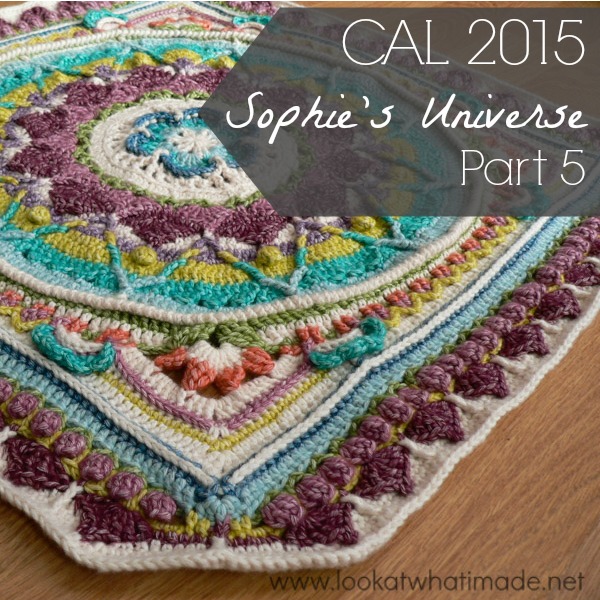
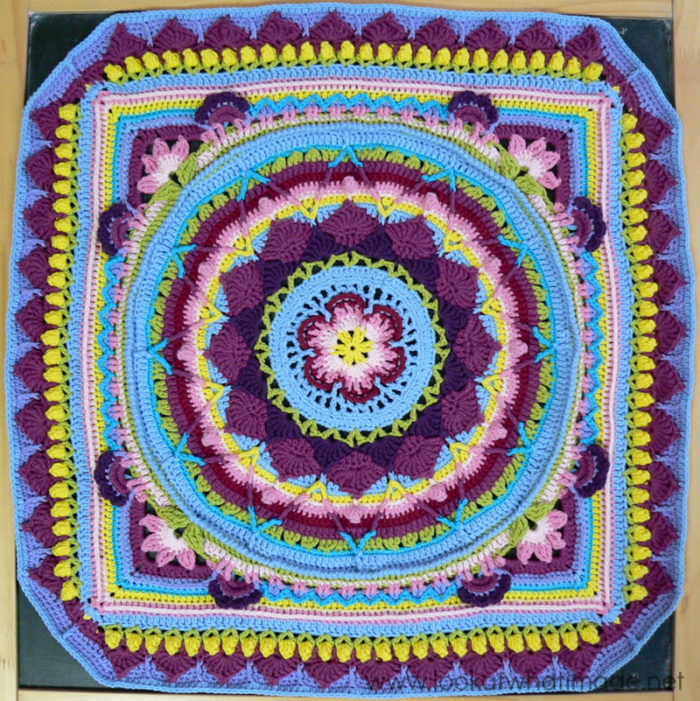
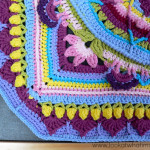
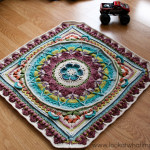
Sophie’s Universe Part 5
©Dedri Uys 2014. All Rights Reserved.
Good morning and welcome to the first completely mystery part of the CAL. We hope you have great fun this week!!
Resources
- Add this CAL to your Ravelry Queue
- Sophie’s Universe CAL 2015 Information
- Use the Print-friendly button at the bottom (right) of this post to print/save this tutorial. Don’t know how? Find out HERE.
- **Part 5 VIDEO TUTORIAL** by Esther Dijkstra from It’s All in a Nutshell
Translations
- Dutch Photo Tutorial by Dianne Baan
- German Translation by Maja Heidingsfelder
- Spanish Translation by Lynda Hernandez
- Finnish Translation by Sari Åström
- French Translation by Sandra Larvin
- Danish Translation by Tina Poulsen
- Russian Translation (with Video) by Natalie V. Alimpieva
- Swedish CAL Information by Emma Vingqvist, Agnetha Magnusson, Åza Karlsson, and Ulrika Larsson
- Arabic Video Tutorial by Banan Felimban
Materials
For the purposes of this tutorial I am using Scheepjeswol Cotton 8 (available from Deramores) and a 3.25 mm Clover Amour Crochet Hook (US D/3 UK 10).
In some of the photos I have used a different colour than the specified colour to make it easier for you to see where the stitches go.
Colours for Part 5 |
|||
| Click on the images to enlarge them. | 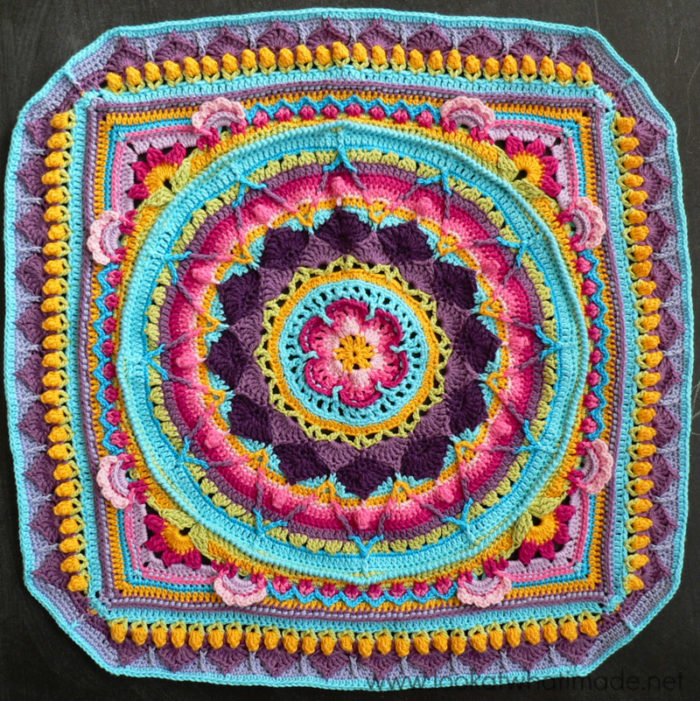 |
 |
 |
| Cotton 8 | Softfun | Stonewashed XL | |
| Round 37 | Light Turquoise | Light Blue | Amazonite |
| Round 38 | Light Green | Olive | Canada Jade |
| Round 39 | Canary | Canary | Corundum Ruby |
| Round 40 | Moors | Cyclamen | Lemon Quartz |
| Round 41 | Moors | Cyclamen | Garnet |
| Round 42 | Light Purple | Violet | Moonstone |
| Round 43 | Light Purple | Violet | Moonstone |
| Round 44 | Light Purple | Violet | Moonstone |
| Round 45 | Light Turquoise | Light Blue | Moonstone |
Abbreviations
US Terminology Used (Basic US/UK comparison chart here)
- Ch – Chain
- Dc – Double crochet
- Fpdc – Front post double crochet
- Fpsc – Front post single crochet
- Hdc – Half-double crochet
- Sc – Single crochet
- Sl st – Slip stitch
- St/st’s – Stitch/stitches
- * – Repeat instructions between asterisks the number of times specified. This is a hardcore repeat and will consist of multiple instructions.
- () – Repeat instructions between parentheses the number of times specified. This is a lower level repeat.
Special Stitches
- Popcorn Stitch: Make 5 dc’s in the same stitch. Remove your hook from the last stitch. Insert your hook into the first dc of the 5 dc’s. Grab the last stitch with your hook and pull it through the first stitch. Ch 1. See this tutorial.
- Beginning Popcorn Stitch: Ch 3 (counts as first dc). Make 4 dc’s in the same stitch. Remove your hook from the last stitch. Insert your hook into the third ch of the beginning ch-3. Grab the last stitch with your hook and pull it through the first stitch. Ch 1. See this tutorial.
- V-Stitch: (Dc, ch 1, dc) in the same stitch.
- Picot: Ch 3, sl st in the third chain from the hook.
Instructions
Rounds 1 – 36
You can find the links for Rounds 1 – 36 HERE.
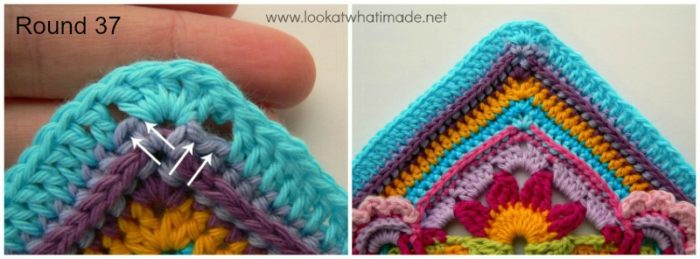
Round 37
Join your new yarn by making a standing double crochet in any ch-2 corner space around. (Dc, hdc, 2 dc) in the same ch-2 corner space. This is your first corner made.
*Skip the first 2 st’s, remembering that first hidden stitch, and dc in the next 80 st’s. Skip the last 2 st’s. (2 dc, hdc, 2 dc) in the next ch-2 corner space.*
Repeat from * to * 3 more times, omitting the last corner on the last repeat. Join to the top of the standing double crochet with a sl st. Fasten off and work away your tails of yarn.
The first photo below shows the 2 skipped stitches on either side of the (2 dc, hdc, 2 dc) corner.
Stitch Counts:
- Total: 340 st’s {4 hdc’s and 336 dc’s}
- Per Side: 84 dc’s (not including corner hdc)
IMPORTANT NOTE
From this point onward, your “square” will have 8 facets (or sides). There will be 4 short sides and 4 long sides. As the rounds grow, the short sides will get longer and the long sides will get shorter. You’ll soon see what I mean.
Round 38 {Leaves}
Join your yarn by making a standing double crochet in the fifth dc of any side. (Ch 1, dc) in the same stitch. This is your first V-stitch made – see Photo 1. (Skip the next 2 st’s and make a V-stitch in the next st – see Photo 2) 25 times. You should now have 26 V-stitches. There should be 4 dc’s left unworked before the corner hdc (Photo 3).
*Short Side: Ch 8 (Photo 4) and skip the next 9 st’s.
Long Side: Make a V-stitch in the fifth dc of the next side (indicated with an arrow in Photo 4 and illustrated in Photo 5). (Skip the next 2 st’s and make a V-stitch in the next st) 25 times.*
Repeat from * to * 3 times, omitting the last long side on the last repeat. Join to the top of the standing double crochet with a sl st.
Stitch Counts:
- Total: 104 V-st’s and 4 ch-8 spaces
- Per Short Side: 1 ch-8 space
- Per Long Side: 26 V-stitches

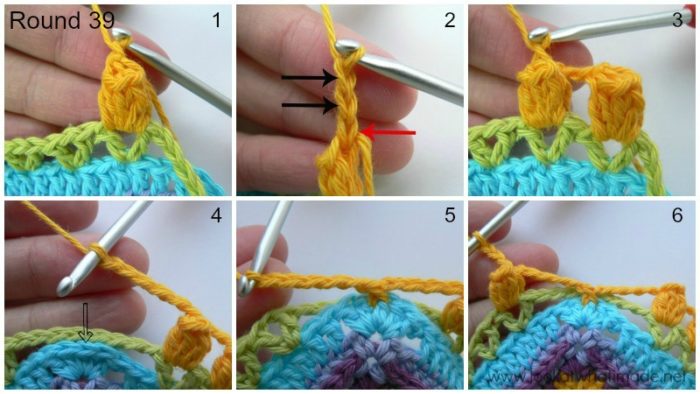
Round 39 {Tulips}
In this round, you will be forming the tulips. Your work will seem quite tight at the end of this round, but don’t worry about it too much. Keep your tension relaxed when making the ch-2 spaces and you will be just fine!
Before we get started, let’s talk about those popcorn stitches. Just like in Round 18 the popcorn stitches are closed with a ch st. This ch stitch is part of the popcorn stitch! When you are instructed to ch 2 after each popcorn stitch that ch-2 does not include the ch used to close the popcorn stitch (red arrow in Photo 2 below).
- If you are using the same colour, sl st into the next ch-1 space and make a beginning popcorn (see Special Stitches above).
- If you are using a new colour, join your yarn by making a standing double crochet in the ch-1 space of the first V-stitch on any side. Make 4 more dc’s in the same ch-1 space and complete a Popcorn Stitch (Photo 1).
(Ch 2 – see Photo 2, and make a Popcorn Stitch in the ch-1 space of the next V-stitch – see Photo 3) 25 times. You should now have 26 popcorns, one in each V-stitch from the previous round.
*Short Side: Ch 5 (Photo 4). Working in front of the ch-8 space from Round 38, make a fpsc around the corner hdc from Round 37. Ch 5 (Photo 5).
Long Side: Make a Popcorn Stitch in the ch-1 space of the first V-stitch on the next side (Photo 6). (Ch 2, make a Popcorn Stitch in the ch-1 space of the next V-stitch) 25 times.*
Repeat from * to * 3 more times, omitting the last long side on the last repeat. Join to the top of the first popcorn with a sl st.
Stitch Counts:
- Total: 108 st’s, 8 ch-5 spaces, and 100 ch-2 spaces {4 fpsc’s and 104 popcorns}
- Per Short Side: 1 fpsc and 2 ch-5 spaces
- Per Long Side: 26 popcorns and 25 ch-2 spaces
Round 40
In this round, you will be working into the ch-2 spaces from Round 39 AND between the V-stitches from Round 38. When working between the V-stitches, work IN FRONT OF the relevant ch-2 space. I have found that it is easier if you fold the ch-2 down behind your work when making the stitches between the V-stitches from Round 38, otherwise it is just in the way.
- If you are using the same colour, sl st into the next ch-2 space. (Ch 1, sc) into the same space. Working in front of the ch-2 space, dc between the 2 V-stitches from Round 38 directly below the same ch-2 space. Sc in the same ch-2 space.
- If you are using a new colour, join your yarn by making a standing single crochet in the first ch-2 space of any long side (Photo 1). Working in front of the ch-2 space, dc between the 2 V-stitches from Round 38 directly below the same ch-2 space (Photos 2 -4). Sc in the same ch-2 space (Photo 5).
(Skip the next popcorn. Sc in the next ch-2 space. Working in front of the ch-2, dc between the 2 V-stitches from Round 38 directly below the same ch-2 space. Sc in the same ch-2 space) 24 times.
*Short Side: Make 4 sc’s into the first ch-5 space (Photo 6). Working in front of the ch-5 space, dc in the first corner dc from Round 37 and hdc in the next corner dc. Sc in the top of the fpsc from Round 39 (Photo 7). Sc in the next ch-5 space (Photo 8). Working in front of the ch-5 space, hdc in the next corner dc from Round 37 and dc in the last corner dc. Make 4 sc’s into the same (last) ch-5 space (Photo 9).
Long Side: (Skip the next popcorn. Sc in the next ch-2 space. Working in front of the ch-2, dc between the 2 V-stitches from Round 38 directly below the same ch-2 space. Sc in the same ch-2 space) 25 times.*
Repeat from * to * 3 more times, omitting the last long side on the last repeat. Join to the top of the first sc with a sl st. Fasten off and work away your tails of yarn.
Stitch Counts:
- Total: 356 st’s {240 sc’s, 8 hdc’s, and 108 dc’s}
- Per Short Side: 14 st’s {10 sc’s, 2 hdc’s, and 2 dc’s}
- Per Long Side: 75 st’s {50 sc’s and 25 dc’s}

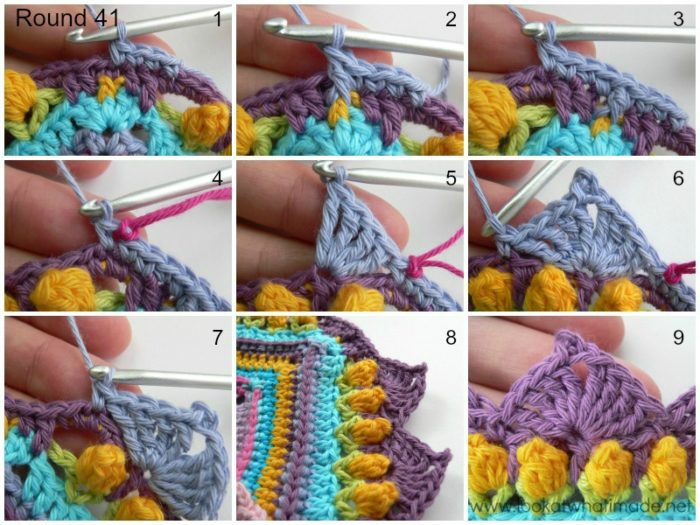
Round 41 {Purple Petals}
You will be making pretty Purple Petals in this round. The petals are similar to the ones used in Rounds 10 and 13.
UPDATE: Please read this round carefully. Not all the petals will fall in a dc between popcorns. ONLY Petals 1, 4, 7, and 10, as specified in the Hint below this round. If you struggle with this round, please have a look at the brilliant video tutorial that Esther Dijkstra has done.
Join your yarn by making a standing single crochet in the fourth sc made into the first ch-5 space of any short side. Sc in the next 3 st’s (Photo 1). The last sc should fall in the sc you made into the fpsc from Round 39. Fpdc around the fpsc from Round 39 (Photo 2). Sc in the next st of Round 40, directly behind the fpdc you just made. Sc in the next 3 st’s (Photo 3). The last sc should fall in the first sc after the dc. This is your first short side made.
*Long Side: Sc in the next st. Mark this stitch with a stitch marker to make it easier to count your stitches later on (Photo 4). (Skip the next 3 st’s. Make 4 tr’s in the next st – see Photo 5. Ch 3 and sl st into the third ch from your hook. This is your picot made. Make 4 tr’s in the same st. Skip the next 3 st’s and sc in the next st – see Photo 6) 10 times – see Hint below. The last sc should fall in the third sc made into the first ch-5 space of the short side (Photo 7). Mark this stitch with a stitch marker to help with counting later. You should now have 10 petals, each separated by one single crochet.
Short Side: Sc in the next 4 st’s. Fpdc around the fpsc from Round 39. Sc in the next st of Round 40, directly behind the fpdc you just made. Sc in the next 3 st’s.*
Repeat from * to * 3 more times, omitting the last short side on the last repeat. Join to the first sc with a sl st.
Fasten off and work away your tails of yarn. Once you have counted your stitches (see Stitch Counts below), you can remove the stitch markers again.
Hint
To help prevent copious amounts of frogging, I am going to give you a little tip. The first petal will fall in the dc between the first 2 popcorns. The fourth petal will fall in the dc between the ninth and tenth popcorns. The seventh petal will fall in the dc between the seventeenth and eighteenth popcorns. The tenth petal will fall in the dc between the last 2 popcorns.
You don’t necessarily have to count the popcorns, but you SHOULD check that petals 1, 4, 7, and 10 fall in a dc. If they don’t, you’ve made a booboo. Have a look at Photo 9 if you need visual help with this.
Stitch Counts:
- Total: 400 st’s and 40 picots {76 sc’s, 4 fpdc’s, 320 tr’s, and 40 picots}
- Per Short Side: 9 st’s {8 sc’s and 1 fpdc}
- Per Long Side (starting at the first marked stitch and ending at the last marked stitch): 10 petals and 11 sc’s {8 tr’s and 1 picot per petal}
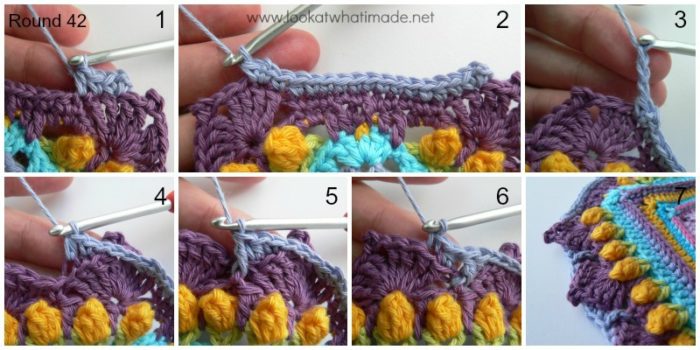
Round 42
Keep your tension relaxed when making the ch-3 spaces. When working into the back loops only, your stitches might look very “stretchy”. Don’t worry about it! It will all magically work out. If you are going to have trouble identifying the ch-1 spaces at the start and end of every short side, consider using stitch markers to mark them.
Join your new yarn by making a standing single crochet in the seventh treble of the last petal on any long side. (Ch 1, sc) in the same stitch. Sc in the last tr of the petal and hdc in the next st (Photo 1). Sc in the next 9 st’s. The fifth sc will fall in the top of the fpdc from the previous round. Hdc in the next st. Sc in the first tr of the first petal. (Sc, ch 1, sc) in the next tr. This is your first short side made (Photo 2).
*Long Side (working into blo): (Ch 3 – see Photo 3. Skip the next 4 tr’s (and the picot) and sc in the blo of the seventh tr of the petal. Hdc in the blo of the last tr of the petal – see Photo 4. Fpdc around the sc between petals – see Photo 5. Hdc in the blo of the first tr of the next petal. Sc in the blo of the second tr of the petal – see Photo 6) 9 times. Ch 3. Skip the next 4 tr’s and the picot.
Short Side: (sc, ch 1, sc) through both loops of the seventh treble of the last petal. Sc in the last tr of the petal and hdc in the next st. Sc in the next 9 st’s. Hdc in the next st. Sc in the first tr of the first petal. (Sc, ch 1, sc) in the next tr.*
Repeat from * to * 3 more times, omitting the last short side on the last repeat. Join to the first sc with a sl st.
Don’t worry about flicking the ch-3’s to the back of your work. You can do that later.
Stitch Counts:
- Total: 248 st’s, 40 ch-3 spaces, and 8 ch-1 corners {132 sc’s, 80 hdc’s, and 36 fpdc’s}
- Per Short Side: 15 st’s {13 sc’s and 2 hdc’s}
- Per Long Side: 47 st’s and 10 ch-3 spaces {20 sc’s, 18 hdc’s, and 9 fpdc’s}
Having Trouble With the Stitch Counts?
When counting the sides (in this and subsequent rounds), you will count from the ch-1 corner space to the next ch-1 corner space. In Rounds that have a ch-2 corner space, you will count from ch-2 corner space to the next ch-2 corner space. Any exceptions will be highlighted. Have a look at the photo at the start of Part 6 if you need visual help.
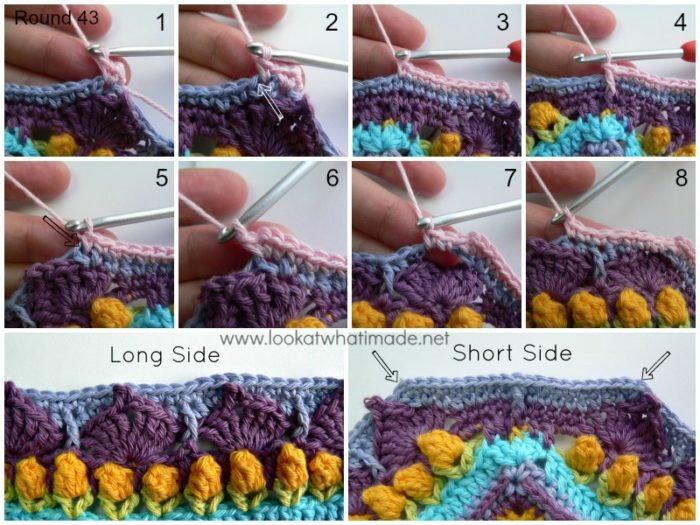
Round 43
The ch-1 spaces are a bit tricky to get into. It is also quite easy to accidentally skip the first sc after the ch-1 space. You will have to skip some of these “hidden” sc’s on purpose, so make sure that you can identify them. See this tutorial if you need a recap of which loops belong to which stitch.
- If you are using the same colour, (ch 1, sc, ch 1, sc) in the same stitch as the sl st join. This is your first corner made.
- If you are using a new colour, join your yarn by making a standing single crochet in the last sc of any long side (in other words, the sc before the ch-1 space). (Ch 1, sc) in the same stitch (Photo 1). This is your first corner made.
Sc in the next ch-1 space (Photo 2). Skip the next (hidden) st and sc in the next 7 st’s (indicated with an arrow in Photo 2 and illustrated in Photo 3). The last sc should fall in the sc made into the fpdc from Round 41. Make a fpdc around the fpdc from Round 41 (Photo 4). Sc in the next 7 st’s of Round 42. Sc in the next ch-1 space (Photo 5). (Sc, ch 1, sc) in the next (hidden) st (indicated with an arrow in Photo 5 and illustrated in Photo 6). This is your first short side made.
*Long Side: Make 2 sc’s in the next ch-3 space (Photo 7). Sc in the next 5 st’s (Photo 8). (Make 3 sc’s in the next ch-3 space. Sc in the next 5 st’s) 8 times. Make 2 sc’s in the last ch-3 space.
Short Side: (sc, ch 1, sc) in the next st. Sc in the next ch-1 space. Skip the next (hidden) st and sc in the next 7 st’s. Make a fpdc around the fpdc from Round 41. Sc in the next 7 st’s. Sc in the next ch-1 space. (Sc, ch 1, sc) in the next (hidden) stitch.*
Repeat from * to * 3 more times, omitting the last short side on the last repeat. Join to the first sc with a sl st.
Stitch Counts:
- Total: 376 st’s and 8 ch-1 corner spaces {372 sc’s and 4 fpdc’s}
- Per Short Side: 19 st’s {18 sc’s and 1 fpdc}
- Per Long Side: 75 sc’s
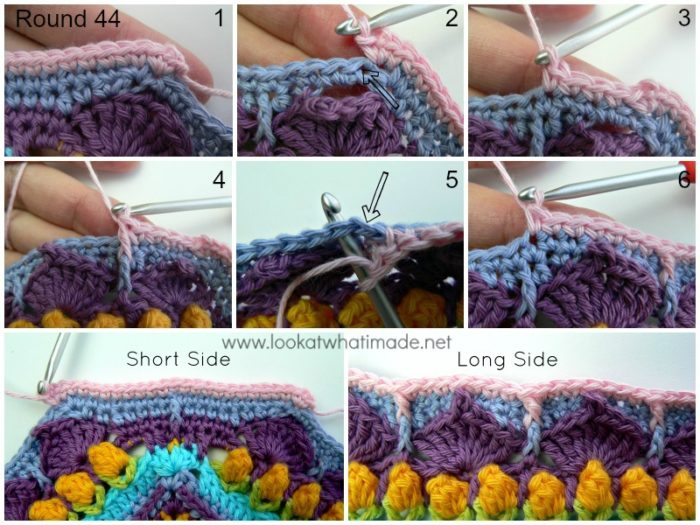
Round 44
Each long side starts with 4 sc’s and ends with 3 sc’s. This slight asymmetry will be corrected in the next round, so do not worry about it.
- If you are using the same colour, (ch 1, sc, ch 1, sc) in the same stitch as the sl st join. This is your first corner made.
- If you are using a new colour, join your yarn by making a standing single crochet in the same stitch as the sl st join. (Ch 1, sc) in the same stitch. This is your first corner made.
Sc in the next ch-1 space. Sc in the next 19 st’s (Photo 1). Don’t accidentally skip the first (hidden) stitch. Sc in the next ch-1 space. (Sc, ch 1, sc) in the next (hidden) stitch (Photo 2). This is your first short side made.
*Long Side: Skip the next sc (indicated with an arrow in Photo 2). Sc in the next 4 st’s. The last sc should fall in the sc you made into the fpdc from Round 42 – see Photo 3. (Fpdc around the fpdc from Round 42 – see Photo 4. Skip the next st of Round 43 – see Photo 5 – and sc in the next 7 st’s. The last sc should fall in the sc you made into the fpdc from Round 42 – see Photo 6) 8 times. Fpdc around the fpdc from Round 42. Skip the next st of Round 43 and sc in the next 3 st’s.
Short side: (sc, ch 1, sc) in the next st. Sc in the next ch-1 space. Sc in the next 19 st’s. Don’t accidentally skip the first (hidden) stitch. Sc in the next ch-1 space. (Sc, ch 1, sc) in the next (hidden) stitch.*
Repeat from * to * 3 more times, omitting the last short side on the last repeat. Join to the top of the first sc with a sl st.
Stitch Counts:
- Total: 380 st’s and 8 ch-1 corner spaces {344 sc’s and 36 fpdc’s}
- Per Short Side: 23 sc’s
- Per Long Side: 74 st’s {65 sc’s and 9 fpdc’s}
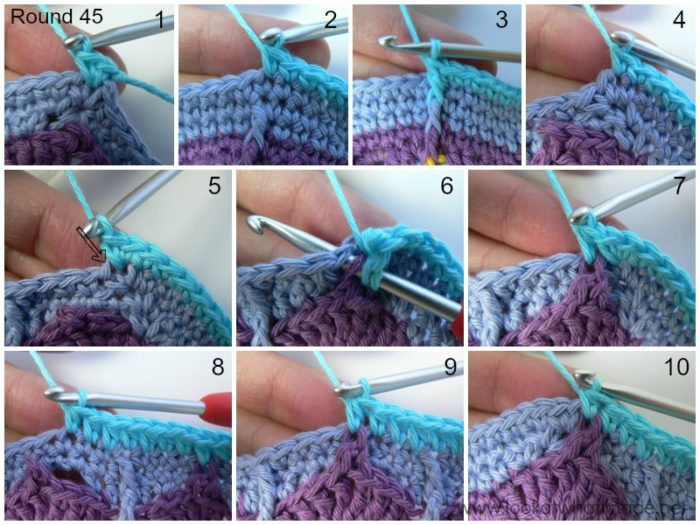
Round 45
- If you are using the same colour, sl st into the ch-1 space. Ch 1 and make 2 sc’s in the same ch-1 space.
- If you are using a new colour, join your yarn by making a standing single crochet in the ch-1 space at the start of any short side. Sc in the same stitch (Photo 1).
Skip the first (hidden) stitch. Sc in the next 11 st’s. The last sc should fall in the sc made into the fpdc from Round 43 (Photo 2). Fpdc around the fpdc from Round 43 (Photo 3). Sc in the next 11 st’s (Photo 4). Make 2 sc’s in the next ch-1 space (Photo 5).
*Long Side: Skip the first (hidden) sc (indicated with an arrow in Photo 5). Catch the picot from Round 41 with the next hdc. To do this, yarn over, insert your hook into the second ch of the picot AND into the next st from Round 44, and complete an hdc through both layers – see Photos 6 and 7. (Hdc in the next 7 st’s. The fourth hdc should fall in the fpdc from the previous round – see Photo 8. Catch the picot with an hdc, as before – see Photo 9) 9 times. Photo 10 shows the last hdc of the long side made.
Short Side: Make 2 sc’s in the next ch-1 space. Skip the first (hidden) stitch. Sc in the next 11st’s. The last sc should fall in the sc made into the fpdc from Round 43. Fpdc around the fpdc from Round 43. Sc in the next 11 st’s. Make 2 sc’s in the next ch-1 space.*
Repeat from * to * 3 more times, omitting the last short side on the last repeat. Join to the top of the first sc with a sl st.
Stitch Counts:
- Total: 400 st’s {104 sc’s, 292 hdc’s, and 4 fpdc’s}
- Per Short Side: 27 st’s {26 sc’s and 1 fpdc} – this stitch count includes both sc’s of the 2-sc corner
- Per Long Side: 73 hdc’s
And that is quite enough for this week. This part was tested and proofread by Kimberly Slifer, Claire Martin, and Venetia Smith. Thank you very much, girls!!!


This blog post contains affiliate links. I only link to products I personally use or would use. All opinions are my own.


Venus says
Everything is right on the path that you have genereously paved…. wish U the best . Full of happiness . ….
Johanna Houman says
I adore this pattern! The tulip round is especially fun; I couldn’t decide which color the tulips should be, so I ended up giving each side its own color. Can’t wait to see how it turns out. Thank you for all the work you put into this pattern! The “notes” are super helpful.
Jenny Lowman says
That sounds fab, Johanna! Do share pics via the community page on the blog’s Facebook page! :)
Charlene Monaghan says
Hi I’ve been knitting years but started crocheting last year and giving this blanket a try liking how it’s turning out but in round 45 I can’t work out if you catch the picot with one of the 7 Hdc or if it’s added? If you could clarify that would be amazing
Thanks
Jenny Lowman says
Hi Charlene. Pics 6&7 show what to do. You catch the picot and the next stitch together with one of the hdc stitches.
BW
Jenny :)
Mhairi says
Hi Dedri, the link to the video on Esther’s website doesn’t work? I’ve managed to find it on youtube though. :) Loving how Sophie is turning out, thank you! Mhairi x
Jenny says
Hi Mhairi. It seems Esther may have changed the format of the original link now.
I will let Dedri deal with the link issue as I would hate to do something wrong, but all the information and various links are here on the blog
HERE.
BW
Jenny :)
Raquel porto says
I’m so upset I didn’t get to do 26 V s. Only 24Vs. Where have I gone wrong?
Dedri Uys says
Hi Raquel. If you use the contact me tab at the top of the page, we can open up an email dialogue and you can then send me a photo so that I can help you.
Michelle says
Thank you so much for this gorgeous pattern. I’ve been crocheting for about 6 months and I finally feel ready to take this on! I can’t believe how much I’m learning.
I have a question though- for round 38 the chain 8 short side – do they just sit there at the back side not really attached to anything? I’m on 41 now and I looked ahead but I’m wondering if i missed something where I was supposed to grab it so that ch 8 won’t catch on stuff?
Thanks so much!
Dedri Uys says
Hi Michelle. I’m glad you feel proud of how much you’ve learnt. That ch-8 won’t get caught. It sits snugly behind the blanket and shouldn’t cause any problems. If you want to, you can always tack it down, but this really isn’t necessary.
Tanja Baldew says
Hi Dedri,
I recently started with the sophies universe cal 2015 .I fell in love immediately when I saw it.
Just started a few days ago and I am now starting on part6. I’m not beginner and also not an advance crocher, but wondering how big the xl version is in yards/cm ( hight/width).
Because I want a really big blanket.
I am trying to follow your instructions but sometimes still need to check the video tutorials of Ester.
I am using a 5.5mm hook and 1 colour. Also trying to Finish before christmas as a prensent for my mom
Also looking forward to crochet all those beautiful patterns that you have.
When finished I really want 1 for myself in colour, because as far as I am now, it turned out so beautifully.
Thanks
Tanja
Dedri Uys says
Hi Tanja. The sizes are in the information post HERE. She works up wonderfully in a single colour. I hope your mom loves it!
Anat Elzam says
Dear Dedri,
This is such a beautiful and intelligent design! Thank you very much for sharing. I’m making it for my daughter, and we are both amazed by the beauty of it. Also I learn a lot from it and enjoy the endless play with color and mini-pattern it opens up. Thank you so much <3
Dedri Uys says
I am so happy to hear that you like it. I hope you enjoy every moment of this journey x
Jeannine says
I don’t like the eight Corners is there any way to do it with just the normal Corners if so can you let me know that I’m not liking that eight Corners thing thank you
Jenny says
Hi Jeanine.
The pattern is only available in this format with the eight corners. If you want to adapt the pattern, that will be down to you I am afraid.
Jenny :)
Alyson says
I am keeping my sophie with 4 corners, just a little adaption, working out OK so far.
Emily J says
This is my first big project that isn’t just one stitch and I am loving it so much. I’m doing mine in all grey and am making it for my husband and me! Thank you for making the directions so clear with photos and letting the video be made also it has been a godsend for me. So thank you!
Dedri Uys says
Hi Emily. I hope you both have very happy memories sat underneath it when it’s done x
Rachel says
firstly i want to say how much i LOVE this pattern, how well written/photgraphed it is, just everything about it is perfect for those looking to challenge themselves and learn something new along the way. i personally recommend it to every crocheter i know!
i am having a bit of trouble, however with round 43.
pattern states:
Long Side: Make 2 sc’s in the next ch-3 space (Photo 7). Sc in the next 5 st’s (Photo 8). (Make 3 sc’s in the next ch-3 space. Sc in the next 5 st’s) 8 times. Make 2 sc’s in the last ch-3 space.
and the count says it should be 75 sc for each long side.
but i can only come up with 73 sc? there are 10 ch3 spaces, 8 of which get 3sc (24 total), the first and last get only 2sc (4 total), the spaces between ch3s get 5sc and there are 9 of those (45 total), this comes to 73 total for the side.
it’s entirely possible i am just being silly with my poor math skills but help would be appreciated as i really hate frogging!
Rachel says
nevermind, i am being silly. i see that the previous round indicates to start counting after the ch1sp at the corners. so that makes up for the 2 missing stitches. (if i’m thinking straight now! lol :)
Dedri Uys says
I’m glad you figured it out. I know the 8 sides throws people, but when you are making a regular square, you count between corner spaces/stitches regardless of where the repeats end and start. The same thing applies here :) Now that you’ve got it, it will get MUCH easier to count. Please holler if you have any other questions x
Dedri
Joanne Rodriguez says
Hello Dedri, I am about to start this amazing project. I was going through the pattern and at some point you start saying to omit certain stitches and corners. Can you please tell me what you mean I am very confused.
Thank you
Dedri Uys says
Hi Joanne. Instead of writing lots of repeats with repeat from * to * x times and from * to ** once, I chose to only use full repeats. Let me explain: Before the repeats start, you will make a certain number of stitches. When you make the last repeat, you will have already made those stitches, so you will leave them out on the last repeat.
For example: (2 dc, ch 2, 2 dc) in the next ch-2 corner space (this is your first corner made). *Dc in the next 20 sts, (2 dc, ch 2, 2 dc) in the next ch-2 corner space.* Repeat from * to * 3 more times, omitting (leave out/ignore) the last corner on the last repeat. As you already made that corner before the *, you won’t make it again.
That would look like: (2 dc, ch 2, 2 dc) in the next ch-2 corner space (this is your first corner made). *Dc in the next 20 sts, (2 dc, ch 2, 2 dc) in the next ch-2 corner space*. Dc in the next 20 sts, (2 dc, ch 2, 2 dc) in the next ch-2 corner space (first repeat). Dc in the next 20 sts, (2 dc, ch 2, 2 dc) in the next ch-2 corner space (second repeat). Dc in the next 20 sts,
(2 dc, ch 2, 2 dc) in the next ch-2 corner space(third repeat).I hope that helps. If it still doesn’t, please have a look at the linked video tutorial for this round, which explains the stitches step by step.
JOANNE RODRIGUEZ says
Thank you for replying. I did figure that is what you were saying. I am getting so a excited to start this. I just ordered my yarn. CAN’T WAIT!!!!
Dedri Uys says
Yay!!! How long do you have to wait for your yarn?
Vicki says
I’m on Row 38. Am I right in assuming that all 4 sides are the same, each with 26 V-stitches? The “short side” “long side” has me confused because as far as I can tell, you skip the 9, start in the 5th stitch, and do 26 V’s, so how is one side short and one side long??? (By the way, I’ve done your Mandela Madness 3 times, and this is my first Sophie. All I can say is you are incredible!!)
Dedri Uys says
Hi Vicki. Can you have a look at the video tutorial for this round? I suspect that you are looking at only 4 sides, whereas this round is the point where Sophie turns into 8 sides – 4 long sides (26 V sts) and 4 short sides (1 ch-8 sp). It will make more sense in the next couple of rounds. For now, as long as you have 4 x 26 v-sts and 4 x ch-8 sps, you’ll be fine.
Julie Chadwick says
I love this!! I originally wanted to start this CAL the first time I saw it in 2015. I got some of the yarn with the intention of starting. I tried a couple of times to get the first few rounds right using different colors each round. I could never get it right so I put it up. Well I started it again last fall. I am now up to part five. I’m excited, it’s awesome! However I’ve been stuck on this for a couple of months. The counts just don’t seem to come out right….. Round 43 right after the petals.For the short side. The count says 15 stitches(13 sc and 2 hdc). There’s the sc ch 1 sc at the beginning, sc, hdc, and then there are 9 sc. That’s 12 right there. And then there’s that next hdc, and the sc and the sc ch 1 and sc. What am I missing? that’s 15 sc and 2 hdc total. Help please!!!
Julie Chadwick says
Whoops I meant Round 42!
Julie Chadwick says
I’m sorry! Never mind! I figured it out!!
Maddie says
I’m having exactly the same problem, except I can’t figure it out at all? I too have 17 stitches on the short sides of round 42. What am I missing :-(
Jenny Lowman says
The pattern is correct. The start and end of the short sides have ‘sc, ch1, sc’ at the start and end. These are technically corners, so the first and last sc are the end and start of the opposing long sides.
I hope that makes sense!
:)
Nan says
Hi Thankyou so much for putting so much detail into descriptions. I’m having a lot of fun learning new techniques as I go along. So far it’s looking wonderful, can’t wait to start part 6.
Joyce says
I am enjoying this beautiful pattern. I think this might be the most fun I have ever had making something. It’s keeping me very busy! Thank you so much for sharing your wonderful talent. :)
Dedri Uys says
Hi Joyce. I am so pleased to hear that!
Sophie says
I just love this pattern so much. I’m not a beginner, but I’m certainly not at an advanced level just yet. This has given me such confidence for other projects and I’ve learned so much along the way. The combination of written instructions and photos is so helpful, if only every pattern writer was so considerate! I’ll admit I’ve gone wrong a couple of times, there has been frogging and a tiny bit of bodging but I’m so pleased with it so far. Can’t wait to finish it but never want it to be over!
Dedri Uys says
Hello Sophie :) I am so glad to hear that you are enjoying the journey. I put my heart and soul into this pattern, and I am so pleased when it pays off for someone. Thank you for taking the time to comment.
Dedri
T says
I’m new to the party too and a crochet newbie :)
Just one question regarding Round 38:
The text says to: Join your yarn by making a standing double crochet in the fifth dc of any side but photo 1 seems to be joined on the third dc? Working from the third dc also seems to work out to leave 4dc’s unworked before the corner hdc.
My friend and I are really enjoying this pattern and are doing it as a CAL so thank you for all your hard work :)
T says
Ignore me :)
You are counting the two corner dc’s – I wasn’t – every day is a learning day!
Regards
T
Dedri Uys says
I’m glad you managed to figure it out yourself :)
Cindy says
I love , love, love how the tulips pop after this row. I am loving this pattern so much. the one I am working on now is for me. But already making plans to make one for my sis in law and daughter for Christmas. I am waiting kinda patiently for my book to get here.
Dedri Uys says
Has it arrived yet?
Greg says
So I’m a bit late to the whole crochet thing not just the CAL. I foolishly mentioned thinking of learning to crochet (I already knit) to a fellow crafting friend of mine. She pretty much bullied me into starting this blanket. I opted to use the Scheepjes Stone Wash XL but I’ve followed my own colour scheme.
Its such a beautiful design. I’m really enjoying this between your descriptions, photos and the videos you link to it’s surprisingly easy. My only complaint is that it grows too quickly. I had planned to take this with me to do on the plane and during layovers when I go on holiday. But now my Sophie is already too big to not annoy the person next to me! I’ve been forced to order more yarn to make cushion covers with the design up to the last section whilst Sophie remains a square!
Dedri Uys says
Haha. Greg, if you knew the struggle I went through trying to work on the design for Sophie on the Picadilly line to work and back! I had to fold it into fourths and sort of squish it onto my lap, flipping and folding it as needed so that I could complete sides (and rounds? forget about it!).
It’s definitely not a plane/train friendly project x